


 22. To stop the animation from permanently pausing, we’ll add a
button to move to the next frame. Actually two buttons. The dark cyan
button appears on the regular frames and the pale cyan NEXT button
appears on all the GOTO frames.
23. After you have created the two buttons, place the dark cyan
version in the same position on all of the non-GOTO frames except the
first (the Background frame) and last frame (the duplicate of the first
Orange frame). So in this example, paste the dark cyan button on the
Orange Frame, Green Frame, etc.
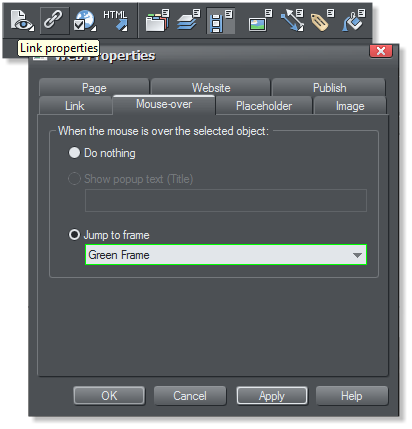
24. Paste the NEXT button onto the 5 GOTO frames in the exact same
position as the dark cyan buttons. Select the button then go to Utilities
> Web Properties > Mouse-over > Jump to frame and select the frame
after the present highlighted frame (from the drop down menu). In this
example it will be frame Green Frame.
25. After all 5 buttons have been given their unique mouse-over
commands, you can preview Flash animation in browser.
26. The slide-show is now complete. Placing the mouse pointer over
the button causes the images to move continuously. Removing the
pointer pauses the animation and the relevant information can be
displayed. In this case just the color names.
22. To stop the animation from permanently pausing, we’ll add a
button to move to the next frame. Actually two buttons. The dark cyan
button appears on the regular frames and the pale cyan NEXT button
appears on all the GOTO frames.
23. After you have created the two buttons, place the dark cyan
version in the same position on all of the non-GOTO frames except the
first (the Background frame) and last frame (the duplicate of the first
Orange frame). So in this example, paste the dark cyan button on the
Orange Frame, Green Frame, etc.
24. Paste the NEXT button onto the 5 GOTO frames in the exact same
position as the dark cyan buttons. Select the button then go to Utilities
> Web Properties > Mouse-over > Jump to frame and select the frame
after the present highlighted frame (from the drop down menu). In this
example it will be frame Green Frame.
25. After all 5 buttons have been given their unique mouse-over
commands, you can preview Flash animation in browser.
26. The slide-show is now complete. Placing the mouse pointer over
the button causes the images to move continuously. Removing the
pointer pauses the animation and the relevant information can be
displayed. In this case just the color names.