


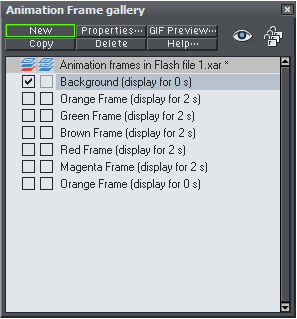
 17. Create a new frame (click New in the Animation Frame Gallery).
Title this frame Background or something similar and move this new
frame to the top so that it is the first frame displayed. Set the duration
to zero seconds check the background box. This automatically adds the
background layer under all of the pages in the animation.
17. Create a new frame (click New in the Animation Frame Gallery).
Title this frame Background or something similar and move this new
frame to the top so that it is the first frame displayed. Set the duration
to zero seconds check the background box. This automatically adds the
background layer under all of the pages in the animation.
 18. Customise this frame however you want. In this case I have added a
medium grey to light grey Linear fill along with the gallery name.
19. So far this animation is automatic and continuous. You can add a
control so that your viewers can pause the slide show on any image.
After each of the 5 image frames, add another 5 frames which you can
use to add image information text, as well as a mouse-over control.
18. Customise this frame however you want. In this case I have added a
medium grey to light grey Linear fill along with the gallery name.
19. So far this animation is automatic and continuous. You can add a
control so that your viewers can pause the slide show on any image.
After each of the 5 image frames, add another 5 frames which you can
use to add image information text, as well as a mouse-over control.
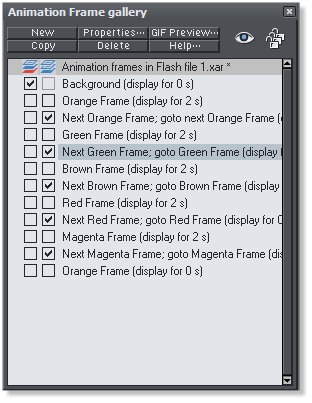
 20. This screen-shot shows the additional 5 frames. The first frame
after the Background frame is titled Orange Frame. This displays the
orange rectangle and the number 1 at the front of the page. The
following frame is titled Green Frame. After this title a command is
given (commands begin with a semi-colon) for the animation not to
continue onto the next frame titled Green Frame but to Goto Next
Orange Frame, that is to go back to beginning of the same frame
(forming a continuous loop). So this frame in reality pauses the
animation. It runs for 0.1 seconds and plays the frame again, and again.
The frame also holds the text which appears on the information
window.
To the left of the animation frame gallery, the Overlay box is checked.
This causes the images on the previous frame to display beneath its
own images. So the image, information window as well as the
background are all displayed while the frame repeats itself.
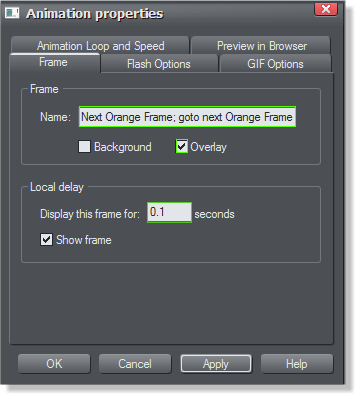
21. Edit each of the new control frames as shown in the screen shot in
the Animation Properties dialog.
20. This screen-shot shows the additional 5 frames. The first frame
after the Background frame is titled Orange Frame. This displays the
orange rectangle and the number 1 at the front of the page. The
following frame is titled Green Frame. After this title a command is
given (commands begin with a semi-colon) for the animation not to
continue onto the next frame titled Green Frame but to Goto Next
Orange Frame, that is to go back to beginning of the same frame
(forming a continuous loop). So this frame in reality pauses the
animation. It runs for 0.1 seconds and plays the frame again, and again.
The frame also holds the text which appears on the information
window.
To the left of the animation frame gallery, the Overlay box is checked.
This causes the images on the previous frame to display beneath its
own images. So the image, information window as well as the
background are all displayed while the frame repeats itself.
21. Edit each of the new control frames as shown in the screen shot in
the Animation Properties dialog.


