
 WEBSITE AND WEBSITE GRAPHICS CREATED WITH XARA DESIGNER 6 PRO


 No calendar would be complete without a Cover so I’ll show how I did
mine. Start with a blank page (Edit > Pages > New Page). Working
through several variations I eventually chose a collage of tall, narrow
photographic images.
No calendar would be complete without a Cover so I’ll show how I did
mine. Start with a blank page (Edit > Pages > New Page). Working
through several variations I eventually chose a collage of tall, narrow
photographic images.
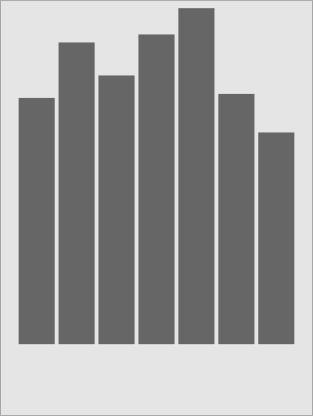
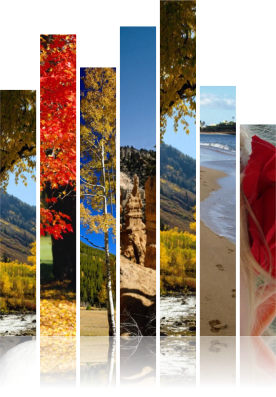
 First draw a series of vertical rectangles of slightly different heights
(roughly .75" by 5 to 7") with the Rectangle Tool (M). When finished,
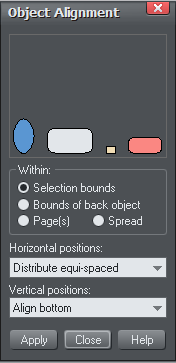
marquee select all of the images and using the Alignment menu
(Arrange > Alignment) vertically align the images to the bottom.
Choose Distribute Equispaced for the horizontal placement.
When you are happy with the results, group the photos (Ctrl+G) and
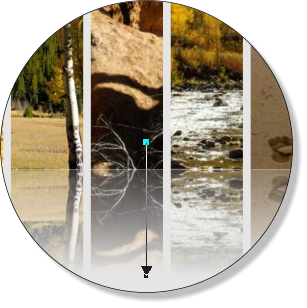
copy them (Ctrl+C) to the clipboard. Paste the grouped objects in place
Edit > Paste in Place. While still selected grab the top central handle
drag the copy so it is below the initial image. This should be slightly
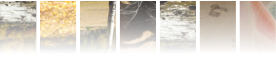
foreshortened compared to the original. Leave this group selected
and open the Transparency Tool (F6). Chose Linear from the
Transparency Shape drop down list. Starting near the top of the
selection drag the control fill path arrow downwards, holding the Ctrl
key down. Adjust the start and end points until satisfied with the
results. In my case the transparency line starts above the section and
finishes inside (as shown in the enlargement).
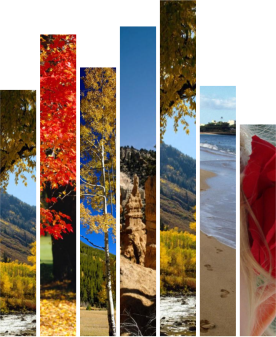
Fill each rectangle with an image: hold down the Shift key when
dropping images onto the boxes. The images can be moved within the
rectangles, enlarged or reduced using the Fill Tool (G).
{Shown half size}
First draw a series of vertical rectangles of slightly different heights
(roughly .75" by 5 to 7") with the Rectangle Tool (M). When finished,
marquee select all of the images and using the Alignment menu
(Arrange > Alignment) vertically align the images to the bottom.
Choose Distribute Equispaced for the horizontal placement.
When you are happy with the results, group the photos (Ctrl+G) and
copy them (Ctrl+C) to the clipboard. Paste the grouped objects in place
Edit > Paste in Place. While still selected grab the top central handle
drag the copy so it is below the initial image. This should be slightly
foreshortened compared to the original. Leave this group selected
and open the Transparency Tool (F6). Chose Linear from the
Transparency Shape drop down list. Starting near the top of the
selection drag the control fill path arrow downwards, holding the Ctrl
key down. Adjust the start and end points until satisfied with the
results. In my case the transparency line starts above the section and
finishes inside (as shown in the enlargement).
Fill each rectangle with an image: hold down the Shift key when
dropping images onto the boxes. The images can be moved within the
rectangles, enlarged or reduced using the Fill Tool (G).
{Shown half size}


 Draw a 16-point horizontal line across the entire image (Straight Line
Tool) and place it where the two groups meet, creating a horizon.
Create any title you want with an appropriate font, enlarged to about
72 to 150 points. I used Amienne at 120 points.
Select the Freehand and Brush Tool (F3 or N) draw a gently curving
horizontal line about the same length as the title (shown above in
green). Select both and apply the text to the line (Arrange > Fit Text to
Curve). Use the Text Justification buttons and the control handles to
get the desired shape. To make the wavy line disappear hold down the
Ctrl key and click on the path. Select None from the Width drop down
list on the Infobar.
Draw a 16-point horizontal line across the entire image (Straight Line
Tool) and place it where the two groups meet, creating a horizon.
Create any title you want with an appropriate font, enlarged to about
72 to 150 points. I used Amienne at 120 points.
Select the Freehand and Brush Tool (F3 or N) draw a gently curving
horizontal line about the same length as the title (shown above in
green). Select both and apply the text to the line (Arrange > Fit Text to
Curve). Use the Text Justification buttons and the control handles to
get the desired shape. To make the wavy line disappear hold down the
Ctrl key and click on the path. Select None from the Width drop down
list on the Infobar.


 Add the year and you’re done. I added a black to white Linear fill to the
cover rectangle to make the photos stand out more.
Congratulations. Once printed, you can punch a hole at the top for
hanging. Or better still, take your work of art down to a local print shop
and have them punch and spiral bind it.
You now have a personalized present for someone special.
I’d be happy to answer your questions or to know if you found this
tutorial helpful. Click the link below to send me an e-mail response.
David Chandler
Send e-mail
Add the year and you’re done. I added a black to white Linear fill to the
cover rectangle to make the photos stand out more.
Congratulations. Once printed, you can punch a hole at the top for
hanging. Or better still, take your work of art down to a local print shop
and have them punch and spiral bind it.
You now have a personalized present for someone special.
I’d be happy to answer your questions or to know if you found this
tutorial helpful. Click the link below to send me an e-mail response.
David Chandler
Send e-mail