
 WEBSITE AND WEBSITE GRAPHICS CREATED WITH XARA DESIGNER 6 PRO


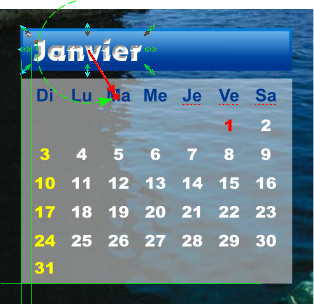
 Select the month name text with the Text Tool (T), then switch to the
Bevel Tool (Ctrl + F3). When the bevel arrows appear drag any of the
double-headed arrows inward slightly to apply an Inner Bevel. Drag the
square box at the end of the Light Angle control arrow and swing it
around 180 degrees or to the four o’clock position to change the angle
of the lighting. This produces an incised look. Move the Bevel Contrast
slider on the Infobar to 65% to increase the shadow contrast.
Jot down the Bevel settings. You will need them in a moment.
If you’ve moved the text during any of this re-align it to the guide you
placed earlier. With the text selected use (Ctrl + C) to copy the
attributes to the clipboard.
Select the next month name, then Edit > Paste Attributes to change the
font. Add the same Bevel using the settings you just jotted down.
Change the day and date attributes at the same time. Repeat these
steps for the other ten months.
Select the month name text with the Text Tool (T), then switch to the
Bevel Tool (Ctrl + F3). When the bevel arrows appear drag any of the
double-headed arrows inward slightly to apply an Inner Bevel. Drag the
square box at the end of the Light Angle control arrow and swing it
around 180 degrees or to the four o’clock position to change the angle
of the lighting. This produces an incised look. Move the Bevel Contrast
slider on the Infobar to 65% to increase the shadow contrast.
Jot down the Bevel settings. You will need them in a moment.
If you’ve moved the text during any of this re-align it to the guide you
placed earlier. With the text selected use (Ctrl + C) to copy the
attributes to the clipboard.
Select the next month name, then Edit > Paste Attributes to change the
font. Add the same Bevel using the settings you just jotted down.
Change the day and date attributes at the same time. Repeat these
steps for the other ten months.
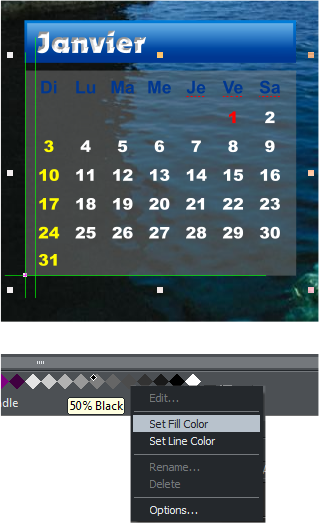 One more small modification: I found the light background didn’t offer
enough contrast. Hold down the Ctrl key and click the background
rectangle for the calendar. RIGHT click the 50% Black colour swatch in
the colour bar. Select Set Fill Color. Repeat with the other months.
This completes the calendar alterations. You can change the location,
font, etc. for the year in the upper left corner or move the actual
location of the calendar on the page.
You will probably want to use your own images. You can hold down the
Ctrl key and drag and drop a replacement image from the desktop,
Windows Explorer, or the Bitmap Gallery onto the existing image. The
problem with this is the dropped image may not match the aspect ratio
of the current photo and may be noticeably distorted. I prefer to hold
down the Ctrl key and drag and drop a solid color from the screen
palette onto the existing photo. This converts the photo to a flat fill.
Then Shift drag and drop a replacement photo onto the flat filled area.
One more small modification: I found the light background didn’t offer
enough contrast. Hold down the Ctrl key and click the background
rectangle for the calendar. RIGHT click the 50% Black colour swatch in
the colour bar. Select Set Fill Color. Repeat with the other months.
This completes the calendar alterations. You can change the location,
font, etc. for the year in the upper left corner or move the actual
location of the calendar on the page.
You will probably want to use your own images. You can hold down the
Ctrl key and drag and drop a replacement image from the desktop,
Windows Explorer, or the Bitmap Gallery onto the existing image. The
problem with this is the dropped image may not match the aspect ratio
of the current photo and may be noticeably distorted. I prefer to hold
down the Ctrl key and drag and drop a solid color from the screen
palette onto the existing photo. This converts the photo to a flat fill.
Then Shift drag and drop a replacement photo onto the flat filled area.
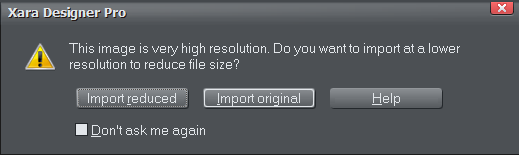 When asked if you want to import at a lower resolution choose Import
Original. You want the highest quality for printing. Check Don’t ask me
again if you do not want to see this message again.
When first inserted into the box you will see edited arrows that allow
you to enlarge and rotate the image within the box frame. If you lose
the arrows you get them back by clicking on the image with the Fill Tool
(G or F5). Drag the square where the two fill path arrows originate to
move the center of the fill around the rectangle. To enlarge or reduce
the image, click either of the squares at the ends of the fill path arrows
then press the left or right arrow keys on your keyboard to enlarge or
reduce the image.
Use the Enhance Photos option (Photo Tool fly out) to edit the photo if
you wish. Other tutorials cover photo tools more completely. Add a title
at the bottom of the picture if you like. Don’t forget to delete the
guidelines made earlier, for each month.
When asked if you want to import at a lower resolution choose Import
Original. You want the highest quality for printing. Check Don’t ask me
again if you do not want to see this message again.
When first inserted into the box you will see edited arrows that allow
you to enlarge and rotate the image within the box frame. If you lose
the arrows you get them back by clicking on the image with the Fill Tool
(G or F5). Drag the square where the two fill path arrows originate to
move the center of the fill around the rectangle. To enlarge or reduce
the image, click either of the squares at the ends of the fill path arrows
then press the left or right arrow keys on your keyboard to enlarge or
reduce the image.
Use the Enhance Photos option (Photo Tool fly out) to edit the photo if
you wish. Other tutorials cover photo tools more completely. Add a title
at the bottom of the picture if you like. Don’t forget to delete the
guidelines made earlier, for each month.


