
WEBSITE AND WEBSITE GRAPHICS CREATED WITH XARA DESIGNER 6 PRO


 The next version used 72 rings, because this was as much as Xara 3D’s
character buffer would accept, along with the 71 Carriage Returns
needed to put them on separate lines, thus making 143 characters, out
of Xara 3D’s maximum of 150. The 72 rings equated to 360/144 = 2.5°,
about 174 miles horizontal resolution.
It was the best resolution Xara 3D could achieve, I thought. But it still
made the continents look pixelly at their coasts because of the width of
the bands. I needed still more rings!
I realized that if I could get rid of the Carriage Returns then every
character could be a ring, and Xara 3D would let me use 150 of them at
most. 150 rings equals 300 bands, = 1.2°, or 84 miles, more than
doubling the horizontal level of detail. But I would need some other way
to get all the rings to overlap.
Remember that Xara 3D was originally a text-only application, and even
the latest version still regards each shape as a character in a document
of lines in one or more pages.
With no Carriage Returns, all the rings would be on the same line in Xara
3D’s buffer. The line size would no longer be relevant, all the shapes are
already vertically centred. But they are all sitting in a line 150
characters wide. They need to be centred on each other.
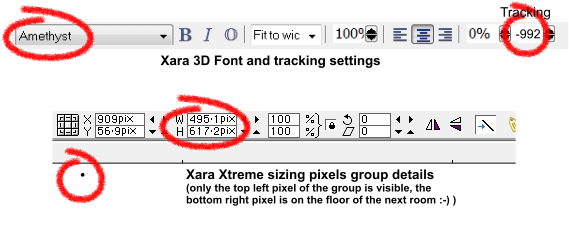
The obvious answer was to adjust the tracking value on each shape, so
that from a textual rendering perspective the right hand edge of each
shape, which is normally where the next adjacent character is
rendered, was actually sitting over the left hand of that shape, so the
next shape would actually be rendered on top of the current one. While
it worked eventually, it turned out to be rather tricky to achieve.
For a given shape the tracking value actually depended on both the font
selected, and on the exact dimensions of the shape. But, at least with
the rings inside their sizing pixels, the tracking value was incredibly
sensitive. I could get fairly close to full overlap with a value like say, -
768, but -769 would completely overdo it and I’d be further away from
overlap.
The next version used 72 rings, because this was as much as Xara 3D’s
character buffer would accept, along with the 71 Carriage Returns
needed to put them on separate lines, thus making 143 characters, out
of Xara 3D’s maximum of 150. The 72 rings equated to 360/144 = 2.5°,
about 174 miles horizontal resolution.
It was the best resolution Xara 3D could achieve, I thought. But it still
made the continents look pixelly at their coasts because of the width of
the bands. I needed still more rings!
I realized that if I could get rid of the Carriage Returns then every
character could be a ring, and Xara 3D would let me use 150 of them at
most. 150 rings equals 300 bands, = 1.2°, or 84 miles, more than
doubling the horizontal level of detail. But I would need some other way
to get all the rings to overlap.
Remember that Xara 3D was originally a text-only application, and even
the latest version still regards each shape as a character in a document
of lines in one or more pages.
With no Carriage Returns, all the rings would be on the same line in Xara
3D’s buffer. The line size would no longer be relevant, all the shapes are
already vertically centred. But they are all sitting in a line 150
characters wide. They need to be centred on each other.
The obvious answer was to adjust the tracking value on each shape, so
that from a textual rendering perspective the right hand edge of each
shape, which is normally where the next adjacent character is
rendered, was actually sitting over the left hand of that shape, so the
next shape would actually be rendered on top of the current one. While
it worked eventually, it turned out to be rather tricky to achieve.
For a given shape the tracking value actually depended on both the font
selected, and on the exact dimensions of the shape. But, at least with
the rings inside their sizing pixels, the tracking value was incredibly
sensitive. I could get fairly close to full overlap with a value like say, -
768, but -769 would completely overdo it and I’d be further away from
overlap.
 I thought that if I got close to overlap with tracking adjustments, I could
make a tiny change in the horizontal position of one of the sizing pixels,
and see if I could nudge things to a better fit that way. Eventually I
succeeded, but not until I went through every font on my computer,
trying out the tracking to see how close I could get to perfect overlay
with a test set of rings. Once I had the best font and tracking setting, I
started adjusting the fine positioning of the sizing pixels (while re-
centreing the rings within the sizing pixels’ bounding-box) to try to get
closer to the perfect overlap. It was crazy! Zooming in at maximum
zoom, and moving a pixel dot 1/10th of a pixel in or out could have a
huge effect on the overlap. It took a few days, but I got a perfect
combination.
I thought that if I got close to overlap with tracking adjustments, I could
make a tiny change in the horizontal position of one of the sizing pixels,
and see if I could nudge things to a better fit that way. Eventually I
succeeded, but not until I went through every font on my computer,
trying out the tracking to see how close I could get to perfect overlay
with a test set of rings. Once I had the best font and tracking setting, I
started adjusting the fine positioning of the sizing pixels (while re-
centreing the rings within the sizing pixels’ bounding-box) to try to get
closer to the perfect overlap. It was crazy! Zooming in at maximum
zoom, and moving a pixel dot 1/10th of a pixel in or out could have a
huge effect on the overlap. It took a few days, but I got a perfect
combination.
 The reason for the extreme precision needed is simply that overlapping
two adjacent shapes perfectly is straightforward, as minor errors of
overlap don’t show, but with150 characters all needing to overlap, all
the errors of each subsequent character add up, so the overlap error
between the first and last character is 150 times the error between the
first and second character, so even a small discrepancy showed.
H 1 2 3 4 5 6 Download Zipped Tutorial
The reason for the extreme precision needed is simply that overlapping
two adjacent shapes perfectly is straightforward, as minor errors of
overlap don’t show, but with150 characters all needing to overlap, all
the errors of each subsequent character add up, so the overlap error
between the first and last character is 150 times the error between the
first and second character, so even a small discrepancy showed.
H 1 2 3 4 5 6 Download Zipped Tutorial


The next version used 72 rings, because this was as much as Xara 3D’s
character buffer would accept, along with the 71 Carriage Returns
needed to put them on separate lines, thus making 143 characters, out
of Xara 3D’s maximum of 150. The 72 rings equated to 360/144 = 2.5°,
about 174 miles horizontal resolution.
It was the best resolution Xara 3D could achieve, I thought. But it still
made the continents look pixelly at their coasts because of the width of
the bands. I needed still more rings!
I realized that if I could get rid of the Carriage Returns then every
character could be a ring, and Xara 3D would let me use 150 of them at
most. 150 rings equals 300 bands, = 1.2°, or 84 miles, more than
doubling the horizontal level of detail. But I would need some other way
to get all the rings to overlap.
Remember that Xara 3D was originally a text-only application, and even
the latest version still regards each shape as a character in a document
of lines in one or more pages.
With no Carriage Returns, all the rings would be on the same line in Xara
3D’s buffer. The line size would no longer be relevant, all the shapes are
already vertically centred. But they are all sitting in a line 150
characters wide. They need to be centred on each other.
The obvious answer was to adjust the tracking value on each shape, so
that from a textual rendering perspective the right hand edge of each
shape, which is normally where the next adjacent character is
rendered, was actually sitting over the left hand of that shape, so the
next shape would actually be rendered on top of the current one. While
it worked eventually, it turned out to be rather tricky to achieve.
For a given shape the tracking value actually depended on both the font
selected, and on the exact dimensions of the shape. But, at least with
the rings inside their sizing pixels, the tracking value was incredibly
sensitive. I could get fairly close to full overlap with a value like say, -
768, but -769 would completely overdo it and I’d be further away from
overlap.
I thought that if I got close to overlap with tracking adjustments, I could
make a tiny change in the horizontal position of one of the sizing pixels,
and see if I could nudge things to a better fit that way. Eventually I
succeeded, but not until I went through every font on my computer,
trying out the tracking to see how close I could get to perfect overlay
with a test set of rings. Once I had the best font and tracking setting, I
started adjusting the fine positioning of the sizing pixels (while re-
centreing the rings within the sizing pixels’ bounding-box) to try to get
closer to the perfect overlap. It was crazy! Zooming in at maximum
zoom, and moving a pixel dot 1/10th of a pixel in or out could have a
huge effect on the overlap. It took a few days, but I got a perfect
combination.
The reason for the extreme precision needed is simply that overlapping
two adjacent shapes perfectly is straightforward, as minor errors of
overlap don’t show, but with150 characters all needing to overlap, all
the errors of each subsequent character add up, so the overlap error
between the first and last character is 150 times the error between the
first and second character, so even a small discrepancy showed.
H 1 2 3 4 5 6 Download Zipped Tutorial