
WEBSITE AND WEBSITE GRAPHICS CREATED WITH XARA DESIGNER 6 PRO


 Positioning and Other Issues
In this section I want to mention some issues I had trying to make things
work properly.
Sizing
One of the annoying things that Xara 3D does is resize imported shapes
to make them all conform to the same height. This often has the effect
that shapes that had specific size and position relationships to each
other before importing, lose that relationship when they appear in Xara
3D. You can correct that within Xara 3D, but the tools to do so can be a
bit clumsy, and I don’t normally use them.
Some years ago, someone (no-one really remembers who, now, but it
wasn’t me!) realized that you can preserve such size and position
relationships by creating a pair of pixel-sized dots at the top-left and
bottom right of the working area in Xara Xtreme for example, and that
by adding the two dots to each shape before exporting it to Xara 3D, all
such shapes acquire the same overall bounding-box, that of the two
dots. Thus Xara 3D makes no attempt to resize them, as they already
have the same size.
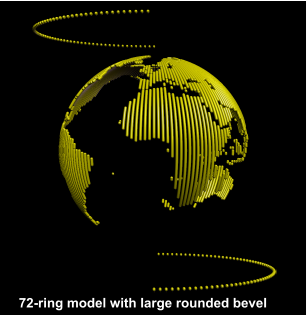
In the context of the arc segments for the Hollow Earth, the problem is
that depending on which arcs are preserved in a given ring the overall
height may differ from ring to ring, so Xara 3D will adjust their relative
sizes. To prevent this, the sizing pixels are brought into play.
You can see them in this screen shot from Xara 3D, I’ve exaggerated the
bevel and reduced the extrusion to make them easier to see. This is an
earlier version, with 72 rings, and also shows the individual arcs.
Positioning and Other Issues
In this section I want to mention some issues I had trying to make things
work properly.
Sizing
One of the annoying things that Xara 3D does is resize imported shapes
to make them all conform to the same height. This often has the effect
that shapes that had specific size and position relationships to each
other before importing, lose that relationship when they appear in Xara
3D. You can correct that within Xara 3D, but the tools to do so can be a
bit clumsy, and I don’t normally use them.
Some years ago, someone (no-one really remembers who, now, but it
wasn’t me!) realized that you can preserve such size and position
relationships by creating a pair of pixel-sized dots at the top-left and
bottom right of the working area in Xara Xtreme for example, and that
by adding the two dots to each shape before exporting it to Xara 3D, all
such shapes acquire the same overall bounding-box, that of the two
dots. Thus Xara 3D makes no attempt to resize them, as they already
have the same size.
In the context of the arc segments for the Hollow Earth, the problem is
that depending on which arcs are preserved in a given ring the overall
height may differ from ring to ring, so Xara 3D will adjust their relative
sizes. To prevent this, the sizing pixels are brought into play.
You can see them in this screen shot from Xara 3D, I’ve exaggerated the
bevel and reduced the extrusion to make them easier to see. This is an
earlier version, with 72 rings, and also shows the individual arcs.
 The use of sizing pixels also solves a related issue, to do with horizontal
positioning. The Hollow Earth depends on all the rings having a common
centre. If the arc segments of a given ring had an arc crossing the
equator at one side of the earth, but had no arc segment on the
opposite side at the equator, the centre of the arc group’s bounding box
would not correspond to the centre of the ring the arcs are supposed to
lie on.
But using sizing pixels makes the arcs or even the rings’ centres
irrelevant, as it is the centre of the sizing pixels’ bounding-box that
determines the positions of the arcs within them, and all the segments
have the same set of sizing pixels, and therefore a common centre, both
horizontally and vertically. For reasons of symmetry, due to the need to
have the first and last rings adjacent to each other with one being
rotated almost 180° compared to the other, the ring centres must be
closely matched to the sizing pixels centre.
The presence of the sizing dots doesn’t really intrude in the image
because they are far enough away from the main shapes that they can
easily be cropped out of any final image.
How Many Rings?
The number of rings used in the model makes a significant difference to
the appearance of the continents on the globe, since the width of the
rings effectively sets the horizontal resolution of the visible detail.
My first version had 60 rings because 60 is an easy number to work with
when considering angles, and at that time I was primarily trying to
prove the concept. Each ring appears on the equator twice, with a band
at the front and a band at the back, making 120 bands around the
equator, so the smallest horizontal detail would be 1/120th of the
circumference at the equator, that is, 3° across, or equivalent to about
209 miles. That version looked extremely crude, quite apart from the
inadvertent distortion of the continents mentioned earlier. The
coastlines looked very blocky. I clearly needed more rings.
H 1 2 3 4 5 6 Download Zipped Tutorial
The use of sizing pixels also solves a related issue, to do with horizontal
positioning. The Hollow Earth depends on all the rings having a common
centre. If the arc segments of a given ring had an arc crossing the
equator at one side of the earth, but had no arc segment on the
opposite side at the equator, the centre of the arc group’s bounding box
would not correspond to the centre of the ring the arcs are supposed to
lie on.
But using sizing pixels makes the arcs or even the rings’ centres
irrelevant, as it is the centre of the sizing pixels’ bounding-box that
determines the positions of the arcs within them, and all the segments
have the same set of sizing pixels, and therefore a common centre, both
horizontally and vertically. For reasons of symmetry, due to the need to
have the first and last rings adjacent to each other with one being
rotated almost 180° compared to the other, the ring centres must be
closely matched to the sizing pixels centre.
The presence of the sizing dots doesn’t really intrude in the image
because they are far enough away from the main shapes that they can
easily be cropped out of any final image.
How Many Rings?
The number of rings used in the model makes a significant difference to
the appearance of the continents on the globe, since the width of the
rings effectively sets the horizontal resolution of the visible detail.
My first version had 60 rings because 60 is an easy number to work with
when considering angles, and at that time I was primarily trying to
prove the concept. Each ring appears on the equator twice, with a band
at the front and a band at the back, making 120 bands around the
equator, so the smallest horizontal detail would be 1/120th of the
circumference at the equator, that is, 3° across, or equivalent to about
209 miles. That version looked extremely crude, quite apart from the
inadvertent distortion of the continents mentioned earlier. The
coastlines looked very blocky. I clearly needed more rings.
H 1 2 3 4 5 6 Download Zipped Tutorial


Positioning and Other Issues
In this section I want to mention some issues I had trying to make things
work properly.
Sizing
One of the annoying things that Xara 3D does is resize imported shapes
to make them all conform to the same height. This often has the effect
that shapes that had specific size and position relationships to each
other before importing, lose that relationship when they appear in Xara
3D. You can correct that within Xara 3D, but the tools to do so can be a
bit clumsy, and I don’t normally use them.
Some years ago, someone (no-one really remembers who, now, but it
wasn’t me!) realized that you can preserve such size and position
relationships by creating a pair of pixel-sized dots at the top-left and
bottom right of the working area in Xara Xtreme for example, and that
by adding the two dots to each shape before exporting it to Xara 3D, all
such shapes acquire the same overall bounding-box, that of the two
dots. Thus Xara 3D makes no attempt to resize them, as they already
have the same size.
In the context of the arc segments for the Hollow Earth, the problem is
that depending on which arcs are preserved in a given ring the overall
height may differ from ring to ring, so Xara 3D will adjust their relative
sizes. To prevent this, the sizing pixels are brought into play.
You can see them in this screen shot from Xara 3D, I’ve exaggerated the
bevel and reduced the extrusion to make them easier to see. This is an
earlier version, with 72 rings, and also shows the individual arcs.
The use of sizing pixels also solves a related issue, to do with horizontal
positioning. The Hollow Earth depends on all the rings having a common
centre. If the arc segments of a given ring had an arc crossing the
equator at one side of the earth, but had no arc segment on the
opposite side at the equator, the centre of the arc group’s bounding box
would not correspond to the centre of the ring the arcs are supposed to
lie on.
But using sizing pixels makes the arcs or even the rings’ centres
irrelevant, as it is the centre of the sizing pixels’ bounding-box that
determines the positions of the arcs within them, and all the segments
have the same set of sizing pixels, and therefore a common centre, both
horizontally and vertically. For reasons of symmetry, due to the need to
have the first and last rings adjacent to each other with one being
rotated almost 180° compared to the other, the ring centres must be
closely matched to the sizing pixels centre.
The presence of the sizing dots doesn’t really intrude in the image
because they are far enough away from the main shapes that they can
easily be cropped out of any final image.
How Many Rings?
The number of rings used in the model makes a significant difference to
the appearance of the continents on the globe, since the width of the
rings effectively sets the horizontal resolution of the visible detail.
My first version had 60 rings because 60 is an easy number to work with
when considering angles, and at that time I was primarily trying to
prove the concept. Each ring appears on the equator twice, with a band
at the front and a band at the back, making 120 bands around the
equator, so the smallest horizontal detail would be 1/120th of the
circumference at the equator, that is, 3° across, or equivalent to about
209 miles. That version looked extremely crude, quite apart from the
inadvertent distortion of the continents mentioned earlier. The
coastlines looked very blocky. I clearly needed more rings.
H 1 2 3 4 5 6 Download Zipped Tutorial