
WEBSITE AND WEBSITE GRAPHICS CREATED WITH XARA DESIGNER 6 PRO


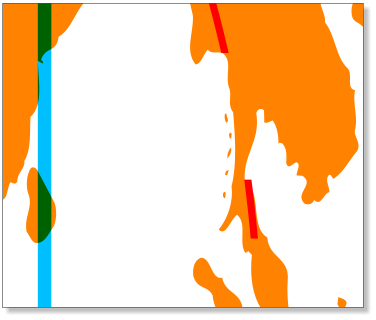
 This is actually the second world map I used. My first globe was clearly
wrong, and it was because I had used an inappropriate projection,
probably a standard Mercator type. That globe had huge continents!
The red ring was sized to approximately the height of the map, made
slightly difficult by the absence of Antarctica. The horizontal position of
the ring is actually irrelevant, due to the way the land sections were
projected onto the ring’s edge.
The two blue bars represent two strips of the map that are about to be
mapped to the ring. The parts of the globe they cover are 180° apart,
and their individual width is calculated to be 1/300th of the equatorial
diameter, which in the case of the world map, is the width of the map.
This is for the latest version, which had 150 rings.
This is actually the second world map I used. My first globe was clearly
wrong, and it was because I had used an inappropriate projection,
probably a standard Mercator type. That globe had huge continents!
The red ring was sized to approximately the height of the map, made
slightly difficult by the absence of Antarctica. The horizontal position of
the ring is actually irrelevant, due to the way the land sections were
projected onto the ring’s edge.
The two blue bars represent two strips of the map that are about to be
mapped to the ring. The parts of the globe they cover are 180° apart,
and their individual width is calculated to be 1/300th of the equatorial
diameter, which in the case of the world map, is the width of the map.
This is for the latest version, which had 150 rings.
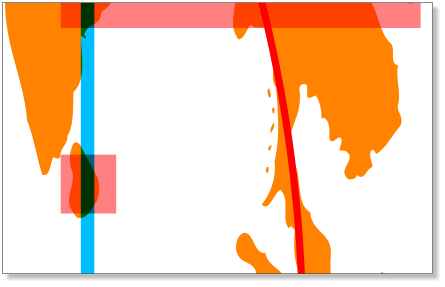 In this shot, the rightmost (Eastern) strip is running down the Indian
continent, and through the island of Sri Lanka. The transparent pink
rectangles are created over those parts of the strip that are over land,
and they are extended horizontally to overlap the rightmost (Eastern)
edge of the ring. This is why it doesn’t really matter what the horizontal
position of the ring is, you would just stretch the rectangle across until
it hit the edge of the ring. You can see that the upper pink rectangle is
already extended, but the one over Sri Lanka isn’t yet. Estimating the
correct height of the pink boxes is done by eye, and is only an
approximation, but is quite good enough for this job.
I would create and stretch similar rectangles from all of the land parts
under both blue strips, stretching the western rectangles over the
western edge of the ring and the eastern rectangles over the eastern
edge of the ring. I would then add (Ctrl-1) all the pink rectangles
together, then also select the ring, and Intersect (Ctrl-3) the boxes onto
the ring.
In this shot, the rightmost (Eastern) strip is running down the Indian
continent, and through the island of Sri Lanka. The transparent pink
rectangles are created over those parts of the strip that are over land,
and they are extended horizontally to overlap the rightmost (Eastern)
edge of the ring. This is why it doesn’t really matter what the horizontal
position of the ring is, you would just stretch the rectangle across until
it hit the edge of the ring. You can see that the upper pink rectangle is
already extended, but the one over Sri Lanka isn’t yet. Estimating the
correct height of the pink boxes is done by eye, and is only an
approximation, but is quite good enough for this job.
I would create and stretch similar rectangles from all of the land parts
under both blue strips, stretching the western rectangles over the
western edge of the ring and the eastern rectangles over the eastern
edge of the ring. I would then add (Ctrl-1) all the pink rectangles
together, then also select the ring, and Intersect (Ctrl-3) the boxes onto
the ring.
 This leaves a series of arc segments as a single object, ready to be
exported to Xara 3D. I select the ring and the sizing pixels (more about
these later), and copy (Ctrl-C) them to the clipboard, then paste the
shapes into Xara 3D, and set the relevant specific Swing angle for it,
checking that the new arcs appear in the correct place next to the
previous arcs.
I’d then save both files (Xara 3D and Xara Xtreme), then set up for the
next strip, by hitting the Undo button back to the un-stretched pink
rectangles stage, then advance the blue strips (grouped together) a
single step to the East. The step size was worked out earlier to match
the width of a strip, so the new strip positions are now adjacent to their
previous positions.
H 1 2 3 4 5 6 Download Zipped Tutorial
This leaves a series of arc segments as a single object, ready to be
exported to Xara 3D. I select the ring and the sizing pixels (more about
these later), and copy (Ctrl-C) them to the clipboard, then paste the
shapes into Xara 3D, and set the relevant specific Swing angle for it,
checking that the new arcs appear in the correct place next to the
previous arcs.
I’d then save both files (Xara 3D and Xara Xtreme), then set up for the
next strip, by hitting the Undo button back to the un-stretched pink
rectangles stage, then advance the blue strips (grouped together) a
single step to the East. The step size was worked out earlier to match
the width of a strip, so the new strip positions are now adjacent to their
previous positions.
H 1 2 3 4 5 6 Download Zipped Tutorial


This is actually the second world map I used. My first globe was clearly
wrong, and it was because I had used an inappropriate projection,
probably a standard Mercator type. That globe had huge continents!
The red ring was sized to approximately the height of the map, made
slightly difficult by the absence of Antarctica. The horizontal position of
the ring is actually irrelevant, due to the way the land sections were
projected onto the ring’s edge.
The two blue bars represent two strips of the map that are about to be
mapped to the ring. The parts of the globe they cover are 180° apart,
and their individual width is calculated to be 1/300th of the equatorial
diameter, which in the case of the world map, is the width of the map.
This is for the latest version, which had 150 rings.
In this shot, the rightmost (Eastern) strip is running down the Indian
continent, and through the island of Sri Lanka. The transparent pink
rectangles are created over those parts of the strip that are over land,
and they are extended horizontally to overlap the rightmost (Eastern)
edge of the ring. This is why it doesn’t really matter what the horizontal
position of the ring is, you would just stretch the rectangle across until
it hit the edge of the ring. You can see that the upper pink rectangle is
already extended, but the one over Sri Lanka isn’t yet. Estimating the
correct height of the pink boxes is done by eye, and is only an
approximation, but is quite good enough for this job.
I would create and stretch similar rectangles from all of the land parts
under both blue strips, stretching the western rectangles over the
western edge of the ring and the eastern rectangles over the eastern
edge of the ring. I would then add (Ctrl-1) all the pink rectangles
together, then also select the ring, and Intersect (Ctrl-3) the boxes onto
the ring.
This leaves a series of arc segments as a single object, ready to be
exported to Xara 3D. I select the ring and the sizing pixels (more about
these later), and copy (Ctrl-C) them to the clipboard, then paste the
shapes into Xara 3D, and set the relevant specific Swing angle for it,
checking that the new arcs appear in the correct place next to the
previous arcs.
I’d then save both files (Xara 3D and Xara Xtreme), then set up for the
next strip, by hitting the Undo button back to the un-stretched pink
rectangles stage, then advance the blue strips (grouped together) a
single step to the East. The step size was worked out earlier to match
the width of a strip, so the new strip positions are now adjacent to their
previous positions.
H 1 2 3 4 5 6 Download Zipped Tutorial