
 WEBSITE AND WEBSITE GRAPHICS CREATED WITH XARA DESIGNER 6 PRO


 A couple of years ago I made an image of the Earth where
the continents appeared to be painted in gold on a
transparent blue globe. I called it the Hollow Earth.
I had animated it, so that it would spin West to East as the
real earth does, and you could see the continents foreshortening as they
approached the edge of the globe, then watch the undersides of those
continents reappear on the far side of the globe.
It prompted a flurry of similar images by others in the Talkgraphics
forum, based usually on flat images of the continents subjected to
various forms of moulding to simulate the foreshortening as the globe
rotated. However the foreshortening in my image followed entirely
automatically from the fact that I had created my continents in Xara 3D,
so that I had an actual three-dimensional model of the Earth or at least
of its continents, to play with, and I could view the model from any
angle.
That first version was actually very crude, and it has since gone through
several revisions, the most recent of which I turned into my avatar on
the Talkgraphics forums.
This article is an attempt to describe how I created the Hollow Earth
(HE) and its animation. Unlike previous tutorials, I am not expecting
anyone to actually try to follow all the necessary steps to make their
own version, partly because it involves so many repetitious steps at
several stages, you would need to be as obsessed as I was to want to
make the attempt, and partly because you would need to find your own
source material for the world map, as the one I used is copywrite to
someone else. I don’t even remember where I found it. So this will be
more like a retrospective diary where I will describe each phase of
building the image.
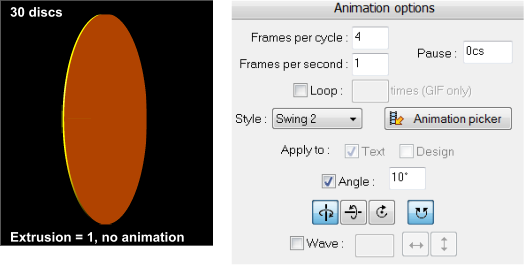
When I had the idea to make the Hollow Earth (HE), I had been playing
with 3d discs in Xara 3D, and discovered that I could create a sphere
from them by taking a number of identical thin discs, say thirty-six, and
by placing each disc on its own line, and reducing the line size to zero,
all the discs would collapse into each other, so they would still look like
I only had one disc. I applied a Swing animation to them, and selecting
each disc one at a time, gave each a specific swing angle. With thirty-
six discs, I would start at 0° swing angle for the first disc, 10° for the
second, and increase the angle by 10° for each subsequent disc.
A couple of years ago I made an image of the Earth where
the continents appeared to be painted in gold on a
transparent blue globe. I called it the Hollow Earth.
I had animated it, so that it would spin West to East as the
real earth does, and you could see the continents foreshortening as they
approached the edge of the globe, then watch the undersides of those
continents reappear on the far side of the globe.
It prompted a flurry of similar images by others in the Talkgraphics
forum, based usually on flat images of the continents subjected to
various forms of moulding to simulate the foreshortening as the globe
rotated. However the foreshortening in my image followed entirely
automatically from the fact that I had created my continents in Xara 3D,
so that I had an actual three-dimensional model of the Earth or at least
of its continents, to play with, and I could view the model from any
angle.
That first version was actually very crude, and it has since gone through
several revisions, the most recent of which I turned into my avatar on
the Talkgraphics forums.
This article is an attempt to describe how I created the Hollow Earth
(HE) and its animation. Unlike previous tutorials, I am not expecting
anyone to actually try to follow all the necessary steps to make their
own version, partly because it involves so many repetitious steps at
several stages, you would need to be as obsessed as I was to want to
make the attempt, and partly because you would need to find your own
source material for the world map, as the one I used is copywrite to
someone else. I don’t even remember where I found it. So this will be
more like a retrospective diary where I will describe each phase of
building the image.
When I had the idea to make the Hollow Earth (HE), I had been playing
with 3d discs in Xara 3D, and discovered that I could create a sphere
from them by taking a number of identical thin discs, say thirty-six, and
by placing each disc on its own line, and reducing the line size to zero,
all the discs would collapse into each other, so they would still look like
I only had one disc. I applied a Swing animation to them, and selecting
each disc one at a time, gave each a specific swing angle. With thirty-
six discs, I would start at 0° swing angle for the first disc, 10° for the
second, and increase the angle by 10° for each subsequent disc.


 Running the animation makes the discs swing around the vertical axis,
spreading them out around the equator of the globe. By pausing the
animation on frame 2, the full globe appears.
H 1 2 3 4 5 6 Download Zipped Tutorial
Running the animation makes the discs swing around the vertical axis,
spreading them out around the equator of the globe. By pausing the
animation on frame 2, the full globe appears.
H 1 2 3 4 5 6 Download Zipped Tutorial


