
 WEBSITE AND WEBSITE GRAPHICS CREATED WITH XARA DESIGNER 6 PRO


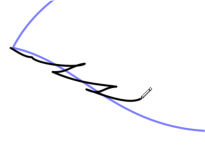
 For the stems we will use another of Designer’s new
features, the Straight Line Tool (last tool in the
Drawing Tools fly out menu). Select the Straight Line
Tool, click and drag upwards to draw a diagonal line.
Change the line Width to 12 pix. Select the Freehand
and Brush Tool (N) and apply a Fallout stroke shape.
Switch to the Shape Editor Tool (F4) (also on the
Drawing Tools fly out) to pull the line into a curve. Edit
the curve to give it a slight wave.
For the stems we will use another of Designer’s new
features, the Straight Line Tool (last tool in the
Drawing Tools fly out menu). Select the Straight Line
Tool, click and drag upwards to draw a diagonal line.
Change the line Width to 12 pix. Select the Freehand
and Brush Tool (N) and apply a Fallout stroke shape.
Switch to the Shape Editor Tool (F4) (also on the
Drawing Tools fly out) to pull the line into a curve. Edit
the curve to give it a slight wave.
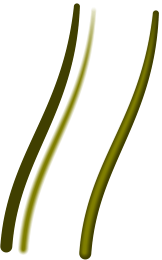 Change the outline color to Dark Yellow. Clone the line
(Ctrl + K). Change the outline color to Medium Dark
Yellow. Feather the clone to about 5 pixels.
Hold down the Alt key and use the arrow keys on your
keyboard to nudge the clone up and to the left a couple
of pixels. Select both lines and group them. Set this
aside for now. Next we’ll work on the leaves, then we
will bring all the pieces together to finish the drawing.
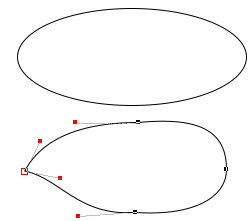
To begin the leaf we will draw an ellipse with a 1pixel
outline and no fill. this will be a guide shape. Of course
if you are talented at drawing you may want to just
draw your leaf shape freehand.
Convert the ellipse to an editable shape (Arrange
menu). Use the Shape Editor Tool (F4) to pull the
ellipse into a rough leaf shape.
Change the outline color to Dark Yellow. Clone the line
(Ctrl + K). Change the outline color to Medium Dark
Yellow. Feather the clone to about 5 pixels.
Hold down the Alt key and use the arrow keys on your
keyboard to nudge the clone up and to the left a couple
of pixels. Select both lines and group them. Set this
aside for now. Next we’ll work on the leaves, then we
will bring all the pieces together to finish the drawing.
To begin the leaf we will draw an ellipse with a 1pixel
outline and no fill. this will be a guide shape. Of course
if you are talented at drawing you may want to just
draw your leaf shape freehand.
Convert the ellipse to an editable shape (Arrange
menu). Use the Shape Editor Tool (F4) to pull the
ellipse into a rough leaf shape.
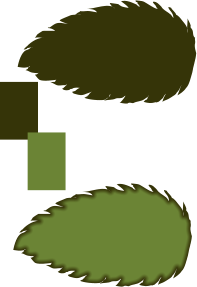
 Select the Freehand and Brush Tool (N). Set the
Smoothness slider on the Infobar to about 5-10%.
Using the shape we just created as a guide, draw
around it in a zig zag to create a serrated leaf shape.
Select the Freehand and Brush Tool (N). Set the
Smoothness slider on the Infobar to about 5-10%.
Using the shape we just created as a guide, draw
around it in a zig zag to create a serrated leaf shape.

 Open the Colour Editor (Ctrl + E) and give the leaf
shape a fill of H-73.3 S-59.8% V-51.8%
Clone the shape and give the clone a fill colour of H-
79.3 S-59.8% V-51.8% Feather the clone about 5
pixels.
Open the Colour Editor (Ctrl + E) and give the leaf
shape a fill of H-73.3 S-59.8% V-51.8%
Clone the shape and give the clone a fill colour of H-
79.3 S-59.8% V-51.8% Feather the clone about 5
pixels.
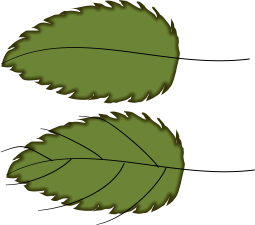
 Using the Freehand and Brush Tool, draw a curved line
through the middle of the top leaf shape as shown to
the left. Draw some smaller lines coming off the center
line to the outer edge. Extend the lines beyond the
edge of the leafshape.
Select all the lines, duplicate them (Edit > Duplicate)
and set them aside. Don’t lose them!
Using the Freehand and Brush Tool, draw a curved line
through the middle of the top leaf shape as shown to
the left. Draw some smaller lines coming off the center
line to the outer edge. Extend the lines beyond the
edge of the leafshape.
Select all the lines, duplicate them (Edit > Duplicate)
and set them aside. Don’t lose them!
 Clone the shape and give the clone a fill colour of H-
79.3 S-59.8% V-51.8% Feather the clone about 5
pixels.
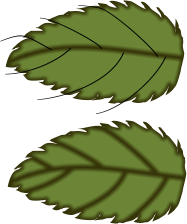
Select the center line and the top leaf shape. From the
Arrange menu, select Combine Shapes > Slice Shapes
(or press Ctrl + 4) to slice the shape in two.
Select one of the halves and one of branching lines and
slice again. Continue slicing the branch lines until have
your top leaf shape in 8 pieces like my example shown
on the left.
Clone the shape and give the clone a fill colour of H-
79.3 S-59.8% V-51.8% Feather the clone about 5
pixels.
Select the center line and the top leaf shape. From the
Arrange menu, select Combine Shapes > Slice Shapes
(or press Ctrl + 4) to slice the shape in two.
Select one of the halves and one of branching lines and
slice again. Continue slicing the branch lines until have
your top leaf shape in 8 pieces like my example shown
on the left.
 H 1 2 3 4 5 Download Zipped Tutorial


