
 WEBSITE AND WEBSITE GRAPHICS CREATED WITH XARA DESIGNER 6 PRO


 For this step work on the pasteboard so you can see
what you are doing. Select the Rectangle Tool (M).
Draw a rectangle 45 pixels wide by 60pix high. Apply a
white fill with no outline. Clone the rectangle (Ctrl +
K) and nudge the clone over to the right until it is just
off the original by one or two pixels. Select both
rectangles and clone again, nudge the clones down like
before until they are just off the originals.
TIP: Hold down the Alt key while you press the arrow
keys on your keyboard and, the nudge distance will be
constrained to 1 pixel.
For this step work on the pasteboard so you can see
what you are doing. Select the Rectangle Tool (M).
Draw a rectangle 45 pixels wide by 60pix high. Apply a
white fill with no outline. Clone the rectangle (Ctrl +
K) and nudge the clone over to the right until it is just
off the original by one or two pixels. Select both
rectangles and clone again, nudge the clones down like
before until they are just off the originals.
TIP: Hold down the Alt key while you press the arrow
keys on your keyboard and, the nudge distance will be
constrained to 1 pixel.

 Select all four white rectangles and apply 3 pixels of
feathering. Group the four rectangles.
Select all four white rectangles and apply 3 pixels of
feathering. Group the four rectangles.
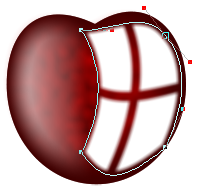
 Place the window on to the right side of the cherry.
With the window selected select the Mould Tool (Shift
+ F6), which now can be found in the Effects fly out
menu. Apply a Default Envelope to the window and
mold it to the cherry. The Default Envelope is the first
rectangle icon on the left of the envelope shape icons.
Place the window on to the right side of the cherry.
With the window selected select the Mould Tool (Shift
+ F6), which now can be found in the Effects fly out
menu. Apply a Default Envelope to the window and
mold it to the cherry. The Default Envelope is the first
rectangle icon on the left of the envelope shape icons.
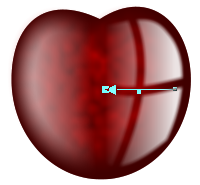
 Give the molded window a Linear, Mix transparency.
Set the transparency setting on the left to about 12%
Adjust as desired.
TIP: The easiest way to apply a Linear transparency (or
a Linear fill) is to click on the shape to select it, then
drag the Transparency Tool (or the Fill Tool) in the
direction you wish the tranparency to go.
Give the molded window a Linear, Mix transparency.
Set the transparency setting on the left to about 12%
Adjust as desired.
TIP: The easiest way to apply a Linear transparency (or
a Linear fill) is to click on the shape to select it, then
drag the Transparency Tool (or the Fill Tool) in the
direction you wish the tranparency to go.
 Select both the highlight on the left and the window on
the right and group them. Now select the Freehand
and Brush Tool (N) and draw a shape on top of this new
group. Make the new shape Black. Copy the shape to
the clipboard (Edit > Copy or Ctrl + C).
Select both the highlight on the left and the window on
the right and group them. Now select the Freehand
and Brush Tool (N) and draw a shape on top of this new
group. Make the new shape Black. Copy the shape to
the clipboard (Edit > Copy or Ctrl + C).

 Select the highlight/reflection group and from the Edit
menu, select Paste Opacity Mask (Shift + Ctrl + M).
Hold down the Ctrl key and click the transparency
shape and feather and enlarge. If you wish, you can
edit the transparency shape with the Shape Editor
Tool. You can also Ctrl click on either of the grouped
highlight/reflection shapes and edit them as well!
Opacity Masks are a very powerful new tool!
Okay. Group the cherry and set it aside. We are ready
to create the stems and leaves.
H 1 2 3 4 5 Download Zipped Tutorial
Select the highlight/reflection group and from the Edit
menu, select Paste Opacity Mask (Shift + Ctrl + M).
Hold down the Ctrl key and click the transparency
shape and feather and enlarge. If you wish, you can
edit the transparency shape with the Shape Editor
Tool. You can also Ctrl click on either of the grouped
highlight/reflection shapes and edit them as well!
Opacity Masks are a very powerful new tool!
Okay. Group the cherry and set it aside. We are ready
to create the stems and leaves.
H 1 2 3 4 5 Download Zipped Tutorial


