
 WEBSITE AND WEBSITE GRAPHICS CREATED WITH XARA DESIGNER 6 PRO


 Select the Ellipse Tool (L). Draw an ellipse 180
pixels wide by 200 pixels high.
Convert the ellipse to a shape — Arrange >
Convert to Editable Shapes (Shift + Ctrl + S)
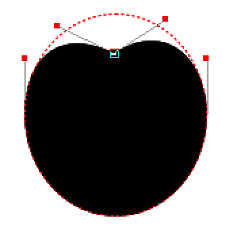
With the ellipse selected, switch to the Shape
Editor Tool (F4). Select the top control point
and pull it downward. Now drag the Bezier
curve handles upward above the top node as
shown on the left.
Select the Ellipse Tool (L). Draw an ellipse 180
pixels wide by 200 pixels high.
Convert the ellipse to a shape — Arrange >
Convert to Editable Shapes (Shift + Ctrl + S)
With the ellipse selected, switch to the Shape
Editor Tool (F4). Select the top control point
and pull it downward. Now drag the Bezier
curve handles upward above the top node as
shown on the left.


 Apply a Dark Red fill, and remove the outline.
NOTE: The colors referred to in this tutorial
appear on the screen palette. Let the cursor
rest over a color for a second or two and the
color name will appear.
Clone the cherry shape (Ctrl + K) and apply a Medium
Red fill to the clone. Apply 42 pixels of feathering to
the clone using the Change Size of Feather Region
slider in the upper right area of the Infobar. Nudge the
clone up and to the left.
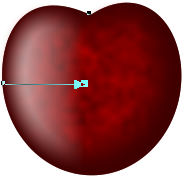
Hold down the Alt key and click on the top shape to
select the shape below it. Create a new clone.
Select the Transparency Tool (F6). Apply a Fractal
Plasma, Mix transparency.
Click the Profile arrow icon on the Infobar and from
the drop down list, choose Profile 3.
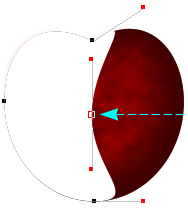
Hold down the Alt key and click two times to select the
bottom shape and clone it again. Apply a White fill.
Use the Shape Editor Tool (F4) to select the right side
control point and pull it to the left as shown.
Apply a Dark Red fill, and remove the outline.
NOTE: The colors referred to in this tutorial
appear on the screen palette. Let the cursor
rest over a color for a second or two and the
color name will appear.
Clone the cherry shape (Ctrl + K) and apply a Medium
Red fill to the clone. Apply 42 pixels of feathering to
the clone using the Change Size of Feather Region
slider in the upper right area of the Infobar. Nudge the
clone up and to the left.
Hold down the Alt key and click on the top shape to
select the shape below it. Create a new clone.
Select the Transparency Tool (F6). Apply a Fractal
Plasma, Mix transparency.
Click the Profile arrow icon on the Infobar and from
the drop down list, choose Profile 3.
Hold down the Alt key and click two times to select the
bottom shape and clone it again. Apply a White fill.
Use the Shape Editor Tool (F4) to select the right side
control point and pull it to the left as shown.
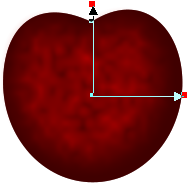
 Apply about 25 pixels of Feathering. Switch to the
Transparency Tool and apply a Linear transparency
with a starting Transparency slider setting of 20% and
an ending slider setting of 100%
Next we’ll create a reflection.
Apply about 25 pixels of Feathering. Switch to the
Transparency Tool and apply a Linear transparency
with a starting Transparency slider setting of 20% and
an ending slider setting of 100%
Next we’ll create a reflection.

 H 1 2 3 4 5 Download Zipped Tutorial


