|
If you do not have the Banner Page template file open please open it now. For a variation we will add some text areas and a change in the banner and navbar locations.
Marquee select the 5 navbar buttons and move them temporarily to about the middle of the page. Now select the Banner rectangle and the Banner Text and move them to the X location at 29
pixels and Y location 7 Pixels. Again marquee select the 5 navbar buttons and move them to X location 29 pixels and Y location 125 pixels. You may be asking “what was all that about?” It was to show
how easily you can modify your original template. ;-)

We now have two configurations of our Banner and Navbar for our Template. For this page we will add an image and some columns or text (know in Xara as Text Areas).
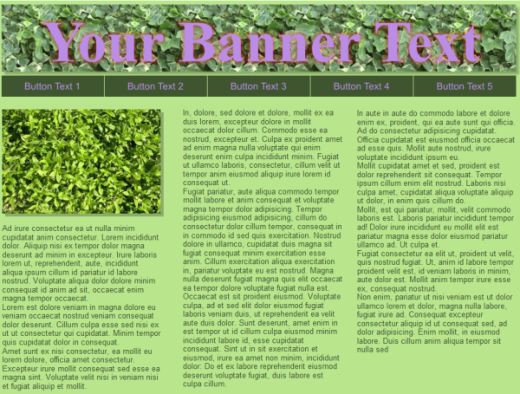
Import (or drag and drop) an image you would like to use. For this tutorial I’m using one of the Fill Gallery (Shift + F11) leaves images, Leaves 2
from the Horticultural folder. The image is larger than our text areas will be wide so change the image width to 263 pixels. Move the image to location X 29 pixels and Y 181 pixels. Select the
Shadow Tool (Ctrl F2) and apply a Wall shadow to the image.
We will add some guide lines to help position the Text Areas. Type Ctrl + L to display the screen rulers if they are not already on the screen. Use the Selector Tool
(F2 or V) and left click on the left side ruler and drag right until your guide line is aligned to the left edge of the Banner. Drag another guide line
from the left side ruler and place it at the right edge of the image’s drop shadow. This gives us a good working width for the first Text Area. The width
is 267 pixels on my system. Yours may vary and don’t worry if it does. Many times an ‘eyeball approximation’ often looks better than an accurately measured placement.
Select the Text Tool (T) and click on the left most guide line then drag a text area diagonally until the cursor is on the right guide line. Continue dragging but
allow the cursor to move down the right guide line until you are somewhere in the neighborhood of 30 pixels from the bottom of the page. Exact
measurements are not required and we can always adjust these later if needed.
To create our other Text Areas we will use the Selector Tool’s right click and drag to create a copy. But first we should add some text in the first text area
to make it easier to see. With the Text Tool selected and the Text Tool cursor within the text area, click on Theme Color 2 to apply the color to the text we
will enter it. Ensure the text cursor is active in the text area and press Shift + Ctrl + L to paste in some placeholder text. This text is gibberish but gives an
idea of how the actual text will look when formatted. Repeat Shift + Ctrl + L as many times as you like to approximately fill the text area.
Switch to the Selector Tool. Select the text area. Now Right Click on the selected text, hold down the Ctrl key (to constrain the movement to horizontal
). Drag until the left edge of the text is aligned with the right guide line then release the right mouse button. We don’t want to just leave our new text area so it is so close the the original. Hold
Ctrl + Alt then hit the right Arrow key on your keyboard. This moves the new text area 10 pixels to the right.
With the Selector Tool, right click and drag a copy of the new text area as we did before but this time align the left edge of the new copy with the right edge
of the copy we previously made. Use the Ctrl key to constrain the angle when you drag, and use Alt and the right Arrow key on the keyboard to move the
newest copy 10 pixels to the right. Save this as Page 1 for our Template.
Shown below is what we have done so far. Take an eye break and when you come back we will create a new page for our template.

|