|
Select the Text Tool (T) and select a web safe font from the Fonts drop down list or use the one I chose for the template; Times New Roman at 96pix and
Bold. For our template enter some appropriate text, for example “Your Banner Text”. You can change the words later.
Now would be a good time to assign names to the text and rectangle. Select the text and open the Names of objects dialog by clicking on the yellow tag icon on the Infobar. Give the text the name “
Banner Text”. Select the rectangle and give it the name “Banner”. Change the justification to Center Justify. Switch to the Selector Tool (F2 or V) and
move the text near the center of our rectangle. Use Shift + click to add the rectangle to our selection.

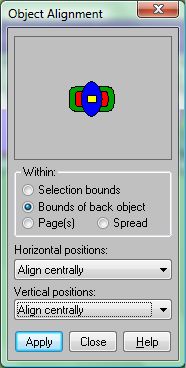
Open the Object Alignment dialog, shown above (Arrange > Alignment...). Change the Within: option to Bounds of back object, add Align centrally to the
Vertical positions. Click the Apply button. Click out side the current selection to deselect everything.
Now select the banner text and left click on the Theme Color 3 colored square box in the Color Line to apply the Fill color. Select the Shadow Tool (Ctrl F2) and apply a Glow
shadow to the text. The red glow helps separate the text from the background Leaves. Select the rectangle and apply a drop shadow. Select the text and the rectangle and group (Ctrl + G
). When you use this template you can change the banner text using the Text Tool (T) without having to ungroup first. The banner is shown below.

We can now start our Navbar buttons.
Create a rectangle 170 pixels by 35 pixels. Move the rectangle to location X 49 pixels and Y 27 pixels. You can see and edit these coordinates on the Infobar. Apply Theme Color 2. Open the
Page Options dialog (Shift + Ctrl + O). On the General tab set the X Duplication distance value to 171 and the Y Duplication
distance value to 0. Close the Page Options dialog.
With the first rectangle for our Navbar selected, press Ctrl D four times so there are now five, equally spaced, horizontal rectangles. Select all five rectangles and copy them to the clipboard (Ctrl
+ C).

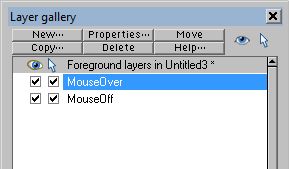
Open the Layer Gallery (F10). Select the MouseOver layer title bar and make it visible by checking the check box under the eye icon for this layer.
Paste (using Edit > Paste in Place) the five rectangles to the MouseOver layer. Apply Shade of Theme Color 3 to the rectangles. Hide the MouseOver
layer by unchecking the check box under the eye icon for the MouseOver layer, then select the MouseOff layer title bar.
Use the Text Tool (T) and using Theme Color 3 make 5 different lines of text : Button Text 1, Button Text 2, etc. Make each text line Center justified.
Starting with the left most rectangle center the Button Text 1 line on the rectangle using the Alignment menu (Arrange > Alignment...). Repeat this
step for the next button to the right, center the next numbered sequence line on each button. Select all five text lines and copy to the Clipboard.
 In the Layers Gallery make the MouseOver layer
visible and paste the text in place onto the MouseOver rectangles (Shift + Ctrl + V). One at a time, group a rectangle and the text over it. Do this for the MouseOver
and the MouseOff layers. Make the MouseOver layer invisible again by removing the check from the check box under the eye icon for this layer. On the MouseOff layer
select the left most group (rectangle and text) open the Web Properties > Link tab and assign a dummy link to web page using “javascript;
” (do not include the quotation marks) as the URL for the web page. Repeat this for each of the button groups on the MouseOff layer.
This dummy address will allow the mouse over effect for the button to work without actually linking to a page. This allows you to preview the mouse over
effects for the template without worrying about” did I forget to change a button’s link”. If you want to avoid keying in the text each time, you can also link to the same page, index.htm. In the Layers Gallery make the MouseOver layer
visible and paste the text in place onto the MouseOver rectangles (Shift + Ctrl + V). One at a time, group a rectangle and the text over it. Do this for the MouseOver
and the MouseOff layers. Make the MouseOver layer invisible again by removing the check from the check box under the eye icon for this layer. On the MouseOff layer
select the left most group (rectangle and text) open the Web Properties > Link tab and assign a dummy link to web page using “javascript;
” (do not include the quotation marks) as the URL for the web page. Repeat this for each of the button groups on the MouseOff layer.
This dummy address will allow the mouse over effect for the button to work without actually linking to a page. This allows you to preview the mouse over
effects for the template without worrying about” did I forget to change a button’s link”. If you want to avoid keying in the text each time, you can also link to the same page, index.htm.
Once each MouseOff button has the dummy link make the MouseOver layer visible and selectable (the check box under the arrow pointer icon is checked). Use the Selector tool
and marquee select the left most button on both the MouseOff and MouseOver layers and apply a new Soft Group (Arrange > Apply Soft Group
). Marquee select the second button groups from the left on both layers and Apply Soft Group. Repeat this for each of the button groups.
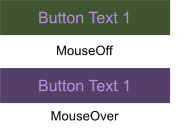
The Navbar is now finished. You can see the completed navbar (reduced) below.

NOTE: After I completed the buttons, I realized that it might have been easier to create the first button rectangle center and center align the text, group the two, then do the duplicate (Ctrl
+ D) four times. All of these grouped buttons could then be copy and pasted onto the MouseOver layer in one step. This would eliminate four extra steps (nine steps if you count the
MouseOver buttons).
Also worthy of note, if you change the text on a soft group, the text changes for the other button(s) within the soft group. For example, change the text of Button Text 1 on the MouseOff layer to HOME and
the text automatically changes the text to HOME on the MouseOver button. Ah, the benefits of hindsight.
Save your .web file for your Banner Page template. You can add a footer if you wish or use the template as it currently exists. A footer appears in the same
place at the bottom of each page and can be a simple graphic, linked text, or just a line of text such as a copyright line. Take another eye break and we will
see how to modify the Banner Page template for another page type using our existing theme.
|