|
I like to use Grid and Ruler spacing values of Major spacing set at 100pix and the Number of subdivisions set at 50. Please make your settings match those values. Utilities
menu > Options > Grid and Ruler tab. My Color Units are set to Percent (Units tab).
Begin your new Xara Web Designer template by selecting a page width from the File > New
menu. I selected the 955 pix web page (XGA) option, you can select one that best suits your screen size. Keep in mind that Xara Web Designer automatically centers your page in the visitor’s browser.

 Selecting theme colors is next in my approach to
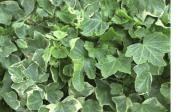
templates. Earth day was the inspiration for selecting the colors for the template this tutorial will make. Looking in the Fill Gallery’s Horticultural fills the Leaves 6
image (shown on the left) was my choice. Use the Rectangle Tool (M) to make a small shape for assigning colors. Use the Color Editor’s (Ctrl e) Color Picker (the eyedropper) and sample from the
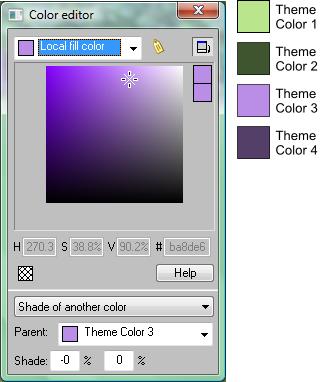
Leaves 6 image. My first sample was H 90.3 S 38.8% V 90.2% (hex values #b9e68d) and given the name Theme Color 1. In the Color Editor
change the drop down option from Theme Color 1 to Current fill color, this will prevent accidentally changing the values of the Theme Color 1 values. Use the Color Picker to select another color, mine was H 96.3 S 44.7% V 33.3% (Hex values
#3e552f) give this color the name Theme Color 2. We now have two colors that the are exact matches for those in the Leaves 6 image. To give us some
contrast a Complimentary from the opposite side of a color wheel will be nice. To get the Complimentary color simply give a shape the Theme Color 1 then change to Current Fill color in the Color Editor
now change the H from 90.3 to 270.3 [H 270.3 S 38.8% V 90.2% (hex values #ba8de6)] give this the name Theme Color 3. Our final color will be a Shade of Theme Color 3 open the Color Gallery
and apply Theme Color 3 to the small rectangle created earlier. Change to local fill color then change the V setting to 40.2% make the color a Shade of Theme Color 3
. H 270.3 S 38.8% V 40.2% (#533f67) Selecting theme colors is next in my approach to
templates. Earth day was the inspiration for selecting the colors for the template this tutorial will make. Looking in the Fill Gallery’s Horticultural fills the Leaves 6
image (shown on the left) was my choice. Use the Rectangle Tool (M) to make a small shape for assigning colors. Use the Color Editor’s (Ctrl e) Color Picker (the eyedropper) and sample from the
Leaves 6 image. My first sample was H 90.3 S 38.8% V 90.2% (hex values #b9e68d) and given the name Theme Color 1. In the Color Editor
change the drop down option from Theme Color 1 to Current fill color, this will prevent accidentally changing the values of the Theme Color 1 values. Use the Color Picker to select another color, mine was H 96.3 S 44.7% V 33.3% (Hex values
#3e552f) give this color the name Theme Color 2. We now have two colors that the are exact matches for those in the Leaves 6 image. To give us some
contrast a Complimentary from the opposite side of a color wheel will be nice. To get the Complimentary color simply give a shape the Theme Color 1 then change to Current Fill color in the Color Editor
now change the H from 90.3 to 270.3 [H 270.3 S 38.8% V 90.2% (hex values #ba8de6)] give this the name Theme Color 3. Our final color will be a Shade of Theme Color 3 open the Color Gallery
and apply Theme Color 3 to the small rectangle created earlier. Change to local fill color then change the V setting to 40.2% make the color a Shade of Theme Color 3
. H 270.3 S 38.8% V 40.2% (#533f67)

We have our page size and Theme colors. Let’s begin adding items to our template. Assign Theme Color 1 to the page background. Ctrl + drag with the
Theme Color 1 color square from the screen palette with the left mouse button and drop the color onto the white portion of the work area. This makes the
entire browser page background Theme Color 1 and when we export and preview the page the entire browser background will be this color.
Next we will make a Header page similar to those in the Xara designed Templates and that consists of a banner and a navigation bar. We will use the
header as a consistent starting point for other pages within our Template theme.
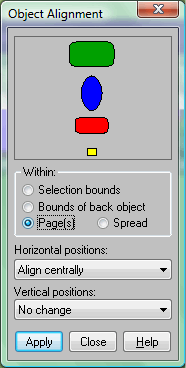
Create a rectangle 854 pixels by 112 pixels. With the rectangle still selected open the Object Alignment dialog shown above (Shift + Ctrl + L). Check the Pages(s)
option check box and select Align Centrally in the Horizontal positions drop down list. Click the Apply button. This puts the rectangle
centrally on the page. We will place our navigation bar above the banner rectangle so change the Location’s Y value to 65 pixels. Switch to the Selector tool (F2) and open the
Bitmap Gallery (F11), select the Leaves 6 image then click the Fill button along the top row of the gallery. Our rectangle now has a copy of the image within it’s border.
Switch to the Fill Tool (F5) and change the Fill tiling option to Repeating tile. You can adjust the fill handles to make the leaves larger or smaller so they look
just the way you want.
Save your project file and take a short break to rest your eyes. On the next page we will Add some text to the banner.
|