|
The Xara Xone Workbook - The best, easy and fun Xara X tutorials |
|
|
|
THE XARA CONFERENCES | XARA.COM | XARA ONLINE | GRAPHICS.COM TOP SITES | ALL WORKBOOKS |
|
The button states are now complete. But before we test the buttons, we need to make sure the links are correct and the buttons are on the appropriate layers.
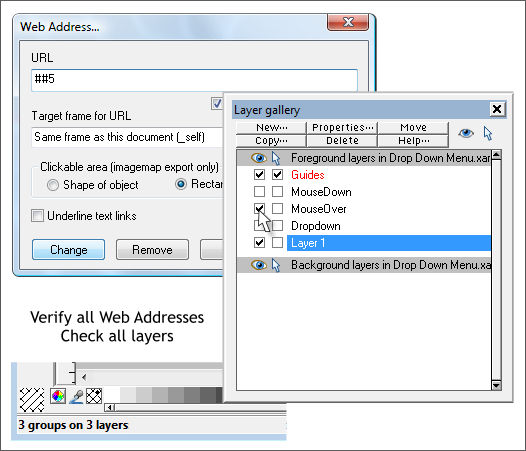
Check all the layer check boxes so that all the layers are visible and editable. Drag a select rectangle (a marquee) with the Selector Tool (the arrow pointer) around the HOME button. The status bar at the bottom left of the screen should display 3 Groups on 3 Layers. Open the Web Address dialog (Shift Ctrl w or right click on the page and select Web Address) and verify the URL. These addresses have a habit of getting messed and lost. The HOME button should show ##1. Marquee select the next button (all three layers). If the URL says (Many), change it to ##2 and press Change. Verify all buttons to make sure they are properly linked. IMPORTANT: Remember to press Change for any link you change. Next un-check all the Make Visible check boxes and then one by one check and un-check each layer to make sure that the contents for each layer are correct. The MENU button must be on Layer 1 or else it will not appear when the page loads. When you have all your links verified and have checked the contents of each layer, you can export your page (File > Export > (Website HTML). Name your page index.htm and press Export . If the file index.htm is in the root directory of your web host's servers (computers that store the websites) then you do not need to add index.htm to the URL. The web browser automatically searches for a file named index.htm or index.html and automatically loads this file. Xara creates an index.htm HTML page and a folder, index.html_files. Double click on the index.htm file to launch your default browser and to preview the page. IE users may see a warming dialog at the top of the screen. Right click on the warning and select Allow Blocked Content then press Yes to close the security dialog. Test your buttons. Only the HOME button link will work as you have not created the other web pages yet. Basically that's it. You have created a drop down menu. To help the search engines (Google, etc.) find your website, we can add TITLE tags to the HTML code. From the File menu, select Document Info... In the Comment text entry box, enter a title and short description for your site. The title will not appear on the page but search engines will see it and if your visitor bookmarks the page the TITLE text will appear in the list of bookmarks. Make the title as descriptive as possible. You can make it a sentence or two long if you wish but put the most important words first.
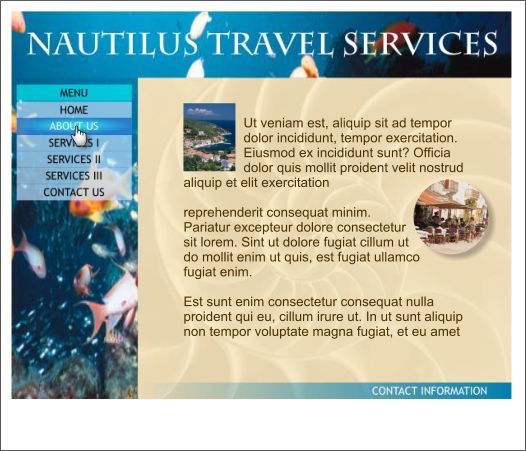
I went the next step and created a small website for Nautilus Travel Services which you can see here. Bookmark the home page and you can see how the TITLE I gave the site works. I added a banner and applied the photo to the banner and the strip to the left over which the menu appears. This photo changes on each page. The banner photo and banner text were grouped so that Xtreme only exports one object. The banner and the left strip appear to be one photo. In reality there are two rectangles to which the same bitmap image has been applied. Once I had my home page the way I wanted it, I duplicated the entire page (Edit > Pages... Duplicate Current Page). I did this 5 times to create the other pages. This duplicates everything including the 3-state buttons on each page. I changed the photo on each page as well as the color of the bar across the bottom of the page and the text that identifies the selected page.
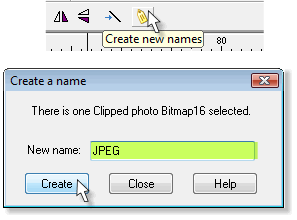
Xtreme exports the banner and text as a 256 color PNG image, which creates a very large file size. You can force Xtreme to export any image as a JPEG which greatly reduces the file size. Select an object, group of objects, or what have you. Press the yellow tag icon (Create New Names) and name the selection JPEG. Don't get creative. JPEG . That's all. Press Create. Repeat this step for each image, or group of images/objects you want to export as a JPEG and repeat this step. You'll see a warning dialog that warns This Name Already Exists... Press Apply. My sample site went from 1.83 MB to about 585K. So it is worth the extra effort. I could have done this with the individual buttons to reduce the file size even more. One final note. Search engines see bitmap images (GIF, PNG, and JPG) as images. They have no way to determine the content of the image. To make matters worse, Xtreme names these images with a number. So a search engine has no idea if 1.png is a horse, a house, or just a number. You can add an Alt (Alternate text) tag to an image. Search engines can see these Alt tags and identify the content. Here's how to add an Alt tag to an image or a group of images. Select an image, click Create New Names (the yellow tag icon), and add your tag using this format, Alt="description". Substitute the appropriate text for description and enclose the descriptive text in quotes. Your visitors can also see a tool tip containing text if they let the cursor hover over the image for a second or two if you change Alt to Title. For example, you can use a Title tag to display a copyright notice so someone does not try to steal your images. For example, Title="© 2008 Ima Guest". On the next page, you'll see how to create multiple drop down menus.
|
||||||
|
|
||||||


