|
Select the teardrop and the 90pix circle, make sure the 90pix circle is on top, then type CTRL-2 to knock out a hole in the teardrop. Then selecting both the teardrop and the 70pix circle, add them together (CTRL-1), then
click on the resulting shape again to put it in rotate mode, and drag the centre icon to the point where the two straight guidelines cross. Clone the shape (CTRL-K) and enter 180 in the rotate shape dialogue field on the
toolbar. You should now have something like the image below which should be a single shape, so add the original and the rotated clone together.
Save your Xara Xtreme file.

Stage 2 Exporting shapes to Xara 3D
We have our initial shape, so select it, and shift-select the sizing pixels and type CTRL-C to copy them to the clipboard.
Now start up Xara 3D, enable the cursor bar and clear the initial screen. With the cursor still enabled, type CTRL-C, followed by Return, CTRL-C again,
followed by Return, and CTRL-C again. This will give you three objects of the same shape in a vertical column in the X3D screen. Give them all the default
extrusion of 1 unit thickness, and a 45 degree bevel of 7 units. Give each shape a different colour, too. Set the background colour to black or whatever suits the choice of colours you made for the objects.
Now, disable the cursor, and go into the Animation options and set it to Rotate2, with 4 frames per cycle, and 1 frame per second. Run it, and when the frame counter in the Timeline bar shows frame 2, pause the animation.
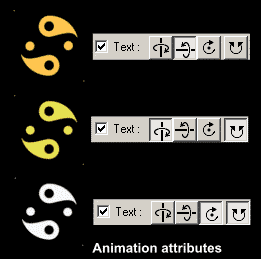
Enable the cursor, and select each object in turn, and set the Rotate2 parameters for them as shown below.

 Disable the cursor again, and with the pointer on the
background, drag the objects around so that the view angles (displayed at the bottom right of the X3D screen) are set as shown here. Disable the cursor again, and with the pointer on the
background, drag the objects around so that the view angles (displayed at the bottom right of the X3D screen) are set as shown here.
Now reduce the line-spacing to 0%. All the shapes will collapse together and interlock, and should look like the image below. You can now adjust the
lighting to highlight the edges of the objects to best effect. Notice how all the sizing pixels are well outside the main image area.
|