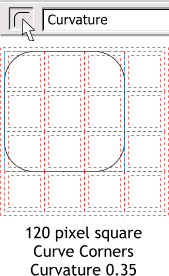


Using the Rectangle Tool, draw a 120 x 120 pixel square snapping it to the inside guides. Press the Curved Corners icon on the property bar. From the drop down list of options, select Curvature and set the amount to 0.35. Press Enter to apply the change.

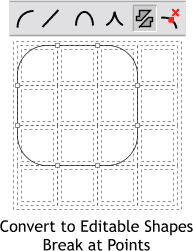
 With the rectangle selected, select Convert to Editable Shapes
from the Arrange menu. And with the rectangle still selected, select the Shape Editor Tool. Drag a rectangle around the selected rectangle with the Shape Editor Tool to marquee select all the
control points and then press the Break At Points icon on the Infobar. This breaks the rectangle into 8 separate line segments.

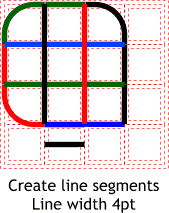
Delete the lower right curved corner. Using the Shape Editor Tool, draw a series or horizontal and vertical line segments to the width of the inner grid. (Click to add the start point and click to add the end point). Change the line width to 4pt and change the line colors as shown to green, blue, red and black. To change the line color, right click on the color on the screen palette with the line selected. Add two straight line segments in the lower right corner.

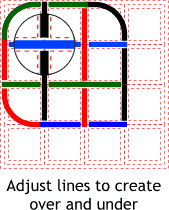
Adjust the height and width of the lines to create the appearance of the lines alternately passing over and under one another. Align the ends of the lines to the inner and outer grid lines as shown in the enlarged circular area. Where two lines appear to pass over a line, for example the blue line in the enlarged circular area, drag one of the two line segments a little over the other.