MAKING AN ISOMETRIC FACETIP FOR DRAWING ISOMETRIC CIRCLES 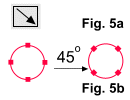 Since our default Angle Constraint is set at
30 degrees, use the "Bounds Creation" mode of the Infobar (Fig. 5a). Ctrl-drag from left to right and then rotate the circle 45 degrees via the Infobar (Fig. 5b
). Next, convert the circle to an Editable Shape (Arrange menu). This method is important when creating isometric circles if the
circles will later be "extruded" because it places their points at critical positions. This will be shown later in Fig. 14 of Assembling A Cylinder. Since our default Angle Constraint is set at
30 degrees, use the "Bounds Creation" mode of the Infobar (Fig. 5a). Ctrl-drag from left to right and then rotate the circle 45 degrees via the Infobar (Fig. 5b
). Next, convert the circle to an Editable Shape (Arrange menu). This method is important when creating isometric circles if the
circles will later be "extruded" because it places their points at critical positions. This will be shown later in Fig. 14 of Assembling A Cylinder.
CREATING AN ISOMETRIC FACE 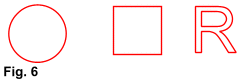 1. Draw an object which will eventually become an isometric face. In Fig. 6, I have used a circle, a square,
and an "R" as examples. 1. Draw an object which will eventually become an isometric face. In Fig. 6, I have used a circle, a square,
and an "R" as examples.2. Transform the object using the following controls of the Selector Tool's Infobar (do NOT enter and apply all three
transformation controls in the Infobar at the same time, rather, apply each one separately and in the sequence shown below): 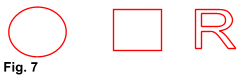  Fig. 7 apply a Scale Height of 86.6%. Fig. 7 apply a Scale Height of 86.6%.
  Fig. 8 apply a Skew angle of either minus or plus 30 degrees. (See the following page for specifics). Fig. 8 apply a Skew angle of either minus or plus 30 degrees. (See the following page for specifics).
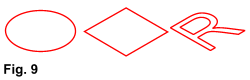  Fig. 9 apply a Rotation angle of either minus or plus 30
degrees. (See the following page for specifics). Fig. 9 apply a Rotation angle of either minus or plus 30
degrees. (See the following page for specifics).
On the next page you will see how the sign (positive or negative + or -) of the Skew and Rotation angles, and the value of the Rotation
angle affects which isometric face is generated and orientation of an object to that face.
|