|
Selecting Named Objects and Attributes
There are a few ways to select Named or unnamed objects and attributes. Using the Selector Tool
is one way. Just go around the page and select, or multiple select things. But let's say you want to select only objects that contain RGB 102, 0, 0 (a deep red). You could eyeball it and try to pick out all the visible objects that look like they are dark red, or you could look in the
Used Colors section, locate RGB 102, 0, 0 and select it. In just one click, all objects containing this shade of red are selected. From here you can modify the color red to any color you wish by selecting a
color on the screen palette, using the Color Editor or Fill Gallery. You can select all text on the page that is Times Roman and change the size, style, font, color, and more. All at once. 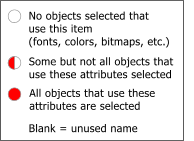 The three circles shown on the left, four if you count a
blank area) are used to indicate selected objects and attributes. An open circle indicates that no objects with this name or attribute are selected but that objects with these attributes exist in the current document. A
half circle indicates that some, but not all objects containing this attribute or Name, are selected. A solid circle indicates that all objects and attributes have been selected. A blank next to
a name indicates an unused name. For example, if you had a named object and then physically deleted it from the page, the name remains until you delete it. The three circles shown on the left, four if you count a
blank area) are used to indicate selected objects and attributes. An open circle indicates that no objects with this name or attribute are selected but that objects with these attributes exist in the current document. A
half circle indicates that some, but not all objects containing this attribute or Name, are selected. A solid circle indicates that all objects and attributes have been selected. A blank next to
a name indicates an unused name. For example, if you had a named object and then physically deleted it from the page, the name remains until you delete it.
You can select a name without selecting the objects or associated properties by selecting the title bar. The title bar becomes a blue rectangle with white text
indicating its selection. You can multiple select title bars by holding down the Ctrl key while selecting the title bars. Pressing the Select button will select all objects
and attributes that apply to the selected title bars. HOW TO:
Let's say you want to change the font and color for all text that is now set in Times Roman. In the Names Gallery, Used Fonts section (this does not refer
to previously owned fonts, but refers to fonts that are currently being used in your document), locate Times Roman and select the circle to the left of the title. If
there are any other associated attributes such as color, these attributes will display as half-filled circles to indicate they are related to the selected font.With all instances of Times Roman
selected, you can change the color by selecting a color from the screen palette, using the Color Editor or the Fill Gallery. In addition you can change the nature of the fill by selecting the Fill Tool
and then selecting a fill type from the drop down list of Fill Types on the Infobar. Switching to the Text Tool, you can modify the font, style, point size and more.
For example, with all instances of Times Roman selected, and the Text Tool selected, from the drop down list of Fonts, change the font to Arial, and the fill to blue. Now switch to the
Shadow Tool and add a Floor Shadow. The options are endless. Export Properties 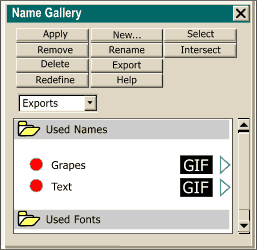 The Export Properties drop down list in the Name Gallery contains three entries, Exports, Slices, and Stretches
. The black rectangles to the right of the Used Names objects refer to the file format in which each will Export. Clicking the right-facing triangle produces the Select Export Location dialog
which is a bit confusing until you understand that the dialog box that appears is not really trying to export the selected item, but merely trying to determine the file format,
(GIF, PNG, or JPEG) and file attributes (color depth, resolution, etc.) you wish for the selected image. I will cover why you might want to change these attributes on the next page when I cover Image Slicing
. When an image has be designated as Slices (by selecting Slices from the drop down list), a box with a check is placed to the right of the title bar. If you
decide you don't want the object to slice, you can uncheck the box. The following is a detailed explanation of the three Export Properties found in the drop down list. The Export Properties drop down list in the Name Gallery contains three entries, Exports, Slices, and Stretches
. The black rectangles to the right of the Used Names objects refer to the file format in which each will Export. Clicking the right-facing triangle produces the Select Export Location dialog
which is a bit confusing until you understand that the dialog box that appears is not really trying to export the selected item, but merely trying to determine the file format,
(GIF, PNG, or JPEG) and file attributes (color depth, resolution, etc.) you wish for the selected image. I will cover why you might want to change these attributes on the next page when I cover Image Slicing
. When an image has be designated as Slices (by selecting Slices from the drop down list), a box with a check is placed to the right of the title bar. If you
decide you don't want the object to slice, you can uncheck the box. The following is a detailed explanation of the three Export Properties found in the drop down list.Exports
enables a black rectangle to the right of the title bar that reads GIF by default. Pressing the right-facing arrow opens the Select Export Location dialog in
which you can select a file type, and name the object, and other properties where appropriate. Press Apply to apply the changes and to exit the dialog. The text in
the black box changes to reflect the modification. The image is not exported at this time. Slices Selecting this option designates the selected object, or objects, as Named
object(s) that will be sliced upon final export. The black title bar is replaced with a check box which can be unchecked by clicking if you decide not to slice a specific object. Stretches
when selected, automatically stretches all objects to make them the same width. And example of this is when you create buttons for your web page and
want the width of each button to be consistent. If your first button is 100 pixels wide and reads HOME and your second button reads PRODUCTS & SERVICES, the
HOME button will automatically change (stretch) to accommodate the longer text.
|