 H 1 2 3 4 5 Download Zipped Tutorial
 WEBSITE AND WEBSITE GRAPHICS CREATED WITH XARA DESIGNER PRO 6


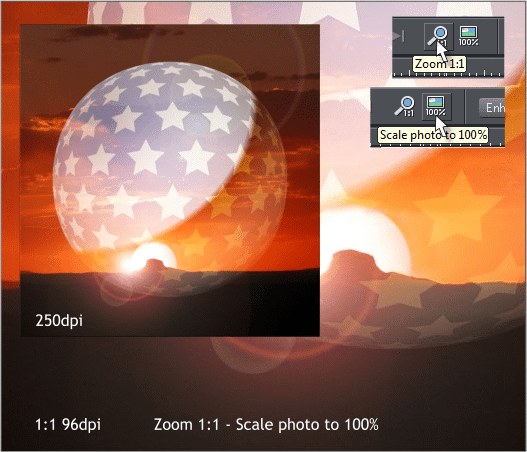 When you import a photo into Designer 6, it often comes in at a
restricted size if you have opted for a size limitation for imported
photos, or a different resolution than the image’s original resolution.
There are two new options on the Photo Tool Infobar at the top of the
page and both are shown above right. To demonstrate these two
settings I will use a small photo imported at 250dpi.
Zoom 1:1 zooms in to display the image at 96dpi, Windows screen
resolution but does not alter the size of the image itself.
Scale photo to 100% enlarges (or reduces if for example if the photo
was saved at under 96dpi) the photo to 96dpi at 100% zoom factor. In
the example above, the square portion of the photo is shown at 100%.
When you import a photo into Designer 6, it often comes in at a
restricted size if you have opted for a size limitation for imported
photos, or a different resolution than the image’s original resolution.
There are two new options on the Photo Tool Infobar at the top of the
page and both are shown above right. To demonstrate these two
settings I will use a small photo imported at 250dpi.
Zoom 1:1 zooms in to display the image at 96dpi, Windows screen
resolution but does not alter the size of the image itself.
Scale photo to 100% enlarges (or reduces if for example if the photo
was saved at under 96dpi) the photo to 96dpi at 100% zoom factor. In
the example above, the square portion of the photo is shown at 100%.
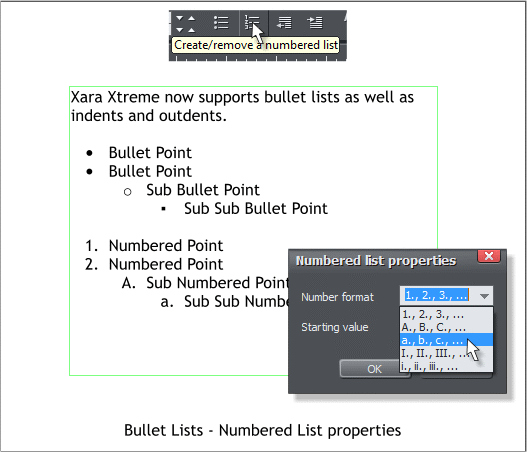 Bullet and Numbered Lists and Indent and Outdent Little by little
Xara is becoming a very strong desktop publishing solution. The addition
of bullet and numbered list support along with indents and outdents
(outdents are the opposite of indents and move the selected text to the
left the same distance as for an indent) are two more DTP essentials.
Select the text paragraphs and click either the Bullet List icon or the
Create/Remove Numbered List icon.
Right click on a line of Numbered List text to open the Numbered List
Properties dialog. You can specify the format for the number or letter
as well as the starting value.
Bullet and Numbered Lists and Indent and Outdent Little by little
Xara is becoming a very strong desktop publishing solution. The addition
of bullet and numbered list support along with indents and outdents
(outdents are the opposite of indents and move the selected text to the
left the same distance as for an indent) are two more DTP essentials.
Select the text paragraphs and click either the Bullet List icon or the
Create/Remove Numbered List icon.
Right click on a line of Numbered List text to open the Numbered List
Properties dialog. You can specify the format for the number or letter
as well as the starting value.
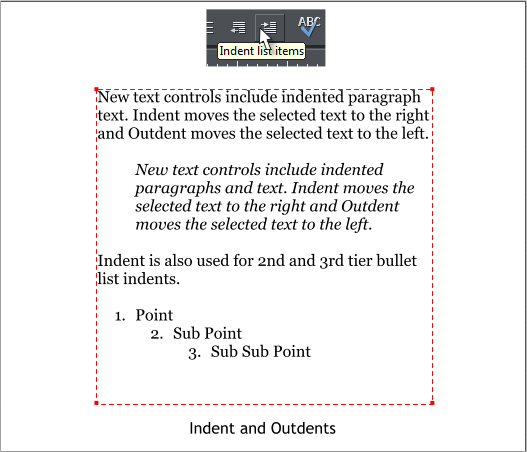 Indents and Outdents Indent moves a selection of text one tab stop.
But unlike a tab, the entire selection is indented. Insert the text cursor
anywhere in a paragraph and press the Indent List Items icon and the
entire paragraph is indented. Likewise insert the text cursor anywhere
in the paragraph and press the Outdent List Items to move the
paragraph back one tab stop.
Indents are good for large quotes or to make a paragraph stand out.
Indents are also used to move listed text one tab stop over.
Indents and Outdents Indent moves a selection of text one tab stop.
But unlike a tab, the entire selection is indented. Insert the text cursor
anywhere in a paragraph and press the Indent List Items icon and the
entire paragraph is indented. Likewise insert the text cursor anywhere
in the paragraph and press the Outdent List Items to move the
paragraph back one tab stop.
Indents are good for large quotes or to make a paragraph stand out.
Indents are also used to move listed text one tab stop over.
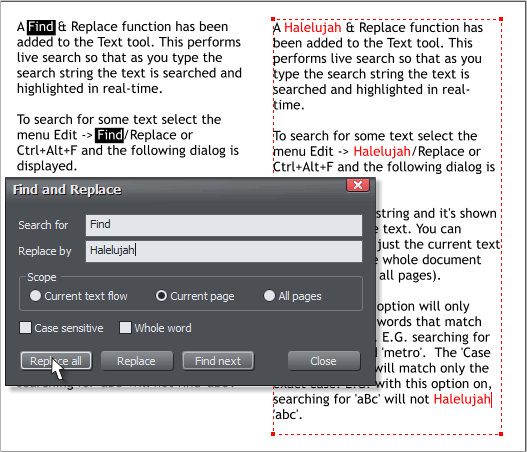 Find and Replace One of the last missing pieces in the DTP package has
finally been added, Find and Replace. This really should need no
explanation but that has never stopped your editor from explaining the
obvious. If you just key in a word in the Search For text entry box,
Designer 6 Pro will search for the first occurrence of that word. The
search can be Case Sensitive, “Designer” for example as opposed to
“designer” or “DESIGNER.” And if you search for the Whole Word,
Designer 6 Pro will ignore “design” and “sign” and only find
“designer.” The searched for word it is automatically highlighted
Replace By replaces the word that you are searching for with a
replacement word.
You can also search for a series of words, a phrase for example, and
replace the phrase with another phrase. And you can even search for a
double space after a sentence and replace it with a single space by
searching for (space bar twice). Very, very cool.
Find and Replace One of the last missing pieces in the DTP package has
finally been added, Find and Replace. This really should need no
explanation but that has never stopped your editor from explaining the
obvious. If you just key in a word in the Search For text entry box,
Designer 6 Pro will search for the first occurrence of that word. The
search can be Case Sensitive, “Designer” for example as opposed to
“designer” or “DESIGNER.” And if you search for the Whole Word,
Designer 6 Pro will ignore “design” and “sign” and only find
“designer.” The searched for word it is automatically highlighted
Replace By replaces the word that you are searching for with a
replacement word.
You can also search for a series of words, a phrase for example, and
replace the phrase with another phrase. And you can even search for a
double space after a sentence and replace it with a single space by
searching for (space bar twice). Very, very cool.
 Designer 6 Pro offers support for fully justified text for use on
websites. Even with a text repelling object as shown here.
Designer 6 Pro offers support for fully justified text for use on
websites. Even with a text repelling object as shown here.
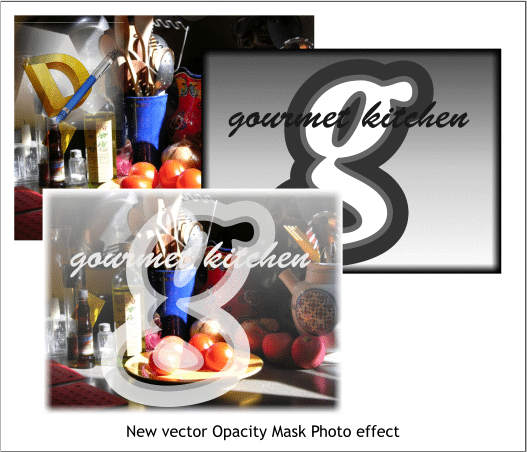 Opacity Mask This is a really powerful new transparency feature. How
powerful we have yet to figure out because the beta testers, and your
editor have been experimenting to see how to put this to best use. But
here are the basics. You create a vector or bitmap such as the grayscale
image in the center. Cut or Copy this to the clipboard. Select a bitmap,
such as my color photo shown top left, and from the Edit menu, select
Paste Opacity Mask. The result is shown in the bottom image.
Black is treated as totally opaque while white is treated as 100%
transparent. Everything in between works like this. The lighter shades
of gray are almost transparent while the darker shades of gray are less
transparent. This technique is non-destructive and can be removed at
any time by simply ungrouping the photo. I’m sure by the next
Workbook, your editor will have come up with some really awesome
uses for this. If any of you forward-thinking readers have some break-
through insights, by all means let me know.
Opacity Mask This is a really powerful new transparency feature. How
powerful we have yet to figure out because the beta testers, and your
editor have been experimenting to see how to put this to best use. But
here are the basics. You create a vector or bitmap such as the grayscale
image in the center. Cut or Copy this to the clipboard. Select a bitmap,
such as my color photo shown top left, and from the Edit menu, select
Paste Opacity Mask. The result is shown in the bottom image.
Black is treated as totally opaque while white is treated as 100%
transparent. Everything in between works like this. The lighter shades
of gray are almost transparent while the darker shades of gray are less
transparent. This technique is non-destructive and can be removed at
any time by simply ungrouping the photo. I’m sure by the next
Workbook, your editor will have come up with some really awesome
uses for this. If any of you forward-thinking readers have some break-
through insights, by all means let me know.
 There is a new addition to the Transparency Type drop down list,
Enhance. You can use this new transparency to edit part of a photo
while leaving the other part of the photo unedited.
The photo above left was exposed for the windows, but the interior is
too dark. I created a vector mask, shown in the center illustration in
gray. This is just a rectangle with two holes cut out for the windows.
Enhance transparency was applied and edited using the Photo Tool
Enhance tools. Basically I just increased the Brightness slider setting.
The windows are untouched but the walls are lightened.
There is a new addition to the Transparency Type drop down list,
Enhance. You can use this new transparency to edit part of a photo
while leaving the other part of the photo unedited.
The photo above left was exposed for the windows, but the interior is
too dark. I created a vector mask, shown in the center illustration in
gray. This is just a rectangle with two holes cut out for the windows.
Enhance transparency was applied and edited using the Photo Tool
Enhance tools. Basically I just increased the Brightness slider setting.
The windows are untouched but the walls are lightened.