 H 1 2 3 4 5 Download Zipped Tutorial
 WEBSITE AND WEBSITE GRAPHICS CREATED WITH XARA DESIGNER PRO 6


 The Photo Tools
Among the new features, the two most improved areas are the Website
tools and the Photo Tools. In this section, we’ll have a look see inside
the Photo Tool fly out.
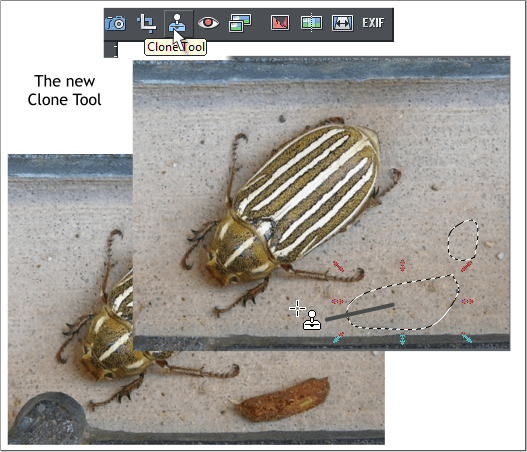
The Clone Tool You’ve been asking, no make that begging for this
feature for some time. And now you’ve got it. Here’s how it works.
Click the Clone Tool. Draw an area around the object you want to
erase. In the photos above I wanted to erase the brown thing next to
the beetle and there was a small rock above that. Once you have
created the shape, drag the clone tool over the area you want to clone.
If you don’t like that area, drag over a new area until you get the fill
area you want. The shape itself is feathered and you can adjust this on
the Infobar to make it more or less feathered.
The most excellent thing about the way Xara does this is the cloned
area is a live area that is grouped with the photo. You can edit it at any
time or Ctrl click on the cloned area and simply delete it.
Press the Esc key to leave the cloned area and to create a new one. I
also removed the bump just below the beetle. Great tool!
The Photo Tools
Among the new features, the two most improved areas are the Website
tools and the Photo Tools. In this section, we’ll have a look see inside
the Photo Tool fly out.
The Clone Tool You’ve been asking, no make that begging for this
feature for some time. And now you’ve got it. Here’s how it works.
Click the Clone Tool. Draw an area around the object you want to
erase. In the photos above I wanted to erase the brown thing next to
the beetle and there was a small rock above that. Once you have
created the shape, drag the clone tool over the area you want to clone.
If you don’t like that area, drag over a new area until you get the fill
area you want. The shape itself is feathered and you can adjust this on
the Infobar to make it more or less feathered.
The most excellent thing about the way Xara does this is the cloned
area is a live area that is grouped with the photo. You can edit it at any
time or Ctrl click on the cloned area and simply delete it.
Press the Esc key to leave the cloned area and to create a new one. I
also removed the bump just below the beetle. Great tool!
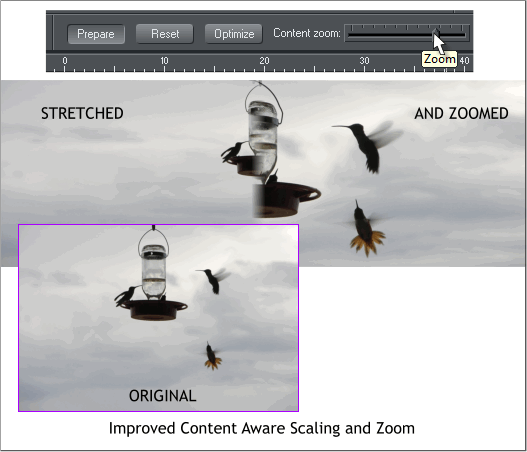 The Content Aware Photo Resizing has been updated. And a new
control has been added: Content Zoom. Content Aware Photo Resizing
extends the image width leaving a prominent feature such as the
humming birds untouched while extending the clouds on either side.
The new Content Zoom control also zooms in on the primary content as
shown on the right side in the top example.
The Content Aware Photo Resizing has been updated. And a new
control has been added: Content Zoom. Content Aware Photo Resizing
extends the image width leaving a prominent feature such as the
humming birds untouched while extending the clouds on either side.
The new Content Zoom control also zooms in on the primary content as
shown on the right side in the top example.
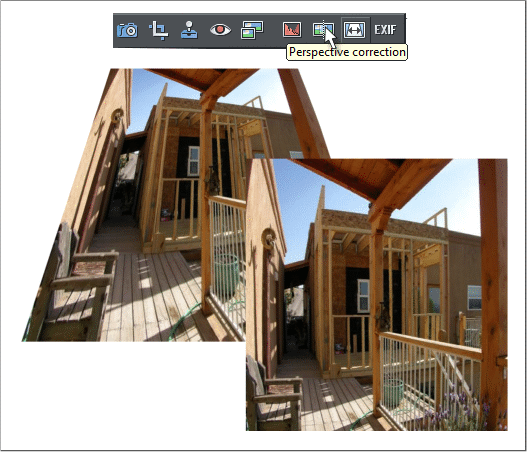 Perspective Correction Keystoning is the name of the exaggerated
perspective that results from shooting at extreme angles. The new
Perspective Correction function works best with verticals. In the
example shown above left, I applied a Default Perspective Envelope
with the Mould Tool to a photo and then made a bitmap copy. I left the
white area of the bitmap to show how much I altered the image. The
bottom right amazingly is after I applied Perspective Correction!
Perspective Correction Keystoning is the name of the exaggerated
perspective that results from shooting at extreme angles. The new
Perspective Correction function works best with verticals. In the
example shown above left, I applied a Default Perspective Envelope
with the Mould Tool to a photo and then made a bitmap copy. I left the
white area of the bitmap to show how much I altered the image. The
bottom right amazingly is after I applied Perspective Correction!
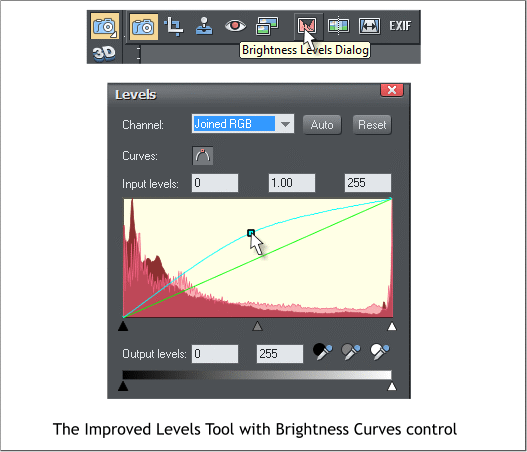 The Levels Tool has been moved inside the Photo Tool fly out and
renamed Brightness Levels Dialog. A new Curves option adds the
ability to edit the brightness levels by dragging the curve as shown.
The Levels Tool has been moved inside the Photo Tool fly out and
renamed Brightness Levels Dialog. A new Curves option adds the
ability to edit the brightness levels by dragging the curve as shown.
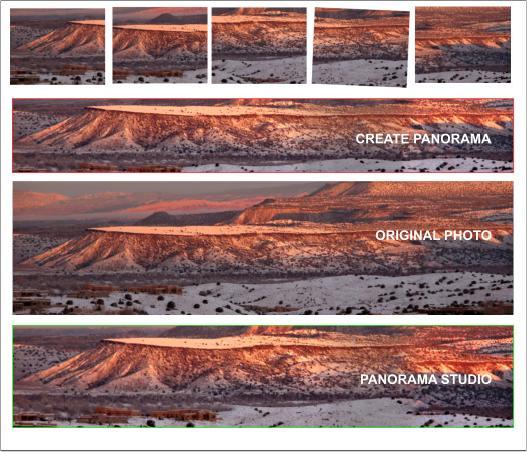 The Create Panorama function has been improved though I am taking it
on faith since I did not use the old one very much. There are two
versions of this feature, Create Panorama, which is built in and
produces a good result. If you need more control, click Panorama
Studio which launches Panorama Studio, an external utility.
Being lazy, I made five small bitmaps from an original photo shown in
the middle. Both panorama functions did a good job at stitching the
segments back together. But Panorama Studio was able to reconstruct
more of the top and bottom of the image.
The Create Panorama function has been improved though I am taking it
on faith since I did not use the old one very much. There are two
versions of this feature, Create Panorama, which is built in and
produces a good result. If you need more control, click Panorama
Studio which launches Panorama Studio, an external utility.
Being lazy, I made five small bitmaps from an original photo shown in
the middle. Both panorama functions did a good job at stitching the
segments back together. But Panorama Studio was able to reconstruct
more of the top and bottom of the image.
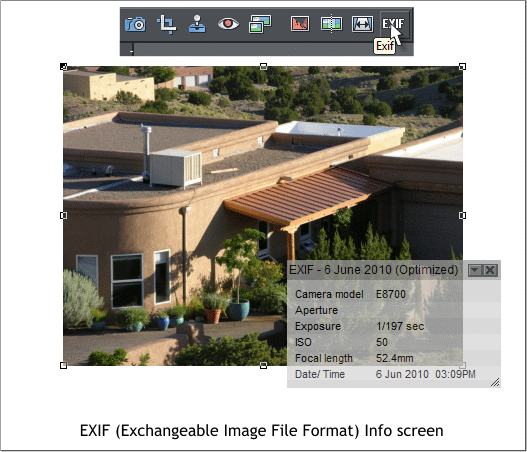 EXIF No that is not a typo for EXIT. EXIF stands for Exchangeable Image
File Format (I know because I Googled it!) This information is contained
in most images taken with a digital camera and can be helpful when
editing a photo. I am not sure how, however. But if one of you clever
members would like to educate me, feel free to bring me up to speed.
EXIF No that is not a typo for EXIT. EXIF stands for Exchangeable Image
File Format (I know because I Googled it!) This information is contained
in most images taken with a digital camera and can be helpful when
editing a photo. I am not sure how, however. But if one of you clever
members would like to educate me, feel free to bring me up to speed.
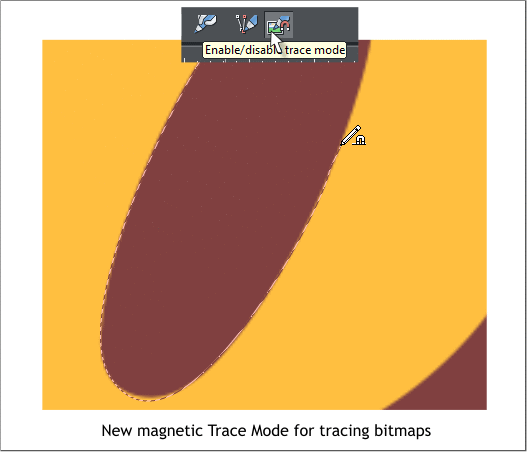 This is included in the photo section but it also applies to the Freehand
and Brush Tool. The example above was made using the new Enable
Trace Mode drawing feature to cut a hole in a mask. In effect the tool
detects sharp contrast between two shapes and magnetically snaps the
line you draw to the outline of the shape. It works best with high
resolution images with well defined areas, at high zoom factors.
This is included in the photo section but it also applies to the Freehand
and Brush Tool. The example above was made using the new Enable
Trace Mode drawing feature to cut a hole in a mask. In effect the tool
detects sharp contrast between two shapes and magnetically snaps the
line you draw to the outline of the shape. It works best with high
resolution images with well defined areas, at high zoom factors.