|

Those little icons that appear in the page tabs in your browser and when you bookmark a page are called Favicons. Two examples are shown above. The
default icon in your browser is a the Windows blank sheet of paper icon which I think we all agree is boring.
In this article we will look at these miniature gems and learn how to create your own Favicons for your websites.
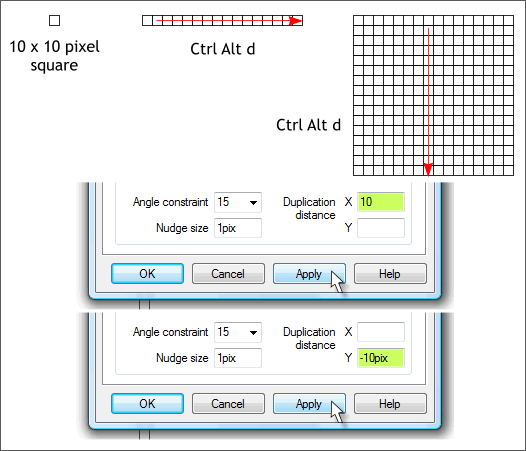
First, let’s see what we have to work with. Not much really. Favicons are only 16 x 16 pixels. A rather limited canvas. We’ll start off by creating a 16 by 16
grid and then seeing how much or how little we can get out of this space.
Select the Rectangle Tool (M). Hold down the Ctrl key, click and drag a small 10 pixel square (the Ctrl key constrains the rectangle to a square).
TIP: Draw any size square. Then change the dimensions in the Width and Height text entry boxes on the Infobar at the top of the screen and press Enter to apply the changes.
Right click on the page and select Page Options... In the General tabbed section, change the X Duplication Distance to 10 or 10pix. Change the Y distance to 0
. Press Apply.
Select the small square and press Alt Ctrl D or Edit > Duplicate 15 times. This creates a row of 16 evenly spaced squares.
In the Page Options dialog change the X distance to 0 and the Y distance to -10pix (minus 10). Press Apply to apply the change.
With the Selector Tool (the arrow pointer), drag a selection rectangle around the row of squares. With the row of 16 squares selected, press Alt Ctrl D or Edit > Duplicate 15 times.
Reset the X and Y Duplication Distance, usually 20 and -20. Press OK to close the dialog and apply the changes.
TIP: Prior to Xtreme 5, Ctrl D was the command for duplicate. But Ctrl D now is the command to remove a mask (the same command as in
Photoshop). If like myself you don’t use the Mask function that often or at all, or prefer to remove it with a menu command, and if you have Xtreme 5 Pro, you can reset Ctrl Alt D to
Ctrl D using the Customize Key Shortcuts dialog (Utilities menu).
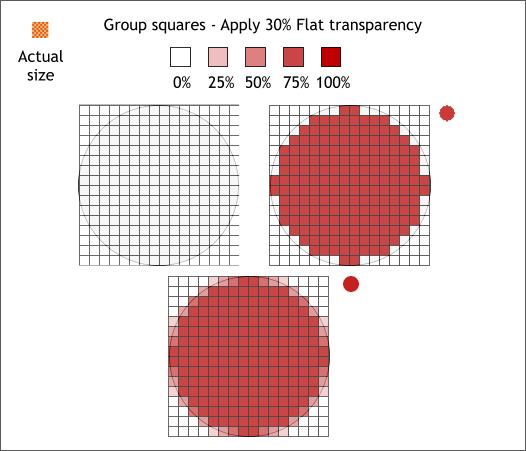
The small checkered shape in the upper left is the actual size of a Favicon. Each of the checks is four squares and at that they barley show.
Drag a selection rectangle (marquee select) around the 256 squares and group them (Ctrl g or Arrange > Group). Change the fill to white by clicking the
white color square on the screen palette.
Select the group with the Transparency Tool (F6), move the transparency slider to 30 and press Enter to apply the change.
Select the Ellipse Tool (L). Hold down the Ctrl key and drag a circle 160 x 160 pixels. Change the fill color to gray. Send the circle to the back (Ctrl b) or Arrange
> Put to Back) Center the circle behind the grid.
Select each square that is entirely inside the circle (shown top right) and apply a red fill (hold down the Ctrl key to select a square inside of the group).
TIP: Ctrl click on any of the squares on the far right of the grid. Press the Tab key to select the next square to the left. Repeat this to cycle through the entire row.
The example top right shows only the red squares that fall inside the outline of the circle. To the right of the grid is an actual size image. You can see that it looks like a circle, but it is not very smooth.
At the top of the illustration above, I have created a 3-step blend between white and red. We can use these colors to create intermediate colored
squares to smooth the outline of the circle. We are in fact anti-aliasing the circle. The percentages shown beneath each of the blend colors represents
the approximate area of the squares that are outside of the circle or overlap the circle. 50% for a square that is half in and half out of the circle. 25% for a
square that is only one forth inside of the circle, and so forth as shown on the bottom example.
The actual size reduction (with no transparency and no outline) appears to be a smoother circle. The intermediate colored squares smooth the outline and
actually give the impression that the small 16 x 16 pixel circle is sharper.
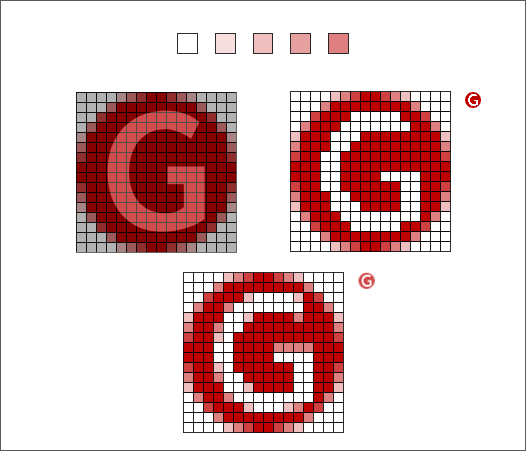
Now we can add a letter or symbol, in this case a G. I have added a dark gray square so that the letter G which is white, will show through the grid.
In the top right example the white squares only appear inside the G.
In the bottom center example, I have filled the intermediate grid squares to anti-alias the G as you can see in the actual sized image to the right. I used a different blend of pink to white this time.
So, this is how you could create a Favicon if you really like to do a lot of busy work.
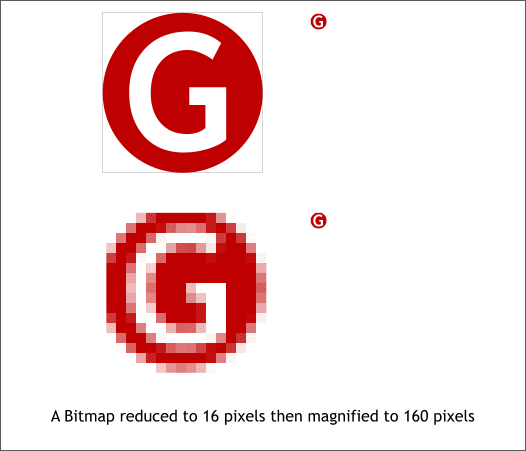
In the example shown above, I created the design in a square, and reduced the size to 16 pixels. Then I enlarged the 16 x 16 pixel bitmap to 160 pixels to
show the anti-aliasing which is almost the same as the example we created by hand. (I set the View Quality to Full Color (Window > Quality > Full Color).
This turns off the anti-alias view quality and shows the individual pixels.
You can use your small bitmap icon, as a Favicon but if you do, you will need to add a line of code to a placeholder image and assign it a HEAD tag. See this thread in the TalkGraphics forum for the actual code. But there is an easier way. And that is to create an *.ico image. Basically, an *.ico file is a bitmap
image that your browser recognizes as an icon file.
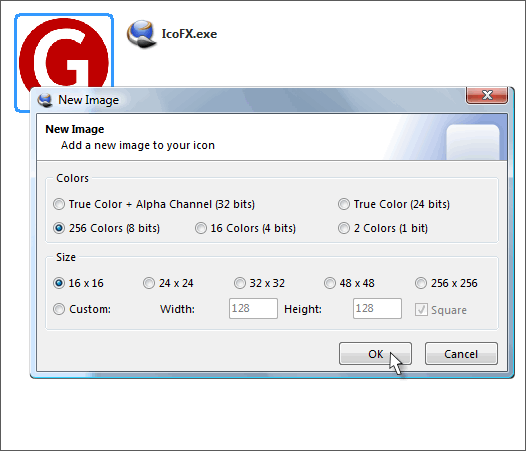
To do this we can use a free utility called IcoFX to create the ico image. Click here to go to the IcoFX home page to download a free copy.
It’s easy. Just drag the bitmap image (it can be any size) onto the window. Select 256 Colors.
Check the 16 x 16 radio button and press OK.
Save your image as a Windows Icon (*.ico) and give it the name Favicon.
And that’s it!
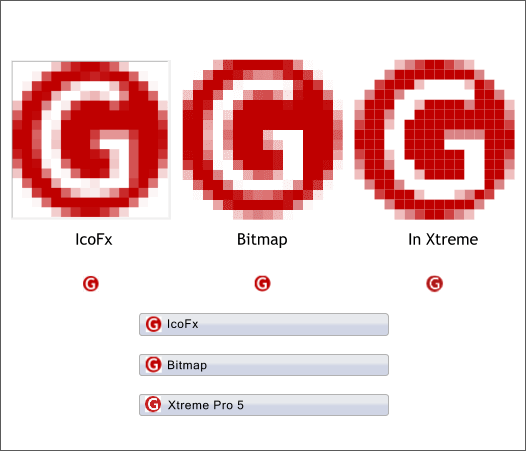
By way of comparison here are three methods, and how the actual icon looks on the browser page tab. I think IcoFx does the cleanest job.
NOTE: If your image has a transparent background save it with the transparency enabled in Xtreme, PNG True Color with Alpha. It will retain the transparency in the 256 colors option.
The final step is to place your Favicon.ico image in the same root folder on your website as your index.htm or index.html file. This will require an FTP
utility of which there are plenty to choose from on the web. I use CuteFTP but any FTP program will work such as FileZilla which is free. The browser (Firefox,
Internet Explorer, or Google Chrome—I have not tested this in other browsers) will recognize the Favicon.ico file and automatically display it the page tab or
the bookmarks section. You may need to refresh the page once or twice if the icon does not show immediately.
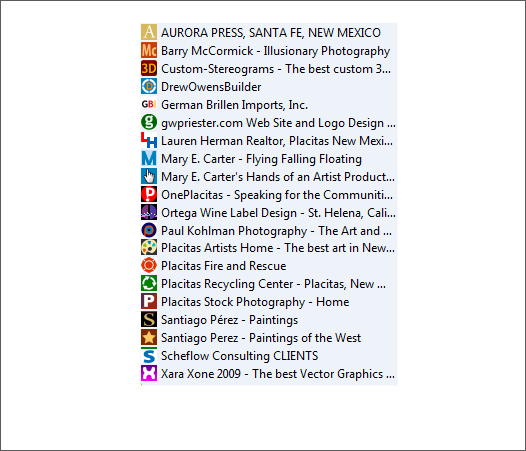
The screen capture above shows some of the Favicons I have created for various websites I manage. Simple is always better.
|