|
Xara Xtreme and Xara Web Designer
can create navigation buttons with three different button states: Mouse Off, Mouse Over, and Mouse Down. Everyone is probably familiar with the mouse off and mouse over effect. But a mouse down effect, when the website visitor presses the button, can add more interaction to your navigational design. And if you really want to be obnoxious, you can add a sound when your visitor clicks a button, such as a very loud click or a squishing noise, though be advised that such effects can loose their novelty very quickly.
For this tutorial we will create a silent 3-state button.
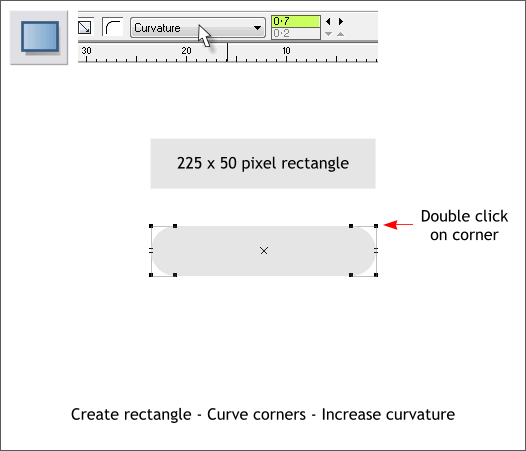
Select the Rectangle Tool (M) and draw a 225 x 50 pixel rectangle. This is about twice the size of a normal button but the large size makes it easier to see what we are doing.
TIP: Draw any size rectangle then change the width and height on the Infobar and press Enter to apply the change.
Double click on any corner of the rectangle with the Rectangle Tool to create curved corners. From the drop down list (shown above), select Curvature and increase the Primary Curvature Ratio setting to
0.7. This produces a capsule-like shape.
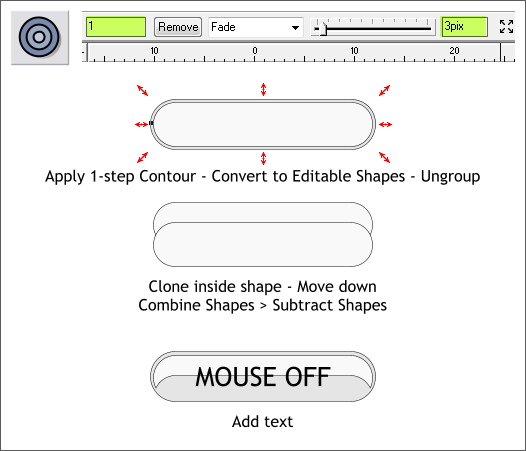
(Xtreme users only) Select the Contour Tool (Ctrl F7). Click on the capsule shape and drag any of the red arrow handles towards the center a short distance.
Change the Number of Contour Steps to 1 on the Infobar and press Enter to apply the change. Change the Contour Width to 3pix and press Enter.
From the Arrange menu, select Convert to Editable Shapes (or press Shift Ctrl s), then Arrange > Ungroup or Ctrl u.
Clone the inside shape (Ctrl k). Move the clone downward about 20 pixels. Hold down the Shift key (to select multiple objects), and click on the clone and the original inside shape.
From the Arrange menu, select Combine Shapes > Subtract Shapes, or press Ctrl 2. The top shape disappears and leaves a nice highlight shape.
Select the Text Tool (T) and add the text MOUSE OFF in a font of your choice and about as large as shown above. On your actual navigation button you will have something more practical such as
HOME or MY GALLERY. But for this example we’ll change the text for each button state to help keep track of which button is which.
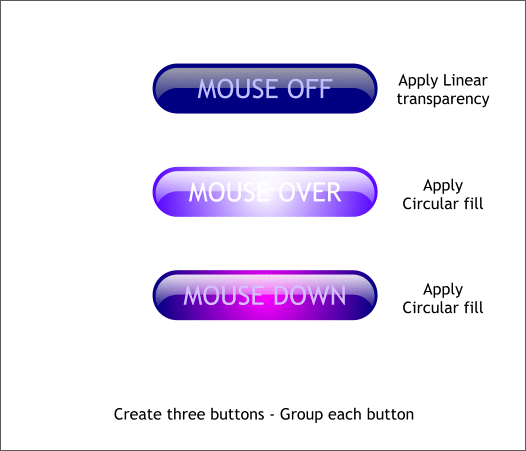
Make two duplicate buttons (Ctrl d) and change the text to designate the other two button states.
Apply different fills to each button to make each different from the other. Select the highlight shape, the select the Transparency Tool (F6). Click and
drag downward from the top of the highlight shape to just below the center of the button to create an interactive Linear transparency.
With the Fill Tool (F5), apply Circular fills to the Mouse Over and Mouse Down buttons.
Group the objects for each button (Ctrl g).
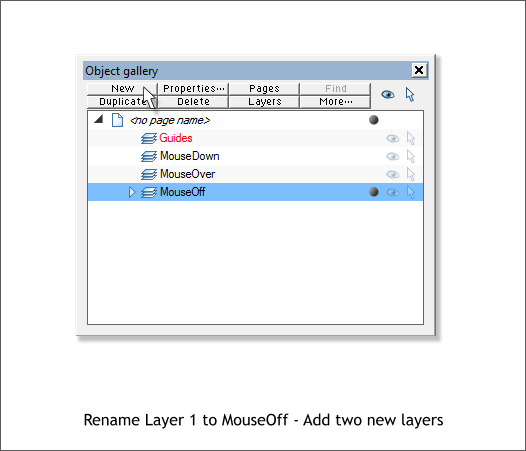
Open the Object Gallery (F10). If you are using Xara Xtreme, rename Layer 1, MouseOff (in Web Designer the first layer is already named MouseOff)..
Press New and and a new layer, MouseOver and add another new layer MouseDown.
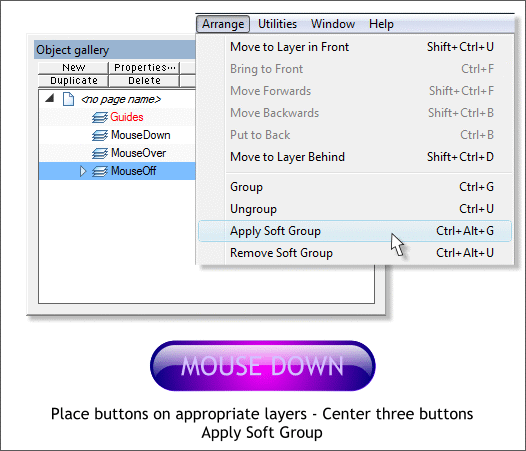
Place each button on the appropriate layer. For example, in the Object Gallery,(F10) select the MouseDown layer, cut the MOUSE DOWN button to the clipboard (Ctrl x
) and then paste it onto the selected layer (Ctrl v or Edit > Paste). Repeat this step for the MOUSE OVER button.
When each of the three buttons is on the correct layer, drag a selection rectangle with the arrow pointer, the Selector Tool (F2) around the buttons.
The status line in the lower left portion of the screen should indicate 3 Groups Selected.
From the Arrange menu, select Apply Soft Group.
NOTE: In normal circumstances, if your three buttons all have the same name, HOME, for example, and if the buttons are soft grouped, you can
edit the text on one button, change HOME to HOME PAGE for instance, and the text will automatically change on the other buttons in the soft group. You can also change the font, style and size.
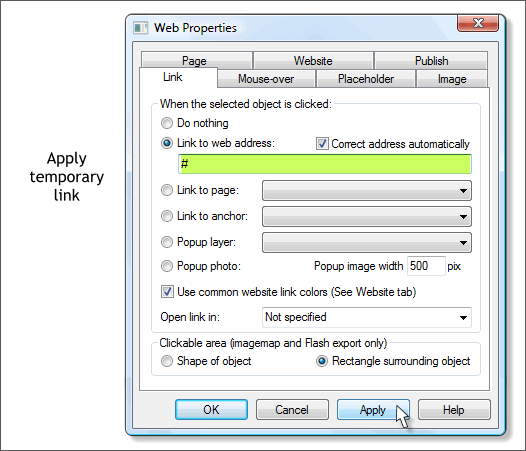
To test the button, we’ll add a dummy link. Open the Web Properties dialog (Utilities > Web Properties or Shift Ctrl w). In the Link tabbed section, key
in a single pound sign (#) in the Link to Web Address: text entry box and press Enter to apply the change. This is a link to nowhere. But if lets us see if the button effects work.
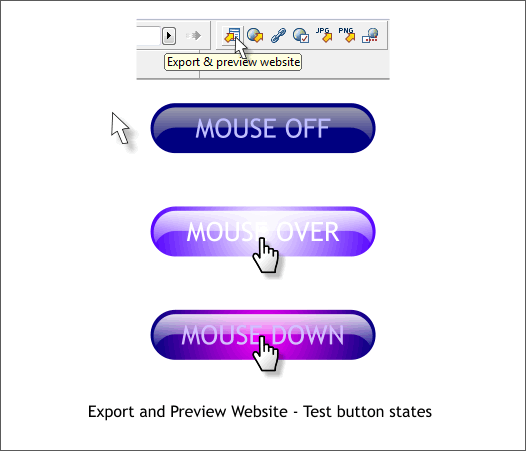
Press the Export & Preview Website icon or File > Preview Website. If your buttons are all on the correct layers and linked, you will see the three button states.
If your buttons do not work, go back and make sure that each button is on the proper layer and that the layers are named correctly with no spaces
(mousedown vs, mouse down). And if still no luck then make sure the buttons are linked to something. If your button is not linked, then the mouse over effects will not work.
If you see nothing at all in the preview window (ack!) then check to make sure your MOUSE OFF button is on the bottom layer.
Comments and questions are welcome. Hearing from you also lets me know that at least one or two persons are looking at these tutorials and short articles.
Gary W. Priester
Your Editor
Send e-mail
|