|
|
|
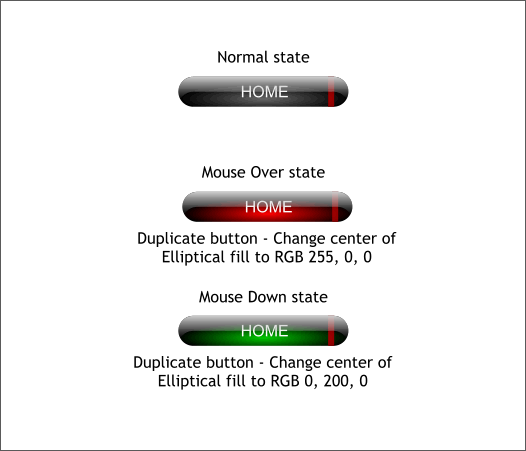
We'll place the three button states on three individual layers and Xara will write a script on export that makes the buttons work. It's magic. After we have the banner and buttons designed, we will build the actual web page and add some simulated content. Your editor (that's me) will show you how to add links to your buttons so you can go from one page to another or to an outside website or even an object on the website. We'll start with the banner. And remember, these sizes are arbitrary. You can make your buttons and banners as simple or as complex as you wish and any size.
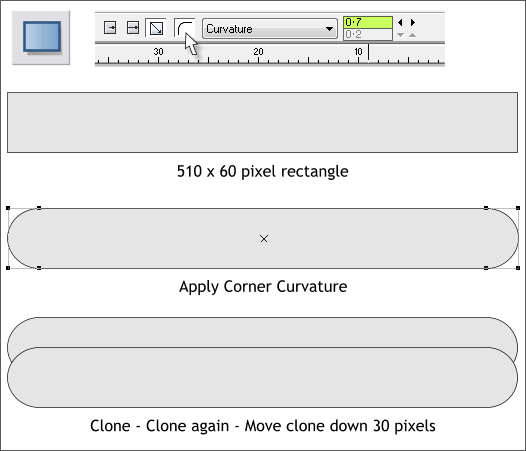
Using the Rectangle Tool (keyboard shortcut M), create a rectangle to the size shown above. Press the Curved Corner icon, or double click on any corner with the Rectangle Tool . From the drop down list of Slider Types, select Curvature and change the setting to 0.7. Press Enter (or Return) to apply the change. Clone this capsule shape two times (Ctrl k Ctrl k) and move the last clone down 30 pixels. TIP: I set my nudge dize (the distance a selected object moves when you press any of the arrow keys on your keyboard) to 1pix in the Utilities > Options... > General > Nudge Size text entry box. If you hold down the Shift key, the selection moves 10 pixels with every click. So to move the capsule shape down 30 pixels, hold down the Shift key and press the down arrow key three times.
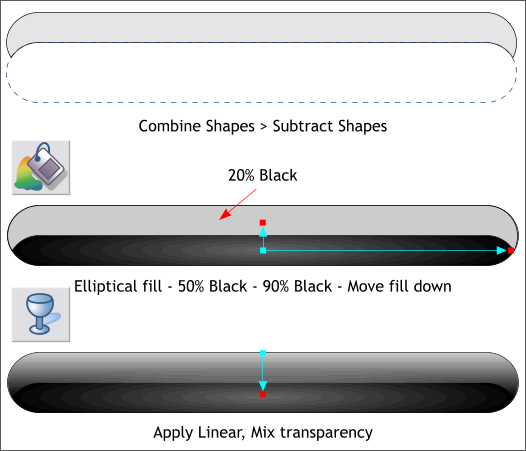
Hold down the Shift key (to select multiple objects) and click on the two clones to select both. From the Arrange menu, select Combine Shapes > Subtract Shapes or use the keyboard shortcut Ctrl 2. The bottom clone goes away quietly and without a fuss and takes away from the other clone, the area that was directly below it. Apply a 20% Black fill to the top subtracted shape. Select the full capsule shape and then select the Fill Tool (F5). From the drop down list of Fill Types on the Infobar, select Elliptical . Click in the center control point square (where the two arrows come together) and click the down arrow key on your keyboard a few times to move the center of the fill downwards as illustrated above. Click on the same center control point box and change the fill color to 50% Black. Click on either outside square and change the fill color to Black. To change a selected fill color, left click on the color on the screen palette or you can edit a specific color in the Color Editor (Ctrl e). Select the Transparency Tool (F6). Click on the top of the light gray shape and drag downwards to about the center of the capsule shape to apply a Linear transparency. This adds a reflected highlight to the capsule shape.
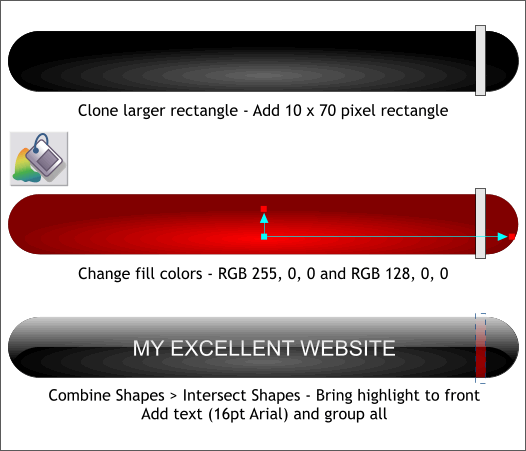
Clone the large capsule shape. The clone is added to the top of the objects. Add a slim rectangle to the right side of the capsule shape. Select the cloned capsule with the Fill Tool (F5). Change the two fill colors to the two RGB colors shown above. Use the Color Editor (Ctrl e) to edit the colors. Select the slim rectangle and the red cloned shape and from the Arrange menu, select Combine Shape > Intersect Shapes (or press Ctrl 3). All of the red capsule shape will disappear except the area that was directly under the slim rectangle. This elaborate step is necessary so the two elliptical fills match. Finally, add some text, in this case MY EXCELLENT WEBSITE, using the font and size shown above. Center the text over the capsule shape. Select the highlight shape and bring it to the front (Ctrl f or Arrange > Bring to Front). Using the Selector Tool (the arrow pointer) drag a selection rectangle around all the shapes and from the Arrange menu, select Group or press Ctrl g. TIP: Version X4 now offers two selection options. Dragging a rectangle around the entire shape or selection of shapes (the default), or one that just touches the selection shapes as Adobe Illustrator uses. You'll find this option in the Page Options > General section.
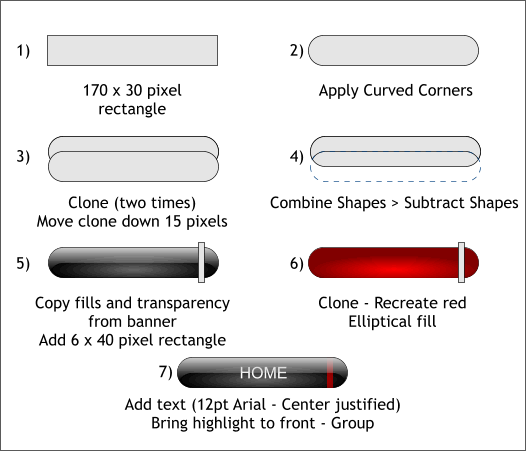
Using the same steps for the banner, create a button. The steps are outlined above. This will be the normal state button. Don't forget to group the button and text.
Make two duplicate buttons and change just the elliptical fills for the large capsule shape as shown. TIP: To select an object within a group of objects, hold down the Ctrl key and click on the object you wish to select. Now we have a banner and a button with three states. Save your drawing and take a short break. When you get back we'll create our first web page and some new layers for the different buttons.
|
||||||
|
|
