|
|
|
There have been many changes and additions to the Page Options menu for Xtreme and Xtreme Pro 3.2 (Utilities > Options). Some are more obvious than others and so your editor who is always looking out for your well being has attempted to cover them here.
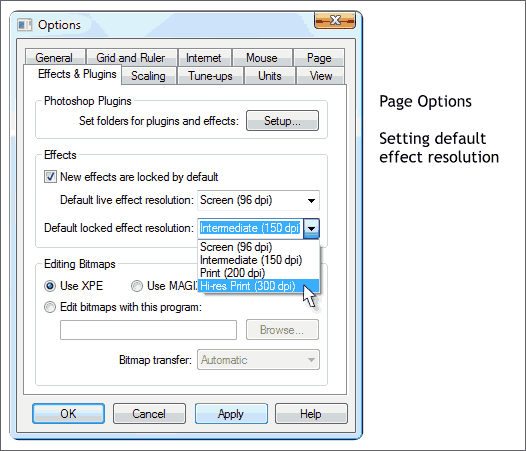
Let's look first at the Effects and Plug-ins tabbed section. In the Effects section there are new controls for setting Default resolutions. If you check Live Effects are Locked by Default, any Live Effects you apply will not be altered if you resize or move the object to which they have been applied. The Default Live Effect Resolution may be set depending upon how you intend to use the object to which the effect has been applied. If you are applying an effect to be viewed on screen or on a website, the select 96dpi. For desktop printing, 150-200dpi is adequate. For commercial printing, select 300dpi or higher (always best to ask your printing professional what resolution they require). If you set a higher Default Live Effect Resolution and you choose Automatic on the Live Effects Infobar, your specified resolution will be used. Otherwise selecting Automatic will default to 96dpi, Windows screen resolution. Default Locked Effect Resolution applies the selected resolution to all locked objects you create. If you wish to change the resolution, however, you need to recreate the effect. If this sounds a bit vague and unclear to you, you are not alone. I'm not quite sure I understand the differences either.
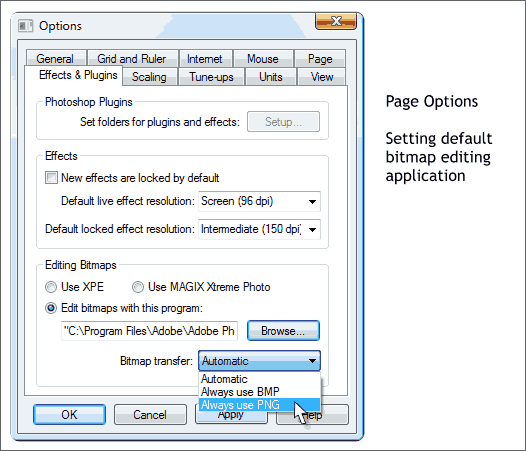
Xtreme 3.2 and Xtreme Pro 3.2 come with two bitmap editors: Xara Picture Editor and Magix Xtreme Photo. The Magix bitmap editor offers several features not found in the more basic Xara Picture Editor. Some of us may prefer other bitmap editors such as Photoshop or PaintShop Pro. You can select your default editor in the Editing Bitmaps section. For editing with Photoshop or PaintShop Pro, check Edit Bitmaps with this Program, press Browse and browse to the appropriate *.exe file. For example, for Photoshop, browse to C:|Program Files\Adobe\Adobe Photoshop\ and select Photoshop.exe . When you select Edit Bitmap from the right click pop up menu, the Utilities menu, or if you double click on a bitmap or a bitmap filled object (new with 3.2), Xara automatically opens your choice of bitmap editor. If you have selected XPE (Xara Picture Editor) or Magix Xtreme Photo, the changes you made will automatically be applied to the selection. In XPE when you press the red check mark icon. In Magix when you select Save. And lo and behold, when I just this moment tried this with Photoshop and saved my changes, the original image in Xtreme Pro was automatically updated! Wow! You can also specify how you want your bitmap to be transferred. The default is Automatic. You can specify Windows BMP or PNG. Always Use BMP is the fasted way to open an image in another image editor but BMP does not support transparency. Always Use PNG is slower but supports alpha channel transparency. Automatic lets Xara determine the best method.
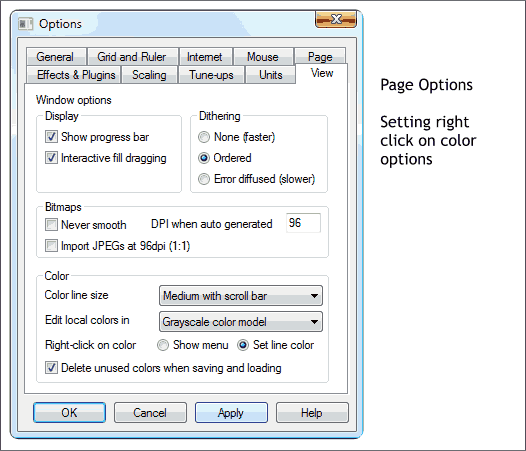
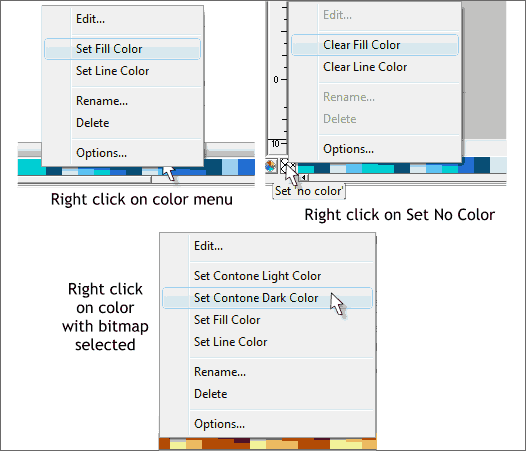
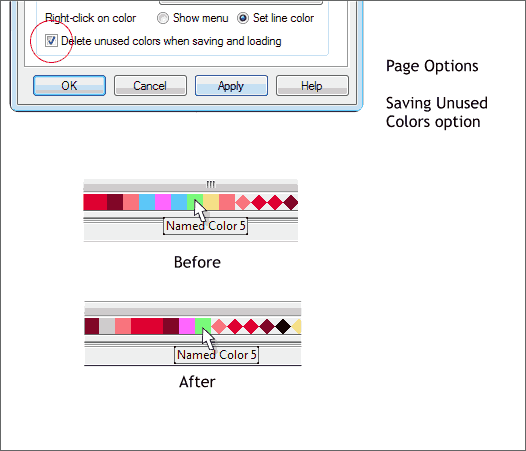
If you read my review of 3.2 in the last Workbook you will be familiar with several of these new settings (as well as some of my nonobjective views). Most digital cameras use JPEG as the default file format. The resolution can vary however. So in the past, when you opened these digital photos in Xara they like as not came in at the camera's resolution, 150 dpi or 300 dpi being the most common. Resizing the images to 1:1 (96dpi) was not always easy. If you check Import JPEGs at 96dpi (1:1) Xara will always import and display a JPEG image (no matter where it came from) at 96dpi. This means that some images will be considerably larger than the screen. So Xara automatically zooms out to show the entire image at 96dpi. (Some of your editor's photos are in excess of 30" wide). TIP: If your image was shot at 300dpi and you want to reduce the 96dpi image to 300dpi, reduce the size to 32% on the Infobar and press Enter. Long time Xara and CorelDRAW users know that to apply a fill color to a selected object, you click any color on the screen palette with the left mouse button. Right click any color to apply the outline color. Left or right click on the small crosshatched box to the left of the screen palette (Set No Color) to set the fill or outline to none. It has always been thus. Until version 3.2, that is. By default, now when you right click on any screen palette color, or the cross hatched Set No Color box to the left of the screen palette, a menu pops up with a set of options that may or may not be a welcome site. We grumpy old users who do not like change can simply check Set Line Color in the View > Color > Right Click on Color section and go about our business as if nothing ever happened. But you new users may find the pop up menu helpful and more intuitive. These pop up menus are covered next. The last new entry in this section is Delete Unused Colors. This applies to new Named colors you might have selected and this will be covered later on.
With a vector object selected, if you right click on any color, you have the options to Edit... the color in the Color Editor, Set the Fill or Line Color, Rename a color, or Delete the color from the palette if it is a Named Color. Options... opens the Page Opens Menu (we've come full circle) where you can say, hrump, I'm going back to the old way and check Set Line Color. Right click on the Set No Color crosshatched box and you have the option to set the Line or Fill color to none. If you have selected a bitmap and you right click on any color you will get a set of options to set a light and dark Contone Color (continuous tone). Xara has been able to create two color contone images as long as I can remember. In a contone image one color covers the lighter colors and the other color covers the darker colors. But this has never been intuitive. This new set of options makes creating a Contone image a no-brainer. Contone photos are covered on Page 4.
In the past, when you selected a color from the Web Browser Palette, that color was added to the right of the named colors (Red, Orange, etc.). In addition, mysterious duplicate colors often appeared such as White 1, White 2, etc. In short order the screen palette became a bit of a dog's breakfast (not a pretty sight). Version 3.2 handles colors differently. Unless you create a new Named Color, (See Workbook 43 - Editing Named Colors), Xara does not automatically place used colors on the Color Line (the screen palette). If you create new Named Colors however, these colors get added to the Color Line as shown in the Before example above. If these new colors are used in your drawing, they will appear on the Color Line the next time (and the time after that and the time...) when you open the document. If you have checked Delete Unused Colors however, and the colors have not been used, they will be gone the next time you open the document as shown in the After example. The pink and lime green colors and other named colors still appear because they have been used in the document.
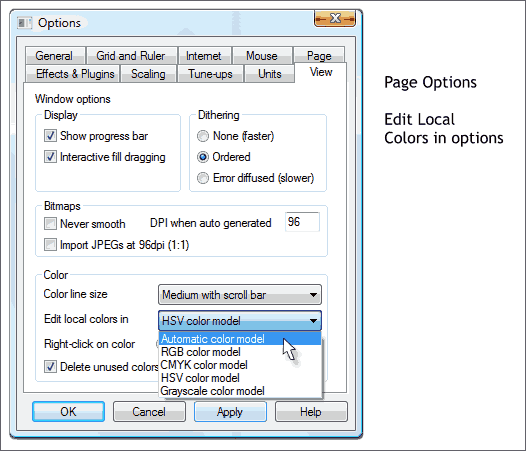
In the View > Color section there is a new option, Edit Local Colors In that lets you select what mode you want to see when you open the Color Editor (Ctrl e). A new entry, Automatic Color Model selects the color model based on how the colors have been defined. For example, if you have a document in which your colors are defined as CMYK then this is the mode Color Editor will open to CMYK Color Model. CONTINUED ON THE NEXT PAGE >
|
||||||
|
|


