|
|
|
In this tutorial, we'll use Xara's Apply Clip View to create a Flash animated banner with all shapes contained within a rectangle. If you are not familiar with the basics of creating a Flash animation, see Flash Animation Basics in Workbook 54. And for a more in-depth exploration of Flash, see Xhris's Ultimate Flash Tutorial in Guest Tutorial 66. There is also an excellent summation of Flash basics that you have the opportunity to view when you create a new Animation in Xtreme Pro.
From the File menu, select New > Animation.
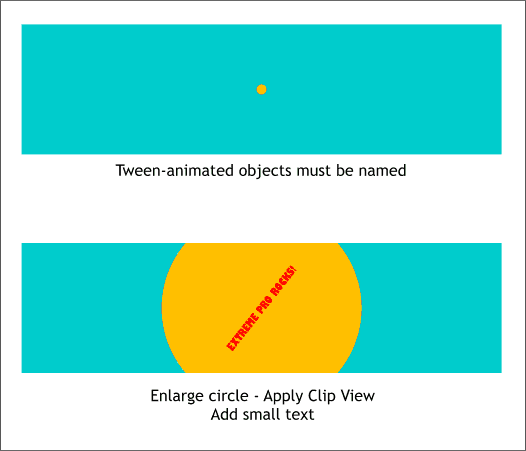
Create a rectangle the size of your ad banner. Centered inside the rectangle, add a small named circle. Zoom in very close and add a line of named text in the center of the circle that reads "EXTREME PRO ROCKS!"
In the new frame, select the circle and text. Hold down the Shift key and drag any of the corner bounding box handles (the black selection squares) outward until the circle is larger than the rectangle. Do the same with the text but do not make it as large. Click twice on the text to enable rotate/skew mode. Drag any of the corner rounded arrow handles to free rotate the text as shown above. Select the circle and the rectangle and Arrange > Apply Clip View. NOTE: We will ultimately use Apply Clip View (Arrange menu) to mask all the circles and text, that extends beyond the edges of the rectangles, inside of the rectangles. But this is a real hassle with the text. So leave the text on top of the rectangles until the end when you can go back and Apply Clip View to all of the text that needs to be masked. The text in the following examples has all been masked with Apply Clip View but only after all the frames have been created.
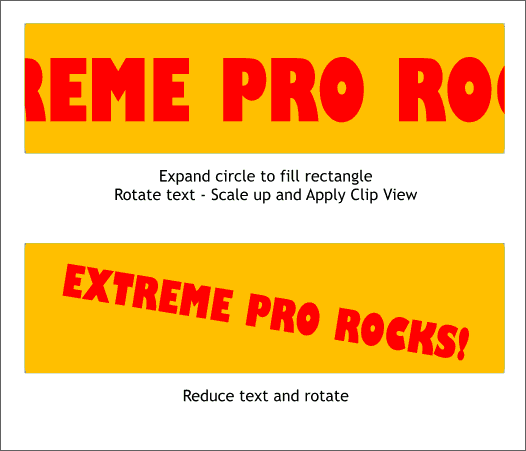
Press the Copy Frame icon. Hold down the Ctrl key and click on the circle to select it within the Clip View. Hold down the Shift key (to resize from the center) and drag any of the corner bounding box handles to enlarge the circle until it fills the entire rectangle. Rotate the text until it is parallel to the rectangle as shown in the top example above. Resize the text from the center (hold down the Shift key) until the text is as shown on the top example above. (Remember, your text will not be clipped until later). Press the Copy Frame icon. Reduce the size of the text and rotate it as shown above in the bottom example.
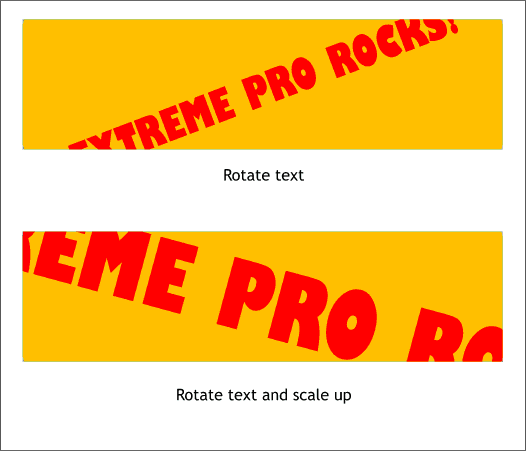
Press Copy Frame. Rotate the text in the opposite direction. Press Copy Frame. Rotate the text in the opposite direction again and enlarge it from the center as shown above bottom.
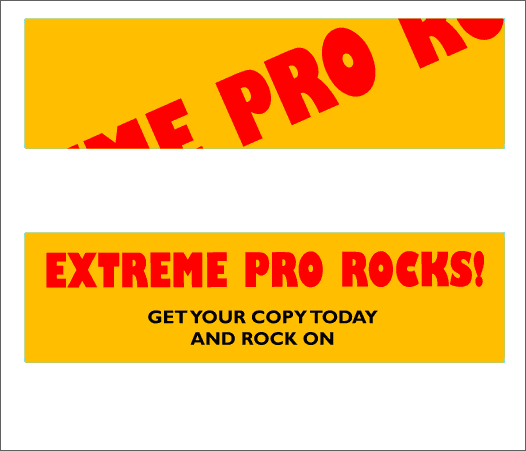
Press Copy Frame. Rotate the text in the opposite direction. Press Copy Frame. Reduce the size of the text and rotate it so the text is parallel to the top of the rectangle as shown above bottom. Add the text "GET YOUR COPY TODAY AND ROCK ON". Go back to the first frame by pressing the Previous Frame triangle icon on the Infobar. Now go forward frame by frame pressing the right facing triangle (Next Frame) and any text that is larger than the rectangle, select the text and the rectangle and Arrange > Apply Clip View. Export your Flash animation (File > Export Animation > Flash Animation).
Here is the final animated banner. NOTE: In Firefox browsers, you many need to right click on the banner and select Play and then Loop from the pop up menu to get the animation to play continuously.
|
|||
|
|


 Remember tweened shapes need to be Named (press the Create New Names yellow tag icon on the Infobar) and
give your shape a name (or let Xara automatically name your objects).
 Press the Copy Frame icon on the Infobar. This creates a new frame
will everything from the previous frame included.

