 |
 |
| H 1 2 3 4 5 6 Download Zipped Tutorial |
|
|
|
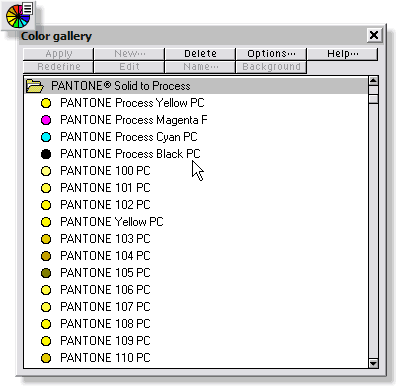
One of the least understood aspects of color are the Pantone® color palettes: Pantone Solid to Process, Pantone Process Coated and Pantone Process Uncoated. These three palettes are found at the very bottom of the color gallery. Shown below are the Solid to Process "Spot" colors.
What are Pantone colors? The Pantone Color Matching System goes way back to the days when most commercial printing was done using one, two or three "spot" colors. 4-color The system works like this. Users specify a spot color by number, for example PMS 300 blue from a book of swatches or a fan book. Each color is printed with a different solid color ink. The printer then looks up the color in his formula book and mixes specified quantities of special inks to come up with a color that exactly matches PMS 300. Because color looks different on coated printing stock versus uncoated printing stock, each spot color is specified in a coated (C) and uncoated (U) version, so Pantone 300 C is for coated paper and Pantone 300 U is specified for uncoated paper. NOTE: Pantone is constantly modifying its colors and adding new ones. The original Pantone spot colors all had 3 digit numbers. The current system has added intermediate colors using a 4 digit numbering system. So there may be numbers of new colors that do not appear in Xara's Pantone color palettes.
Pantone has a variety of other swatching systems including a set of pastel colors, metallic colors, Hexachrome colors (for printing with 6 colors--CMYK plus a special orange and green) fluorescent colors, and others. For more information on Pantone products visit www.Pantone.com. Pantone Process Colors
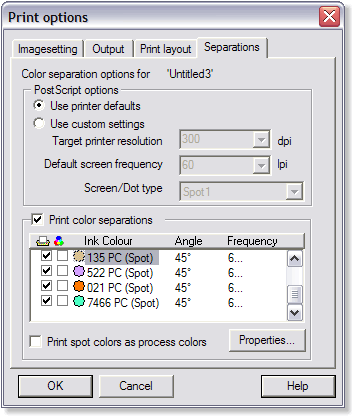
For example, the CMYK equivalent to Pantone 300 C is C 100%, M 0%, Y 0% and K 0%. So in essence, Pantone 300 C is really Cyan. But not all Pantone spot colors can be matched in CMYK. In fact only 1/2 can be matched exactly. 1/4 of the colors come close but not quite and the remaining 1/4 do not even come close. Sadly, this fact is not widely known and many unfortunate designers have specified some of these non-matching colors only to have disappointed clients when the job finally prints. TIP: When specifying a 4 color version of a Pantone spot color, select the color from a Process Color swatch book and compare it to the spot color version. If the colors do not match, inform your client of this problem before you go to the printers. Using Pantone Colors in Xara No two monitors are alike. No two viewing conditions (lighting, wall color, etc.) are the same. Hence viewing colors on the screen will vary greatly from monitor to monitor. And even in a perfect world where every user was viewing her and his monitor in the exact same viewing environment, you would have all the differences in monitors further muddled by various adjustments made by the users and by profiles supplied by the manufacturers. In short, selecting colors on the screen is a very iffy sort of proposition. Especially selecting Pantone spot colors. On the other hand, Pantone colors by their very nature are very exact. That is the whole idea behind their color matching system. But even here there are variables caused by a multitude of viewing conditions. Commercial printers and professional design and advertising companies have special light controlled booths and light boxes for viewing color transparencies, color artwork, and color printing. This allows for some consistency so that a viewer in one location can look at the same color proof in the same color controlled viewing environment as someone around the corner or around the world and make judgments about color as they are each looking at the same colors in the same viewing environment. Most of us do not have that luxury. My point? If you want to specify a Pantone color, either spot or process, do it from one of the printed swatch books or fan books. Do not assume for one moment that the Pantone color you see on your screen is anything but an approximation. If color is critical, and your client has specified a certain Pantone color for his or her printing job, then use the specifications for that color. If you are creating documents for CMYK printing, then work in a CMYK environment such as Minimiro's CMYK template. (And make sure your color units are set to % and not 0-255). Specify your Pantone colors by the CMYK percentages shown in the Pantone Process Color swatch book. Using Pantone Spot Colors Many times you may be printing a job using a few spot colors instead of CMYK. Remember that spot colors are intended to be printed as solid color inks (or screen tints of that color). While it is possible to create a blend or a gradient fill using two Pantone colors, doing so in Xara will convert the spot colors to process colors which is not what you want to do. If a job is going to be printed using spot colors you can create your art using black and white and percentages of black (grays). Export your job as an EPS file and include the Pantone color (for example PMS 258 U). Then when the printer prints your job, he or she can use Pantone 258 U ink. This just scratches the surface regarding Pantone colors. But I am hopeful that this small amount of information will keep you out of trouble when you design using these colors. When in doubt, talk to your printing professional. Printers work with these colors, and many other color matching systems, all the time and can give you useful tips and tricks for getting the best results with Pantone colors. Outputting Spot Colors If you planning to print a document using spot colors (remember spot colors are intended to be printed as specially mixed inks, and each spot color requires a separate printing press plate) Xara can help. NOTE: If you are using more than three spot colors, you might want to consider printing your job in CMYK instead. First of all, make sure that your document only contains SPOT colors. These can be from the Pantone Solid to Process palette, or colors you have mixed and then converted to Spot colors in the Name Gallery . (Select the color, open the Color Editor (Ctrl e), from the Color Type drop down list at the bottom of the Color Editor, select Spot. You will be prompted to Name your color and your color will now appear as a circle in the on-screen color palette and in the Name Gallery.) If your objects have outlines, make certain these outlines are one of the spot colors or set the outline to none. A black outline counts as a color. The best way to output your spot color separations (each color becomes a separate sheet of film) is to have your printing company or service bureau print directly from Xara X. For the most part this is not an option as very few service bureaus have Xara installed on their computers. The next best way to to create a *.PRN printer file. This file is exactly the same as if your printing company or service bureau were printing from within Xara directly to their output device. To create a printer file, you will need to determine from your printer what output device he or she will be using to output the film. More often than not, this will be a Linotronic machine. Once you have determined the output device you will need to install a printer driver for this device on your computer. Microsoft includes a wide range of printer drivers on the Windows CD. Alternately you can output to a generic PostScript device but the results may be as complete. Once you have an appropriate printer driver installed, open the Printer Setup dialog (File > Printer Setup) and select your printer and set up your page and paper options if necessary. Next open the Print Options (File > Print Options) (shown below). In the Separations tabbed section, check the Print Color Separations check box.
In the inks window, uncheck the check boxes for Cyan, Magenta, Yellow and Black (unless you are printing these colors in addition to the spot colors) and check the print check boxes for the spot colors you are printing. NOTE: If you have used more than 3 spot colors, you may want to have Xara convert these colors to CMYK and just output the 4 process colors. To do this, check the Print Spot Colors as Process Colors check box. Printing 4 or more spot colors may be more expensive than printing in CMYK.
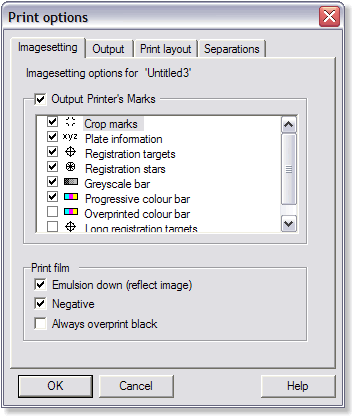
In the Imagesetting tabbed section you can select to Output Printers Marks to place these various marks on the film. You can also check if you want the film emulsion to be down or up and negative or positive. If you are not sure, ask your service bureau or printing professional for the proper setting.
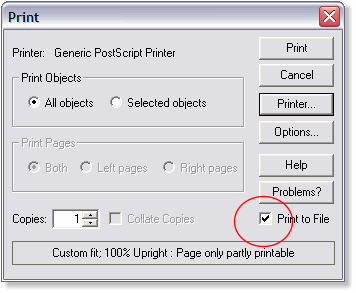
Now you are ready to create your printer *.prn file. Select File > Print. In the Print dialog, check Print to File. Check either All Objects to print everything on the page or Selected Objects to just print the selection. Press Print. Name your file and press Save. Xara will create a printer file which you can put on a disc and deliver, or e-mail, to your printing company or service bureau. Before you actually go to press, you should see and approve a color proof created by your printing company. If you are printing a job for a client, make sure your client sees and signs off of the color proof before you start printing. Is is cheaper to made changes to a job before you go on press than having to reprint the job. The PDF Option If you have access to Adobe Acrobat Distiller (or a similar product) specify Adobe PDF (or similar product) as the Printer. Uncheck Print to File. Make sure are the other settings are already set according to the previous instructions and Print. Your PDF file will contain the printers marks and a separate page for each color in your job. Most printers prefer to receive a job as a PDF file and this eliminates the need to use a specific printer driver. In addition you can see the results of the separations right in the PDF window after you have saved the job. I hope this information has proved helpful. I have tried to include as much information as I could. For more information, press Help in any of the Print dialogs for a more in-depth description of the various options.
|
||
|
|
 process printing (CMYK) was very expensive and limited to magazines and very costly brochures. A uniform standard way to specify color was needed
and Pantone filled this need with their Matching System for specifying solid color (spot) inks.
process printing (CMYK) was very expensive and limited to magazines and very costly brochures. A uniform standard way to specify color was needed
and Pantone filled this need with their Matching System for specifying solid color (spot) inks.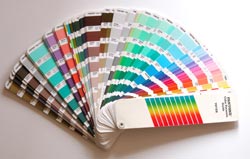 For variations and to make the colors go farther, another Pantone Spot Color
swatch book shows each colors in screened tints from 90 to 10%. Another Pantone swatch book shows how two, three and four spot colors can be combined to create duotones, tritones and quadratones.
For variations and to make the colors go farther, another Pantone Spot Color
swatch book shows each colors in screened tints from 90 to 10%. Another Pantone swatch book shows how two, three and four spot colors can be combined to create duotones, tritones and quadratones.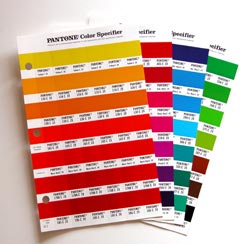 As four color printing, also known as
process color printing (CMYK are the four process colors) became more affordable, many clients asked their printers to match certain Pantone spot colors in CMYK. One reason for this was to match
a specific color used for a corporate logo. So Pantone answered this need by creating a new set of swatch books that provided CMYK percentages to match their spot colors.
As four color printing, also known as
process color printing (CMYK are the four process colors) became more affordable, many clients asked their printers to match certain Pantone spot colors in CMYK. One reason for this was to match
a specific color used for a corporate logo. So Pantone answered this need by creating a new set of swatch books that provided CMYK percentages to match their spot colors.