 |
 |
| H 1 2 3 4 5 6 Download Zipped Tutorial |
|
|
|
Perhaps the best way to get your TIFF image to the printer is to hand over the RGB TIFF file and to let the printer do the conversion to CMYK. While many printers will be more than happy to do this for you, some humorless printing professionals would rather you did this yourself. NOTE: Commercial printing companies require images at higher resolution than what is needed for screen display (web pages for example). Windows screen resolution is 96dpi (dots per inch). Commercial printers require images to be 266 dpi or larger. Check with your printer and see what resolution they prefer to receive your images. If your printer asks for 300dpi and you have lots of type in your image, it is not a bad idea to export your image at a higher resolution, such as 600dpi and let your printer downsize the image at his end. The easiest way to convert your RGB TIFF to CMYK is to import the image into a bitmap editing program such as Photoshop, Corel Photo-Paint, Jasc Paint Shop Pro or other bitmap editing and paint applications. All of these applications offer a one-step mode change to CMYK. You can also make some additional enhancements to the image if necessary. For those of you who do not have one of these applications there are several useful freeware utilities on the Xara Xone Shareware page.
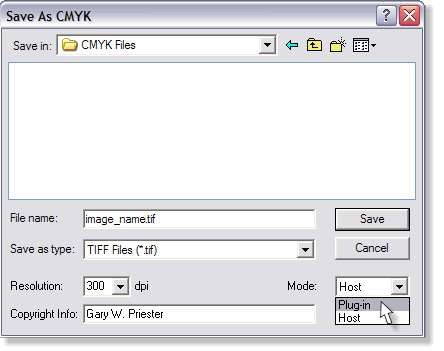
x-Port CMYK is a Photoshop compatible plug-in created by Sean Sedwards that allows Xara X to export CMYK TIFs. It works by converting a 24-bit (RGB) bitmap copy of your artwork and can use either Xara's or its own conversion algorithm (Host or Plug-in), each having different advantages. It also allows copyright information to be embedded in the file. NOTE: I have found the Plug-in option better than the Host option. On my computer, the resulting CMYK file has a pale tan caste. This may be due to my monitor profile, although I am not sure of this. The zip file contains the plug-in (xcmyk.8bf) and a readme file (readme.txt). Installation consists of placing the plug-in in your Xara > Plug-ins folder. No other files are needed. Click here to download your free copy of Sean Sedwards' x-Port CMYK (about 2/3 rd down on the page). If you know from the beginning that you will be creating a document for CMYK printing then it is useful to configure Xara for this color space. Minimiro's CMYK Color Model Template does most of the configuring for you. Minimiro's CMYK Color Model Template
The Solution: The CMYK Color Model Template is configured to work in CMYK color space and will display colors using the CMYK Color Model. Download the zipped file. Open it, and save it as template! (File > Save As Template...). Save it in the Xara Templates folder and it will be available when you go to File > New... (to display the template files). Unless you plan to make this your default template, do not check the Use As Default Template check box. Click here to download the template (3K). NOTE: You may need to set your Color Units: to Percent (%) (Utilities > Options > Units). Xara uses your current color units setting. Also, you may need to change Edit Local Colors to CMYK (View tabbed section) as Xara uses your current settings for this too.
The colors you see on the screen may not print the same in CMYK. If matching color is critical, it is important that you select your colors from a CMYK color swatch book such as Pantone Process Colors or TruMatch Swatching System (this is covered on the next page). Then assign the CMYK percentages to your objects in Xara in the Color Editor ( Ctrl e) using the CMYK Color Model and with your Color Units: set to Percent (Utilities > Options > Units). So far so good. However, if you make a palette of colors with these exact CMYK values, export this palette as an Uncompressed TIFF file and import the file into Photoshop, convert the color mode to CMYK, the percentages of the colors will have changed dramatically. At this point you may smack yourself up side the head and yell at the top of your lungs, "WHAT IS THE POINT OF ALL THIS? DO I REALLY NEED THIS AGGRAVATION?!" This is where Brian's rgb2cmyk comes to your rescue. Export your file as a TIFF file with no compression and at the appropriate resolution. Open the file in rgb2cmyk , (the conversion to CMYK is made automatically when you open the TIFF file) and then save the file. Now if you open the file in Photoshop and check the colors with the eyedropper tool, your sanity will be restored. The CMYK percentages are exactly the same as when you initially exported them from Xara X. Click here to be transported to Brian's SmokingGun.co.uk to download rgb2cmyk and Brian's other cool utilities. Thanks Brian. And thanks to Sean, and Minimiro, and all the folks who have provided these valuable tools to help us get the best results from our printing companies.
|
||
|
|
 rgb2cmyk is a freeware utility program created by Brian Etherington
for converting Xara X Pantone CMYK images exported as RGB TIFF files back to accurate Pantone CMYK format Tiff files. For more about Pantone colors, see the
rgb2cmyk is a freeware utility program created by Brian Etherington
for converting Xara X Pantone CMYK images exported as RGB TIFF files back to accurate Pantone CMYK format Tiff files. For more about Pantone colors, see the