 |
 |
| H 1 2 3 4 5 6 |
|
|
|
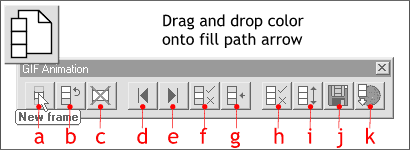
Close Xara 3D and open Xara X. Press the New Animation icon on the top left portion of the Infobar to open a New Animation window. The Animation window looks the same as the normal Xara Drawing window except now the Gif Animation icons on the Infobar will be enabled. (Some will be grayed out until they become available). If you do not see the Gif Animation icons (shown above) open the Window menu, select Control Bars... and check the Gif Animation check box. For those of you not familiar with the Animation buttons, here is a very brief description: a. New Frame, creates a new animation frame. b. Copy Frame, creates a new frame and copies the contents of the current frame to the new frame. c. Delete Frame, deletes the current frame. d. Previous Frame, steps back one frame with each click. e. Next Frame , steps forward one frame per click. f. Frame Properties, opens the Frame Properties dialog in which you can set frame duration, and other options. g. Preview Frame, opens a preview window. h. Animation Properties, opens the Animation Properties dialog which is the same as the Frame Properties dialog except it applies to the entire animation. i. Preview Animation, opens a preview window and plays the animation. j. Export Animated GIF, opens the export dialog. k. Preview Animation in Browser opens your default web browser and displays the animation along with color depth, file size, animation dimensions, and other useful information.
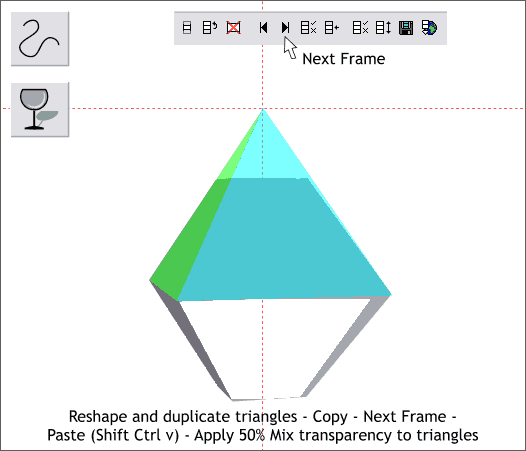
From the File menu, select Import. Browse to the folder containing your Xara 3D 5 exported GIF animation and import it. You will see that all the GIF Animation buttons are now enabled. All 24 frames have been loaded. You can press the previous and next frame buttons to step forward and backward. Select the QuickShape Tool. Set the number of Sides to 3 and disable the Starred Shapes icon (the star). Hold down the Shift and Ctrl keys and drag a triangle. Position the triangle over the first frame bitmap, change the color to cyan and apply some transparency so you can see the bitmap under the triangle. Resize the triangle to fit the top half of the bitmap as shown and squash the top of the triangle down a bit so the sides align with the bitmap shape. Convert the triangle to Editable Shapes (Arrange menu) and using the Shape Editor Tool , select and delete all but the three corner points. Copy the triangle to the clipboard (Ctrl c).
Press the Next Frame button. Paste the triangle from the clipboard using Shift Ctrl v. Using the Shape Editor Tool, drag the sides of the triangle to fit the bitmap as shown. The top of the triangle (and all future triangles) should align with the intersection of the two guidelines. Duplicate the triangle (Ctrl d), change the color to green, and using the Shape Editor Tool , reconfigure to fit the left triangle as shown above. Copy the two triangles to the clipboard, advance to the next frame, paste the triangles and resize to fit. Repeat these steps until the next side of the pyramid appears and change the color to magenta (or any color you like). Continue to step through all the animation frames until you have added triangles to each of the 24 frames.
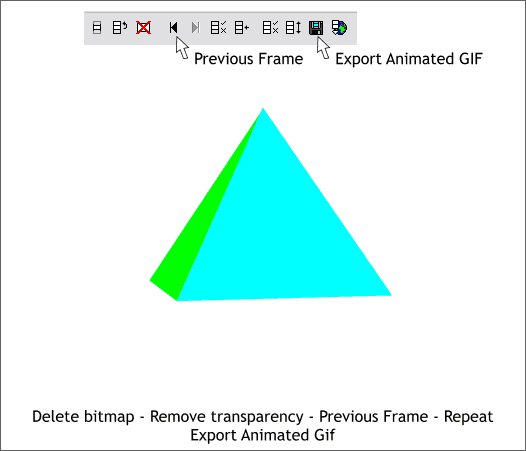
When you reach the last frame (the Next Frame button will be grayed out), delete the guidelines, delete the bitmap, and set the transparency to none. Press the Previous Frame button, delete the bitmap and set the transparency to none. Keep repeating this step until you reach frame one. Press the Export Animation button and save your GIF Animation.
And this is how your final animation should look. If anyone discovers a better way to do this, please let me know and I will share the information with everyone next month.
|
|
|
|
|
|
|