 |
 |
| H 1 2 3 4 5 6 |
|
|
|
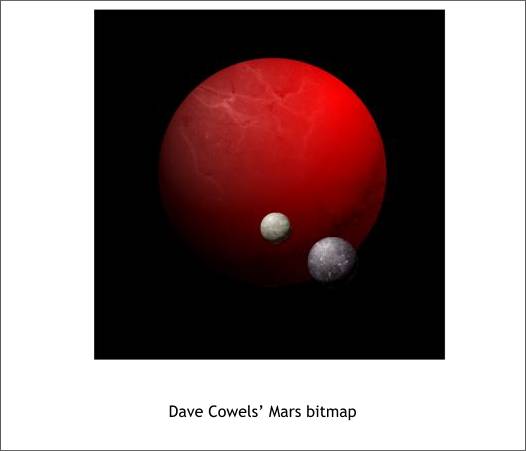
Dave Cowels posted a message/challenge in the Xara Conference "I was fooling around and did a little picture of Mars that I though turned out good. I realized I did not know how to do a concave bevel like for a crater, volcano, or bowl. Is this possible? If so, what might be the best way to do the tapered rim of the crater?" Here is what I came up with.
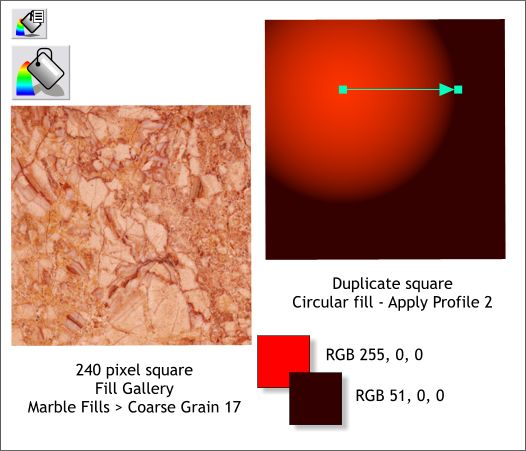
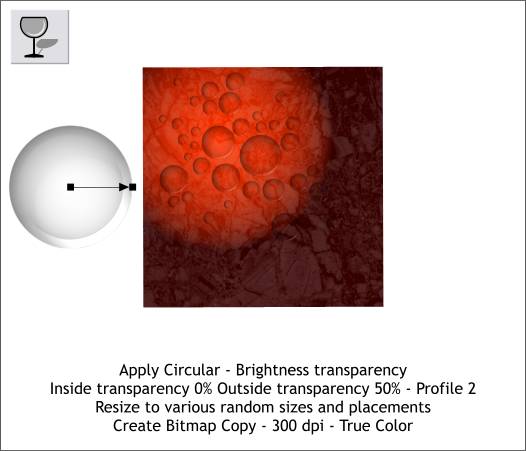
Create two 240 pixel squares. Apply a Coarse Grain 17 fill from the Fill Gallery > Marble Fills folder. Apply a Circular fill to the second rectangle using the two colors shown. Move the center of the fill up and to the left. Use the two colors shown. NOTE: The fills for the Fill Gallery are on the Xara X CD. To add fills to the Fill Gallery, open the Fill Gallery, click Disc Fills... and browse to your CD drive (the Xara X CD must be in your CD drive). Find the Fills folder and double click it. Click Add. Xara will add folders containing thumbnail images for all the fills in your Fill Gallery . The actual fills remain on the CD however. To apply a Circular fill, select the square with the Fill Tool then select Circular from the drop down list. Drag the center control handle of the fill as shown. Click on the control handle on either end of the fill path arrow then open the Color Editor (Ctrl e). Select RGB Color Model from the drop down list and enter the RGB values shown in the R, G, and B text entry boxes.
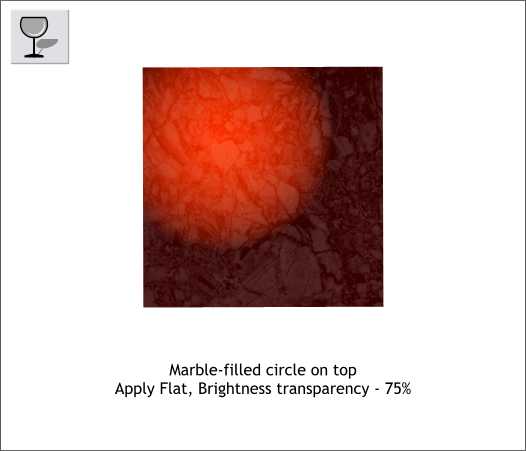
Center the marble-filled square over the circluar-filled square. Select the marble-filled square with the Transparency Tool. From the Transparency Type drop down list on the Infobar, select Brightness . Move the Transparency slider on the Infobar until the percentage reads 75%.
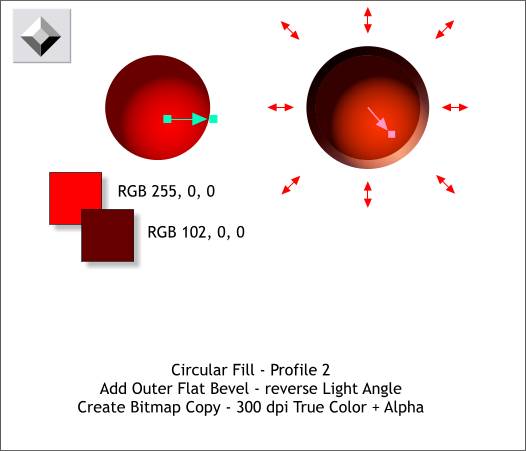
Draw a circle approximately 100 pixels in diameter. Apply a Circular fill using the two colors shown above left and position the center of the fill in the lower right area of the circle. Select the circle with the Bevel Tool and pull any of the red arrow handles outwards just a little to apply an Outer Bevel. Drag the Light Angle control arrow (in the center of the shape) until it is pointing down and right as shown. With the beveled circle selected, select Create Bitmap Copy... from the Arrange menu. Set the Resolution to 300 dpi and press Create.
Select the bitmap with the Transparency Tool. From the drop down list of Transparency Shapes, select Circular and from the drop down list of Transparency Types select Brightness. Click the square on the inside of the circle and move the Transparency slider to on the Infobar to 0. Select the outside square (at the tip of the arrow) and change the Transparency slider setting to 50 %. Click the Profile arrow icon on the Infobar and select Profile 2 from the drop down list of presets. Resize the bitmap to about 1/3 size and make a series of larger and smaller duplicates and position them as shown above. When you have a good number of craters, select the squares and the craters and Create Bitmap Copy, True Color,(not True Color + Alpha) with a resolution of 300 dpi. TIP: The fastest way to make a duplicate is to drag and duplicate. Drag the object and before you release the left mouse button, click the right mouse button to drop the duplicate. Resize, the drag and duplicate again, etc.
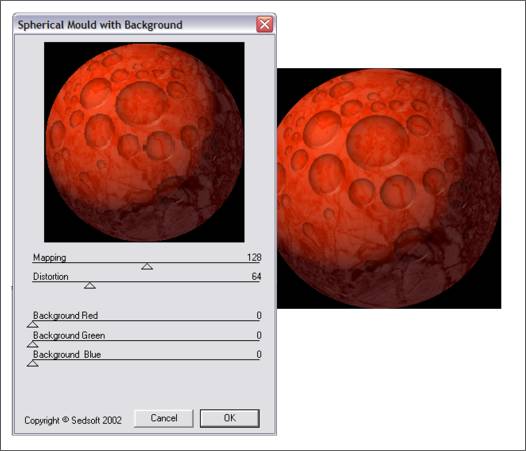
We will use Sean Sedwards' SS Mould plug-in filter to turn the square into a spherical shape. You can download the plug in here. (We will be using the new and improved Shareware Spherical version). Place the plug-in filter file in Xara's Plug-ins folder. (Read the ReadMe.txt file for Shareware information). Select the bitmap, then from the Utilities menu, select Bitmap Effects and Plug-ins. From the flyout menu, select Mould > Spherical Mould with Background. Set the Mapping slider setting to around 128 and the Distortion slider setting to around 64. Press OK and your bitmap should now look like the example above.
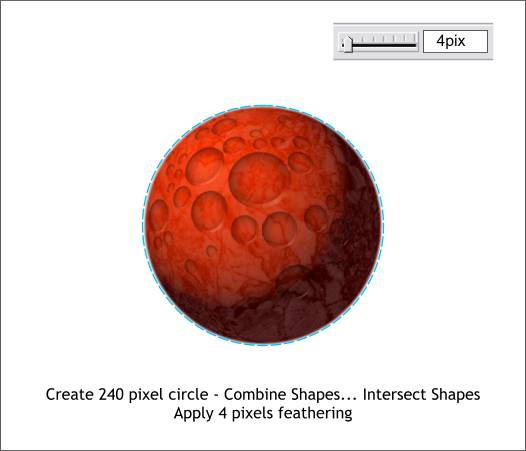
Draw a circle the same diameter as the bitmap (240 pixels). Center it over the bitmap and Arrange > Combine Shapes... Intersect Shapes. This masks the bitmap inside the circle.
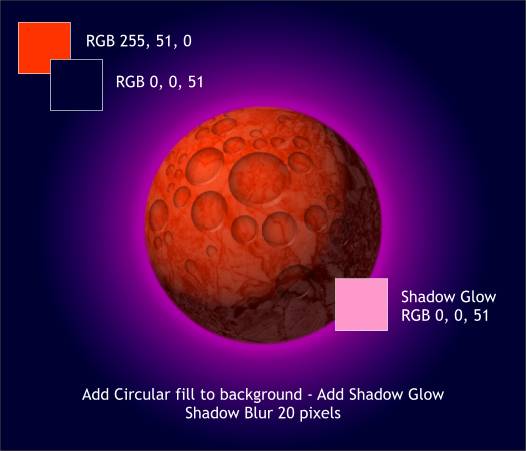
Add a rectangle behind the cropped sphere and apply a Circular fill using the two colors shown. Center the fill behind the sphere. Select the sphere and using the Shadow Tool, apply a Glow Shadow. Change the Shadow Blur slider setting on the Infobar to 20 pixels to extend and soften the glow. Click on the pink square on the color palette and drag and drop it onto the glow.
Duplicate the background rectangle and change the fill to Fractal Clouds and change the fill colors to black and dark blue. Stretch the fill path arrows until you have a cosmic nebulae look. Apply a Circular, Bleach transparency. And that kind of looks like a red planet with craters.
|
|
|
|
|
|
|