|
|
|
|
|
||||
 |
|||||
|
I have seriously considered renaming the Xara Xone to The Xara Xone featuring the creativity of Christine Farrelly. Honest! Not only did Christine contribute some cool lace brushes to the Fills and Brushes page (along with her existing entries) she also sent your editor the idea that became this fun tutorial.
Step 1 Key in some text in a thin font such as Arial Narrow. I'll leave the words up to you. (Christine's example said "Eloise", her enchanting granddaughter).
Step 2 Select the Contour Tool then select the text. Drag away from the text to apply an Outer Contour. Change the Contour Width to 5pix and press Enter. Click the Miter Join icon. If you are not familiar with the Contour Tool, click the other joins to see the difference each makes. Select the contour and from the Arrange menu, select Convert to Editable Shapes. From the Arrange menu now select Ungroup. The text and the contour are now two separate shapes.
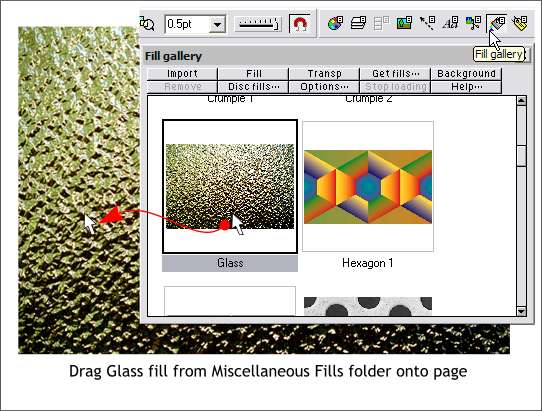
Step 3 Open the Fill Gallery and from the Miscellaneous Fills folder select Glass and drag it onto the page. Adding Fills: If you have just installed Xara X and have no fills or have never installed the fills, put the Xara X CD disc in your CD drive. In the Fill Gallery , press Disc Fills... Xara will attempt to locate your CD drive. If it does not find it, browse to the CD drive. Locate the Fills folder. Double click on the Fill folder icon then press Add . Xara will tell you that no index exists, etc. Say that you would be happy to have Xara perform this useful function for you (OK). Xara will add all the Fill folders on your hard drive plus small thumbnail images for each fill. The actual fill images remain on the disc.
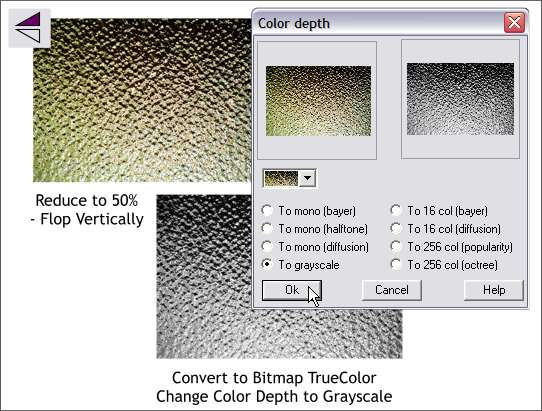
Step 4 Reduce the size of the fill image by one half by entering 50 in either the Height or Width % text entry box on the Infobar. Press Enter to apply the change. Right click on the bitmap and from the pop up menu, select Bitmap Effects and Plug-ins... Bitmap Effects > Color Depth. Check the To Grayscale radio button and press OK.
Step 5 Right click again on the bitmap. This time from the pop up menu, select Bitmap Effects and Plug-ins... Bitmap Effects > Brightness and Contrast. Move the Contrast slider one tick mark to the right. This increases the contrast which makes the darks a bit darker and the lights a little bit lighter.
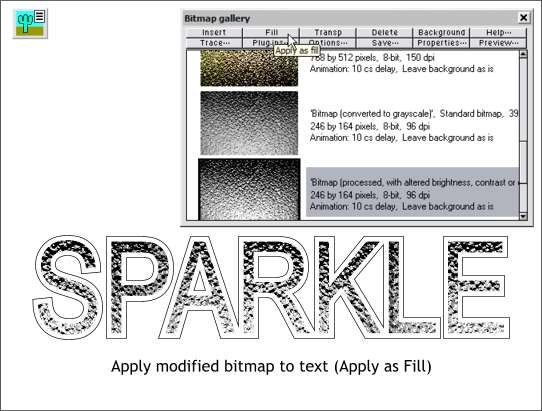
Step 6 Select the type. Open the Bitmap Gallery on the Infobar, locate the modified version of the bitmap (it should be the last entry), select it, then press Fill.
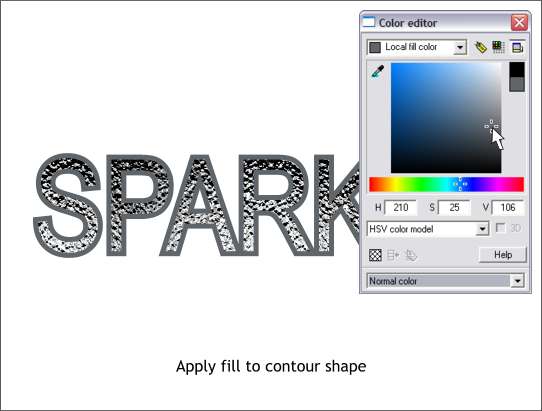
Step 7 Select the outer contour shape. Open the Color Editor (Ctrl e). Apply these HSV values, H 210, S 25, V 106. This creates a very cool (as in warm and cool) gray.
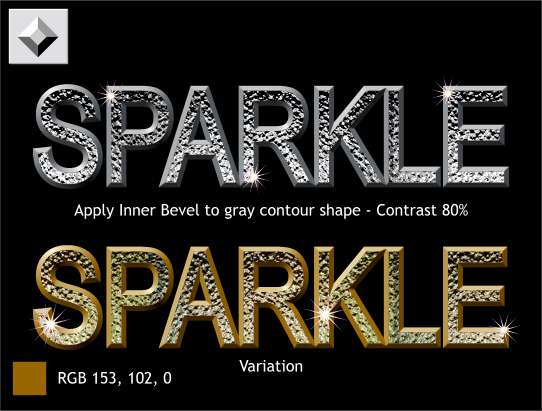
Step 8 Select the cool gray contour shape with the Bevel Tool. Drag towards the center of the text until the bevel outline is about the same width as the text. Move the Contrast slider on the Infobar to 80%. I've included a variation using the original half size Glass fill with the bevel color changed to RGB 153, 102, 0. Thanks again to Christine Farrelly for suggesting this effect. |
|