
 WEBSITE AND WEBSITE GRAPHICS CREATED WITH XARA XTREME PRO
H 1 2 3 4 Download Zipped Tutorial
WEBSITE AND WEBSITE GRAPHICS CREATED WITH XARA XTREME PRO
H 1 2 3 4 Download Zipped Tutorial
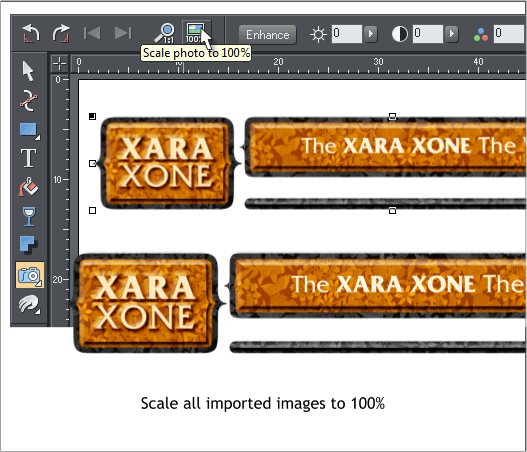 If you look at the resolution of some of the imported images, the page
background, for example, you will see that the resolution is greater
than 96dpi (Windows screen resolution). Here’s a really cool new
feature in Web Designer 6. Marquee select all of the imported images.
Select the Photo Tool (P). On the Infobar, click the Scale Photo to 100%
button. Now all the images are 96dpi and the same size they are on the
web page from which the images were imported. Why they were
changed in the first place is anybody’s guess.
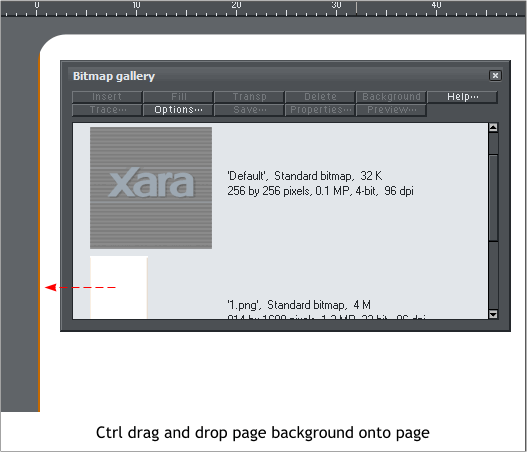
Note the size of the resized page background image (1.png). The
Bitmap Gallery shows the size to be 814 x 1609 pixels.
From the Utilities menu, select Options. In the Page Size tabbed
section, select Custom. Change the page size to 814 wide by 1609
pixels deep. Press OK to close the dialog.
Hold down the Ctrl key. Drag the page background image from the
Bitmap Gallery and drop it onto the page to create the background.
If you look at the resolution of some of the imported images, the page
background, for example, you will see that the resolution is greater
than 96dpi (Windows screen resolution). Here’s a really cool new
feature in Web Designer 6. Marquee select all of the imported images.
Select the Photo Tool (P). On the Infobar, click the Scale Photo to 100%
button. Now all the images are 96dpi and the same size they are on the
web page from which the images were imported. Why they were
changed in the first place is anybody’s guess.
Note the size of the resized page background image (1.png). The
Bitmap Gallery shows the size to be 814 x 1609 pixels.
From the Utilities menu, select Options. In the Page Size tabbed
section, select Custom. Change the page size to 814 wide by 1609
pixels deep. Press OK to close the dialog.
Hold down the Ctrl key. Drag the page background image from the
Bitmap Gallery and drop it onto the page to create the background.
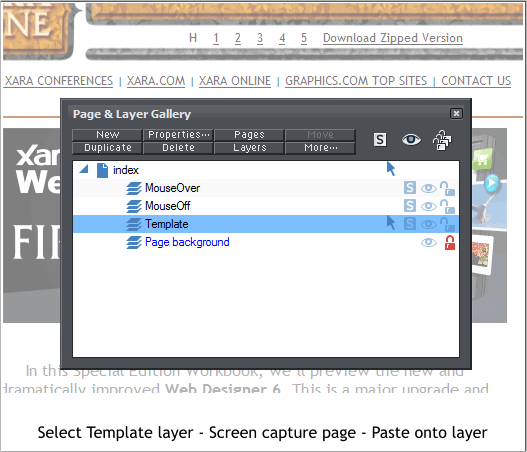 Load the Workbook page into your web browser. Press the PrtScn (print
screen) button on your keyboard. Press Ctrl v to paste the captured
screen into Web Designer. Trim the image to just the actual page. Cut
the image to the clipboard (Ctrl x).
In the Layer Gallery (F10) select the Template layer. Paste the screen
capture onto the Template layer.
Select the Transparency Tool (F6) and change the transparency for the
bitmap to 50%. Scroll down in your browser to get the bottom half of the
page, Print Screen, and repeat the last step. Lock the layer when you
have the whole page on the layer. We’ll use the template to position the
page elements that we just downloaded.
Load the Workbook page into your web browser. Press the PrtScn (print
screen) button on your keyboard. Press Ctrl v to paste the captured
screen into Web Designer. Trim the image to just the actual page. Cut
the image to the clipboard (Ctrl x).
In the Layer Gallery (F10) select the Template layer. Paste the screen
capture onto the Template layer.
Select the Transparency Tool (F6) and change the transparency for the
bitmap to 50%. Scroll down in your browser to get the bottom half of the
page, Print Screen, and repeat the last step. Lock the layer when you
have the whole page on the layer. We’ll use the template to position the
page elements that we just downloaded.