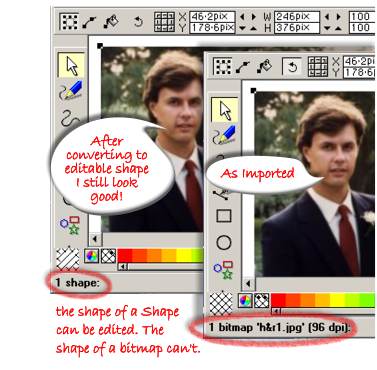
 The technique doesn't change the
bitmap at all - it only changes the shape of the object that has a bitmap fill. It means the technique is very flexible as you can always reposition the nodes to expose more or less of the bitmap. The technique doesn't change the
bitmap at all - it only changes the shape of the object that has a bitmap fill. It means the technique is very flexible as you can always reposition the nodes to expose more or less of the bitmap.
I often do a very quick edit on the shape to get rid of most of the stuff I don't want and then edit that reduced shape more carefully. Besides just adding more nodes and dragging you can also interactively drag the
edge of the shape to curve its edge. How accurately you need to edit the shape depends on how anal retentive you are! Seriously, if your final image will be very high resolution you need to take more care and have the
shape correspond to the image as accurately as possible. For my example I didn't need to be very fussy since, exported as a low resolution JPG, more accuracy wouldn't have shown
anyway. Furthermore by adding a touch of feathering you can smooth out minor inaccuracies.
For more info on using the Shape Editor Tool refer to Issue #17 of Gary Priester's WebXealot on-line manual that covers using it to edit shapes.
|

 As an editable shape you can, lo and behold, edit the shape. Doing so isn't particularly difficult using Xara's Shape Editor Tool. With
the bitmap-filled shape selected, click the Shape Editor Tool.
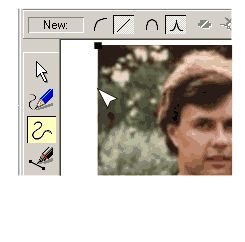
As an editable shape you can, lo and behold, edit the shape. Doing so isn't particularly difficult using Xara's Shape Editor Tool. With
the bitmap-filled shape selected, click the Shape Editor Tool. Note how when mousing over the
edge of the shape, the cursor changes from a little crosshair thingie to an arrow-like wedge. Clicking the left mouse button when that wedge is visible will position a editing node in the location. Those nodes can then be
dragged around and thus be repositioned as required. Add a node and then drag it over to the edge of the part of the pic you want to keep.
Note how when mousing over the
edge of the shape, the cursor changes from a little crosshair thingie to an arrow-like wedge. Clicking the left mouse button when that wedge is visible will position a editing node in the location. Those nodes can then be
dragged around and thus be repositioned as required. Add a node and then drag it over to the edge of the part of the pic you want to keep.