The Internet has been the great enabler. Websites and Blogs have
enabled anybody to be a writer and a publisher. YouTube has enabled
anybody to be a star/producer/director. And eBay has given you and me
the ability to be a merchant and to sell our wares to the world.
The term, e-commerce refers to business conducted on the web.
Amazon.com was one of the very first companies to figure out how to
make money selling on the web. At first Amazon just sold books.
Anybody, anywhere could purchase a wide selection of books, even if
there was no bookstore for hundreds of miles. And the book business
has been changed forever. Today, Amazon is still way out in front of the
curve. If it exists, you can buy it on Amazon.com!
A new generation of e-commerce websites and widgets are about to
enable you and me to become e-merchants. We may not make it as big
as Jeff Bezos, the founder of Amazon.com, but hey, you never know!
In this Special Edition Workbook, we’ll examine some of these options
that are no farther away than the Designs Gallery in Xara Web
Designer Premium 7 and Xara Designer Pro 7.
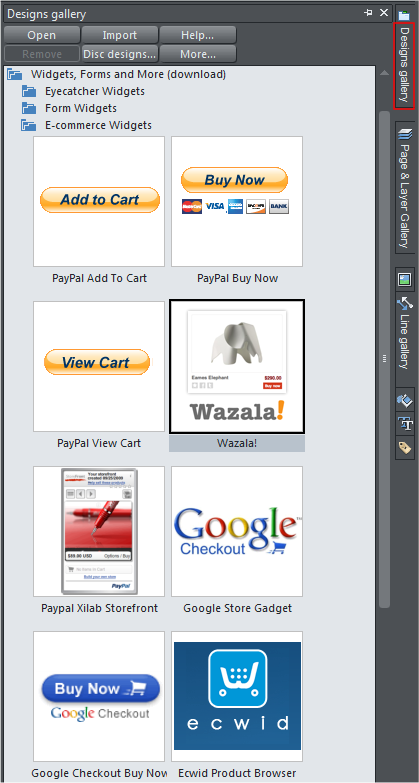
Open the Designs Gallery and then open the Widgets > E-commerce
Widgets folder. There are some familiar names like PayPal and Google
and some that may not be as familiar such as ecwid and Wazala!
If you’re like me you just said Wazala! What’s that? Well it’s a brand
new e-commerce solution from some clever folks in Los Angeles. We’ll
talk about it in moment and all will be revealed.
You can drag any of these widgets onto the screen and a window will
open, which I regret to say, more often than not creates more confusion
than solutions. But it is a catalog of many of the options that exist for
us e-entrepreneurs.
PayPal has a new beta widget that is very easy to use. We’ll look at
PayPal Xilab Storefront first.
After a bit of fiddling around, I have decided that it is best to go
directly to the PayPal website. So go here
http://storefront.paypallabs.com/ for the PayPal Xilab Widget.
The Internet has been the great enabler. Websites and Blogs have
enabled anybody to be a writer and a publisher. YouTube has enabled
anybody to be a star/producer/director. And eBay has given you and me
the ability to be a merchant and to sell our wares to the world.
The term, e-commerce refers to business conducted on the web.
Amazon.com was one of the very first companies to figure out how to
make money selling on the web. At first Amazon just sold books.
Anybody, anywhere could purchase a wide selection of books, even if
there was no bookstore for hundreds of miles. And the book business
has been changed forever. Today, Amazon is still way out in front of the
curve. If it exists, you can buy it on Amazon.com!
A new generation of e-commerce websites and widgets are about to
enable you and me to become e-merchants. We may not make it as big
as Jeff Bezos, the founder of Amazon.com, but hey, you never know!
In this Special Edition Workbook, we’ll examine some of these options
that are no farther away than the Designs Gallery in Xara Web
Designer Premium 7 and Xara Designer Pro 7.
Open the Designs Gallery and then open the Widgets > E-commerce
Widgets folder. There are some familiar names like PayPal and Google
and some that may not be as familiar such as ecwid and Wazala!
If you’re like me you just said Wazala! What’s that? Well it’s a brand
new e-commerce solution from some clever folks in Los Angeles. We’ll
talk about it in moment and all will be revealed.
You can drag any of these widgets onto the screen and a window will
open, which I regret to say, more often than not creates more confusion
than solutions. But it is a catalog of many of the options that exist for
us e-entrepreneurs.
PayPal has a new beta widget that is very easy to use. We’ll look at
PayPal Xilab Storefront first.
After a bit of fiddling around, I have decided that it is best to go
directly to the PayPal website. So go here
http://storefront.paypallabs.com/ for the PayPal Xilab Widget.
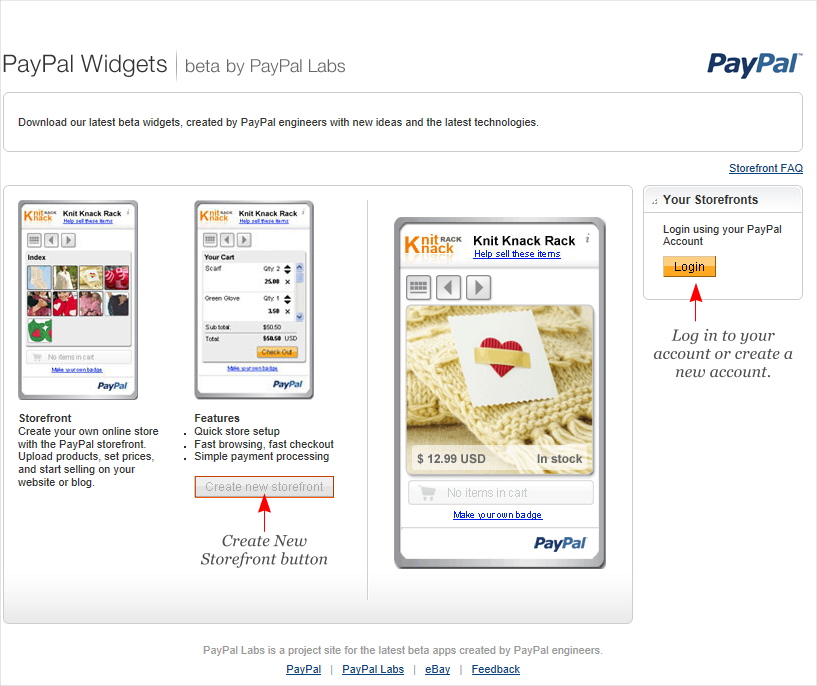
 The PayPal Widgets website is shown above. The first thing you need to
do is to log in to your PayPal account. You must have a PayPal account
to go any further. Luckily I do. I only use my account to send invoices
but it’s all I need to sign in and get started.
After you have signed into your account you will see essentially the
same screen as above, except the Create New Storefront button will
be enabled. If you have already set up a storefront, it will be listed
where the login button is shown above on the right and you can select
it and edit your widget as needed.
The PayPal Widgets website is shown above. The first thing you need to
do is to log in to your PayPal account. You must have a PayPal account
to go any further. Luckily I do. I only use my account to send invoices
but it’s all I need to sign in and get started.
After you have signed into your account you will see essentially the
same screen as above, except the Create New Storefront button will
be enabled. If you have already set up a storefront, it will be listed
where the login button is shown above on the right and you can select
it and edit your widget as needed.
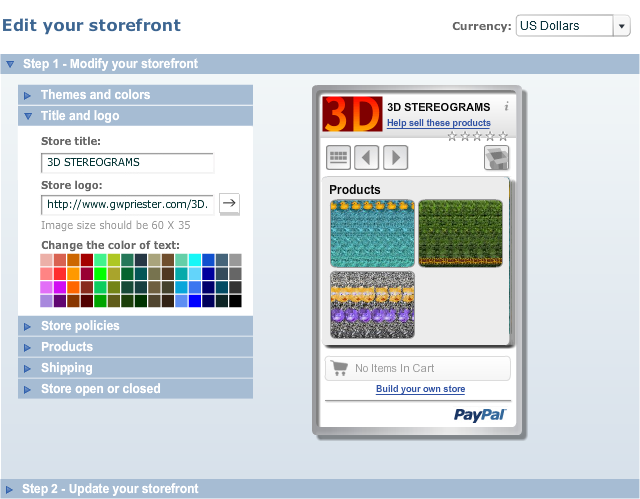 Once you are inside you can set up your storefront. The menu on the
left lets you specify a Store Title, add a small logo, and add some small
photos of your products. You can add Store Policies, add products, add
inventory numbers for each product, establish shipping, though as
always with PayPal it can only be based on the purchase amount. And
you can indicate if your store is open or closed. Once you are done you
will be prompted in Step 2 to Publish Your Storefront or in my case, to
Update Your Storefront. The widget is updated as you make changes.
At present the PayPal Storefront does not let you upload images, so you
need to post your images somewhere where PayPal can fetch them. You
can use your own website or any of the web based photo galleries. Just
locate the image in your web browser, right click on the image and
select Copy Image Location. Paste the URL in the address dialog box.
Product images have to be 188 x 168 pixels. Your logo can only be 60 x
35 pixels. The actual sizes are shown with the images below.
Once you are inside you can set up your storefront. The menu on the
left lets you specify a Store Title, add a small logo, and add some small
photos of your products. You can add Store Policies, add products, add
inventory numbers for each product, establish shipping, though as
always with PayPal it can only be based on the purchase amount. And
you can indicate if your store is open or closed. Once you are done you
will be prompted in Step 2 to Publish Your Storefront or in my case, to
Update Your Storefront. The widget is updated as you make changes.
At present the PayPal Storefront does not let you upload images, so you
need to post your images somewhere where PayPal can fetch them. You
can use your own website or any of the web based photo galleries. Just
locate the image in your web browser, right click on the image and
select Copy Image Location. Paste the URL in the address dialog box.
Product images have to be 188 x 168 pixels. Your logo can only be 60 x
35 pixels. The actual sizes are shown with the images below.


 These logo and product pictures are posted on my website and then
linked to from the widget. For example, www.gwpriester.com/Rubber-
Ducky.jpg is the link I submitted to display the Rubber Ducky image.
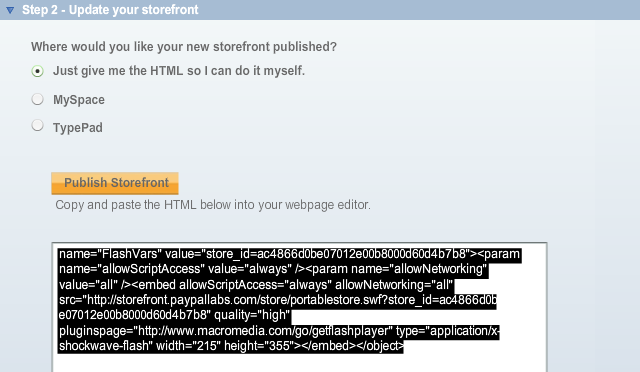
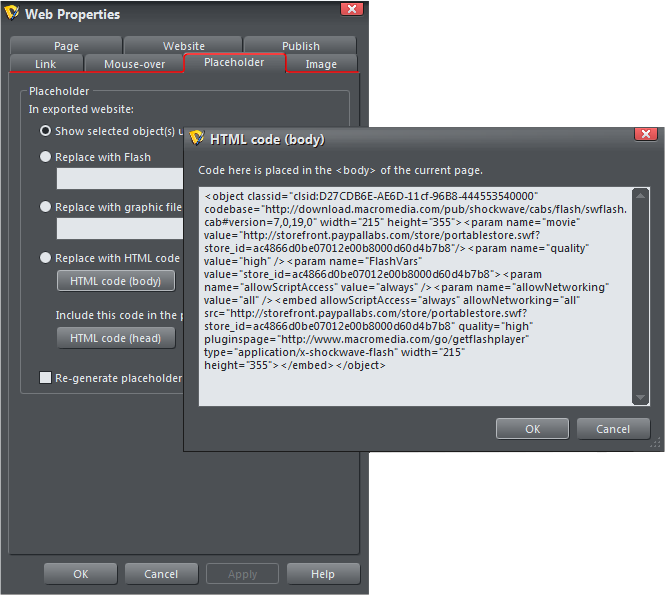
When you publish your Storefront, you are given three options. Pick the
first, Give me the HTML. Copy the script and add it to a placeholder
and you are good to go. A placeholder if you are a new user is a simple
rectangle. With the rectangle selected, open the Website Properties >
Placeholder menu and click HTML code (body), paste the script, press
OK and then press Apply. The image below shows the pasted script.
These logo and product pictures are posted on my website and then
linked to from the widget. For example, www.gwpriester.com/Rubber-
Ducky.jpg is the link I submitted to display the Rubber Ducky image.
When you publish your Storefront, you are given three options. Pick the
first, Give me the HTML. Copy the script and add it to a placeholder
and you are good to go. A placeholder if you are a new user is a simple
rectangle. With the rectangle selected, open the Website Properties >
Placeholder menu and click HTML code (body), paste the script, press
OK and then press Apply. The image below shows the pasted script.
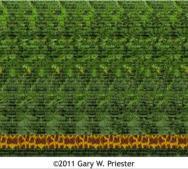
 And here is my Storefront. I removed
the inventory just in case you felt
compelled to purchase one of my 20” x
16” stereogram prints (they don’t
exist).
The beauty of this system is the PayPal
back end is already in place. So
everything else is taken care of when
your visitor makes a purchase.
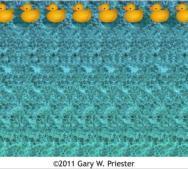
I left one Rubber Duckie print so you
can see the other options such as
shipping, etc. Please don’t buy it.
And here is my Storefront. I removed
the inventory just in case you felt
compelled to purchase one of my 20” x
16” stereogram prints (they don’t
exist).
The beauty of this system is the PayPal
back end is already in place. So
everything else is taken care of when
your visitor makes a purchase.
I left one Rubber Duckie print so you
can see the other options such as
shipping, etc. Please don’t buy it.
 I added the code
shown above to a 216
x 350 pixel
placeholder.
You see the actual
working strorefront.
I added the code
shown above to a 216
x 350 pixel
placeholder.
You see the actual
working strorefront.

 CLICK HERE
TO DOWNLOAD
YOUR FREE
TRIAL COPY OF
XARA
DESIGNER PRO 7
CLICK HERE
TO DOWNLOAD
YOUR FREE
TRIAL COPY OF
XARA
DESIGNER PRO 7

 CLICK HERE
TO DOWNLOAD
YOUR FREE
TRIAL COPY OF
XARA
WEB DESIGNER
PREMIUM 7
CLICK HERE
TO DOWNLOAD
YOUR FREE
TRIAL COPY OF
XARA
WEB DESIGNER
PREMIUM 7


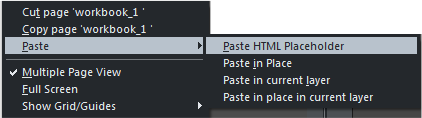
 TIP: I’m used to creating placeholders, but there really is a
simpler (and more effective) way. Simply copy the script to the
clipboard, then right click on the page and select Paste > Paste
HTML Placeholder. Instead of a non-nondescript rectangle, when
you Paste HTML Placeholder shows the actual object as you see it
in the browser.
From within the Xara Create New Widget’s window, you can copy
the script, then click Insert. Now I just need to remember this!
TIP: I’m used to creating placeholders, but there really is a
simpler (and more effective) way. Simply copy the script to the
clipboard, then right click on the page and select Paste > Paste
HTML Placeholder. Instead of a non-nondescript rectangle, when
you Paste HTML Placeholder shows the actual object as you see it
in the browser.
From within the Xara Create New Widget’s window, you can copy
the script, then click Insert. Now I just need to remember this!