


 Xara has just introduced the next version of Xara Web Designer,
version 6.0. There are many new and improved features, the result of
user feedback and comments made in the TalkGraphics web design
forum. In this Special Edition we’ll look at what’s new and improved.
The list is quite long so let’s begin.
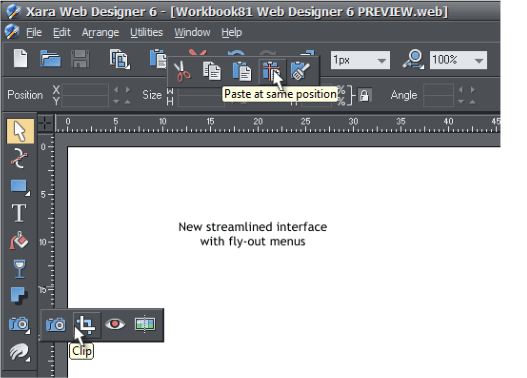
As you can see in the screen capture above, the interface has been
redesigned and sports a very high tech looking appearance. All of the
old tools are still there, but not all are immediately visible. Part of the
interface redesign includes grouping many options and tools and moving
them into fly out menus. The example above shows the Photo Tool
flyout menu and the clipboard fly-out menu which includes icons for
Cut, Copy, Paste, Paste in Place, and Paste Attributes. And remember,
the ability to create a custom control bar still exists. So if you would
rather have Cut Copy and Paste in Place on the Standard Toolbar, you
can create a custom control bar to suite your taste.
Xara has just introduced the next version of Xara Web Designer,
version 6.0. There are many new and improved features, the result of
user feedback and comments made in the TalkGraphics web design
forum. In this Special Edition we’ll look at what’s new and improved.
The list is quite long so let’s begin.
As you can see in the screen capture above, the interface has been
redesigned and sports a very high tech looking appearance. All of the
old tools are still there, but not all are immediately visible. Part of the
interface redesign includes grouping many options and tools and moving
them into fly out menus. The example above shows the Photo Tool
flyout menu and the clipboard fly-out menu which includes icons for
Cut, Copy, Paste, Paste in Place, and Paste Attributes. And remember,
the ability to create a custom control bar still exists. So if you would
rather have Cut Copy and Paste in Place on the Standard Toolbar, you
can create a custom control bar to suite your taste.
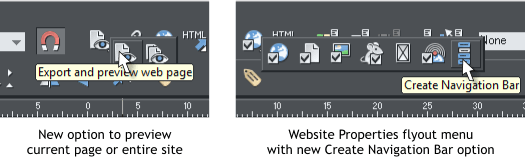 Xara Web Designer 6 has two preview icons shown above left. You can
now preview just the current page, or preview the entire website.
Website Properties has its own fly out menu shown above right. A new
feature has been added that we’ll cover shortly, Create Navigation Bar.
This new capability makes it so much easier to create a custom
navigation bar and to have it appear on, and automatically link to each
page in your site.
Also greatly improved are the Publish Website options. We’ll look at
these in depth a little later on. Trust me, you’re going to love it.
Xara Web Designer 6 has two preview icons shown above left. You can
now preview just the current page, or preview the entire website.
Website Properties has its own fly out menu shown above right. A new
feature has been added that we’ll cover shortly, Create Navigation Bar.
This new capability makes it so much easier to create a custom
navigation bar and to have it appear on, and automatically link to each
page in your site.
Also greatly improved are the Publish Website options. We’ll look at
these in depth a little later on. Trust me, you’re going to love it.
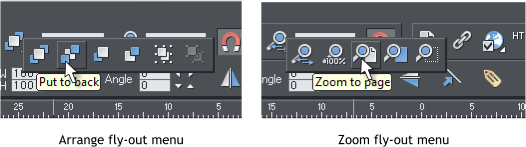 Shown above are the Arrange and Zoom Tool fly out menus. The end
result of all these fly out menus, is a much cleaner work area. And yet
most drop down menu functions are covered in the flyout menus.
If you look closely at this page you’ll notice some more really important
new capabilities. Go ahead, have a look. I’ll wait.
OK. Did you notice the bitmap background behind the page? How did I
do that? Simple. Just hold the Ctrl key and drag and drop a bitmap, or a
color from the screen palette onto the pasteboard! Awesome! And did
you notice the rounded corners on this page? Piece of cake. And the
brown outline on each side of the page? Isn’t that cool?
You can also hold down the Ctrl key and drag and drop a color or
bitmap onto the page. In the case of these pages, a simple horizontal
bitmap 20 pixels high by 800 pixels wide with a thin brown rectangle on
each end.
Shown above are the Arrange and Zoom Tool fly out menus. The end
result of all these fly out menus, is a much cleaner work area. And yet
most drop down menu functions are covered in the flyout menus.
If you look closely at this page you’ll notice some more really important
new capabilities. Go ahead, have a look. I’ll wait.
OK. Did you notice the bitmap background behind the page? How did I
do that? Simple. Just hold the Ctrl key and drag and drop a bitmap, or a
color from the screen palette onto the pasteboard! Awesome! And did
you notice the rounded corners on this page? Piece of cake. And the
brown outline on each side of the page? Isn’t that cool?
You can also hold down the Ctrl key and drag and drop a color or
bitmap onto the page. In the case of these pages, a simple horizontal
bitmap 20 pixels high by 800 pixels wide with a thin brown rectangle on
each end.
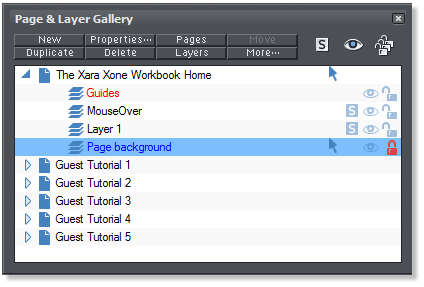 Once you add a color or bitmap to the page, the Page Background
layer becomes editable. Unlock the Page Background layer and you
can select the page which is now a rectangle, and apply Curved
Corners and basically treat the page as you would any rectangle.
And while we’re here, notice the new S icons. This is called Solo
Mode. Click any of these S icons to see and edit only that layer. You
can drag the S icon over any other layer (that has an S icon) to see
what is on that layer while masking the other layers.
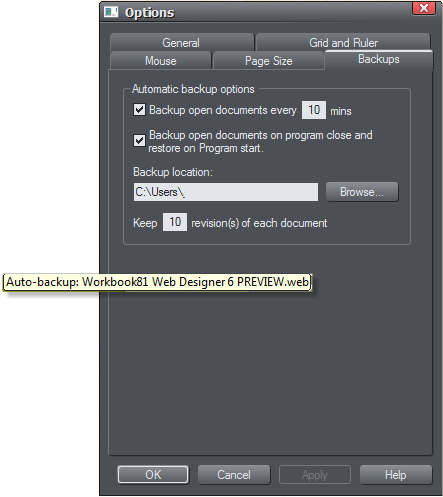
Another very welcome change. Every ten minutes, your hard work is
automatically saved. You can change the time period for auto backup or
live dangerously and turn it off altogether. But why would you do this?
You can also opt to make a backup file every time you save your site.
Once you add a color or bitmap to the page, the Page Background
layer becomes editable. Unlock the Page Background layer and you
can select the page which is now a rectangle, and apply Curved
Corners and basically treat the page as you would any rectangle.
And while we’re here, notice the new S icons. This is called Solo
Mode. Click any of these S icons to see and edit only that layer. You
can drag the S icon over any other layer (that has an S icon) to see
what is on that layer while masking the other layers.
Another very welcome change. Every ten minutes, your hard work is
automatically saved. You can change the time period for auto backup or
live dangerously and turn it off altogether. But why would you do this?
You can also opt to make a backup file every time you save your site.

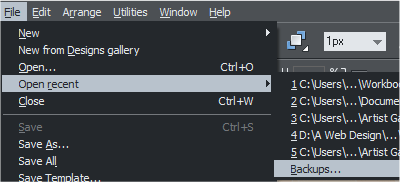 Should the need to restore a document occur, go to File > Open Recent
> Backups... And locate the file you wish to restore.
Should the need to restore a document occur, go to File > Open Recent
> Backups... And locate the file you wish to restore.
 H 1 2 3 4 5 Download Zipped Version
WEBSITE CREATED ENTIRELY WITH XARA WEB DESIGNER 6
H 1 2 3 4 5 Download Zipped Version
WEBSITE CREATED ENTIRELY WITH XARA WEB DESIGNER 6


