|
|
|
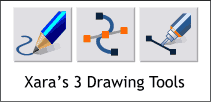
New users are often perplexed by Xara X's 3 drawing tools: The Freehand and Brush Tool, the Shape Editor Tool, and the Pen Tool. All three are very different and at the same time similar. I'll try to explain how each works and let you decide which tool is right for you.
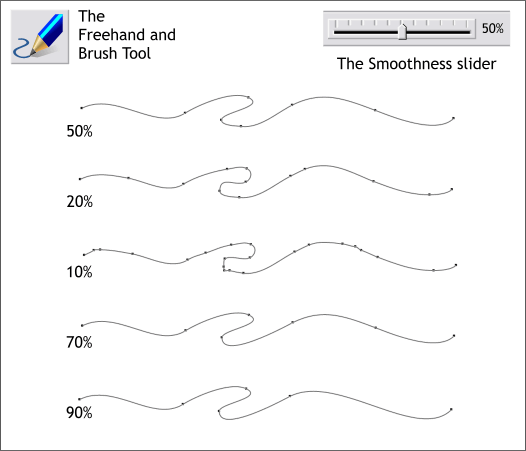
We'll start with the Freehand and Brush Tool. This tool is used for freehand drawing. It is also used to apply stoke shapes and custom brushes to selected paths and shapes. The Smoothness slider determines how smooth the path you draw is. The example above shows the same path with different percentages of smoothing applied. The default setting is 50%. As the % gets lower, more points are added to the path, making the line more accurate to how it was actually drawn. As the percentage increases, fewer control points are added creating a very smooth path. If you are using a digital pad and pen, you will probably want to use a lower percentage for more accuracy. If you are drawing with a mouse, a setting between 40-60 will produce a more refined-looking line. TIP: Immediately after you draw your line, and the line and the Freehand and Brush Tool are still selected, you can adjust the Smoothness slider setting and the line will react accordingly. This way you can determine which setting is best. As soon as you deselect the path or switch to another tool, this capability is lost.
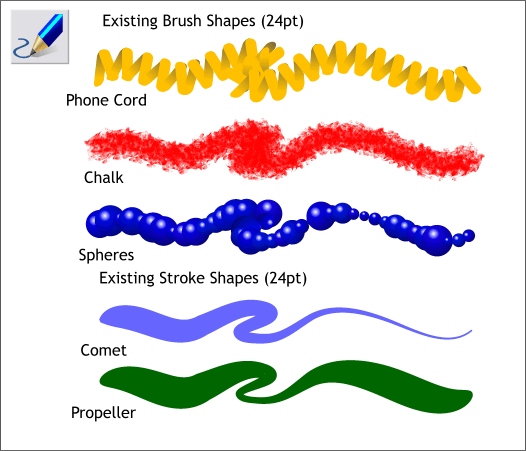
The Freehand and Brush Tool is also used to apply Existing Brush Shapes and Existing Stroke Shapes as shown above.
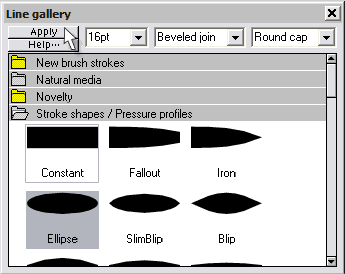
To apply a Brush or Stroke shape, select one from the drop down lists on the Infobar or from the Line Gallery (F12). Select the line or shape and then select from the Novelty (Brush shapes) or Stroke Shapes / Pressure Profiles folder. Set your line Width and press Apply. These effects are applied in real time and you can continue to apply different line effects and sizes as well as Line Joins and End Caps just by selecting them and pressing Apply. NOTE: If you are using a digital drawing pad and pen that supports pressure, your lines will have an additional thick and thin quality depending upon the pressure you apply when drawing. TIP: Once you are finished with a stroke or brush, you can use Xara's Arrange > Convert Line to Shape command. In the case of a stroked line, the line now becomes a shape to which you can apply any of Xara's fills. A path with a brush applied becomes a group of brush shapes which you can ungroup and edit if desired.
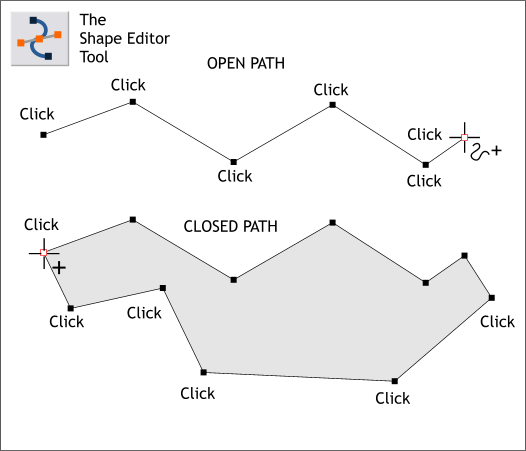
Most Xara users use the Shape Editor Tool for drawing because of its ease-of-use and flexibility. To draw a series of connected line segments, click the first point on the page, then click the 2nd, and the 3rd and so on as shown in the first illustration above. To create a "closed path" (a shape to which a fill can be applied) click the last control point on top of the first point as shown in the 2nd example above. The cursor will change to a bold plus to let you know the path is about to be closed. TIP: To add a control point to a path that has already been drawn, simply click on the line with the Shape Editor Tool. To remove a control point or points, select the point and press the Delete key on your keyboard.
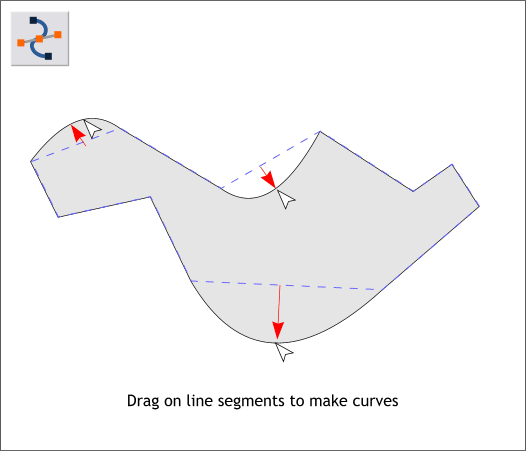
You can change line segments into graceful curves by dragging on the line segments with the Shape Editor Tool (the shape must be selected first with the Selector Tool (F2)- the Shape Editor Tool cannot select an un-selected object or path). In the example above the line segments are automatically converted to curves as they are dragged with the Shape Editor Tool. No fuss ! No muss! as you find with other drawing applications. TIP: You can edit the line segments while you are drawing. This is the beauty of the Shape Editor Tool. No need to switch to another drawing tool, or convert the line to curve before you edit. Just click and drag. Simple.
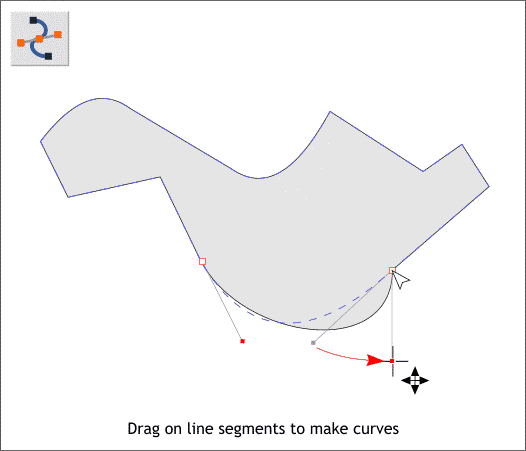
Dragging to create a curve is good but not perfect. If you need to further edit the paths, click on a control point with the Shape Editor Tool. A line with two red squares on either end will appear. This is a Bezier control handle which you can drag in any direction to modify the curve. NOTE: If you click on a control point that is the conjunction of 2 straight line segments, you will not get a Bezier control. If you drag the line segment just a tiny amount, the line will become a curve and the control handles will appear. TIP: To create the smoothest curve, the Bezier control handle should be almost parallel to the shape as you can see with the control handle on the bottom left.
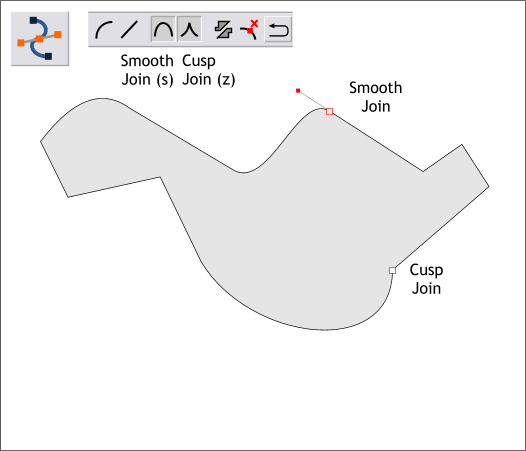
When an object and the Shape Editor Tool are selected, several options appear in the Shape Editor Tool Infobar. The first two, the arc and the diagonal line will change the nature of a line between 2 or more selected control points. If the line is a curve, pressing the diagonal icon (Make Line) will change the curve into a line. Pressing the arc icon ( Make Curve) changes the line segments into curves. With the line segment selected, pressing C (for curve) or L (for line) will change the line properties as well. The next 2 icons determine the join properties of two line segments. Smooth Join (s) creates a curve greater than 90 degrees. The Bezier control handles with a smooth join operate as one. So if you rotate one handle, the opposing handle also rotates. Cusp Join (z) creates a join at 90 degrees or less and each Bezier control handle operates independent of the other. A cusp join is more like a V-shape.
When used with a Stroke Shape or a Bush stroke, the start and end of the stroke shape or brush are reversed as you may remember from the Cave Brush tutorial on the last page.
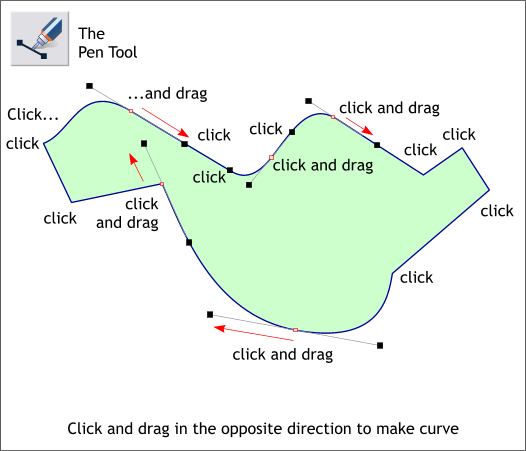
The Pen Tool is a Bezier drawing tool and works like Adobe Illustrator's Pen Tool. It is the least intuitive of Xara's drawing tools. (Unless you happen to be an Illustrator user and have learned to draw with this tool). Here's how it works. The example above starts on the far left with a single click. The second point is clicked down on the page and then you drag in the opposite direction in which you want the curve to be drawn. (This is what I mean about non-intuitive). To add a straight line segment, just click the next control point, but do not drag. The example above shows the path around the shape with the clicks and click and drags noted as well as the direction of the drag indicated with the red arrows. This is a drawing technique only a glutton for punishment could love!
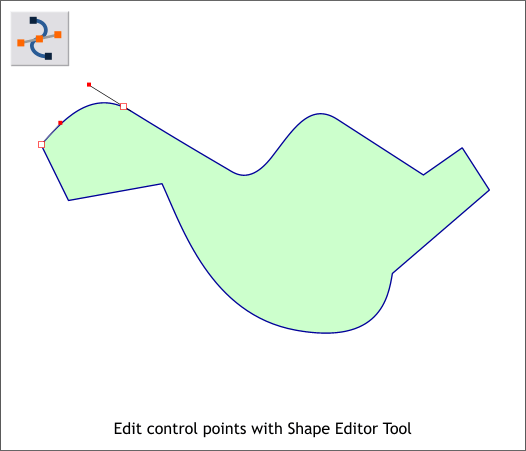
Once you have laboriously created your shape, you can select the object with the Selector Tool (if it is not already selected) and edit the control points with the Shape Editor Tool. I hope this explains the differences between these drawing tools. And I think you new users will see how much easier it is to draw with the Shape Editor Tool! If you still have questions, you can send them to me using the Feedback Form on Page 6.
|
||
|
|


