


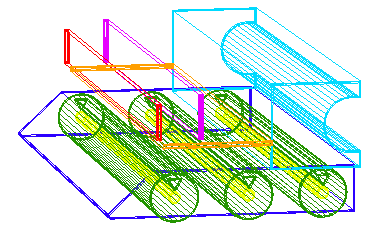
 X3D views: Shown above is each vector shape copied and pasted into
Xara 3D Maker 7 along with the invisible frame. The correct length of
each extrusion has not yet been determined. When you copy and paste
each vector shape one by one into Xara 3D Maker 7, they will not
appear in the colours or depths as shown. I have colored each shape in
Xara 3D to illustrate how the basic shapes look in 3D.
X3D views: Shown above is each vector shape copied and pasted into
Xara 3D Maker 7 along with the invisible frame. The correct length of
each extrusion has not yet been determined. When you copy and paste
each vector shape one by one into Xara 3D Maker 7, they will not
appear in the colours or depths as shown. I have colored each shape in
Xara 3D to illustrate how the basic shapes look in 3D.
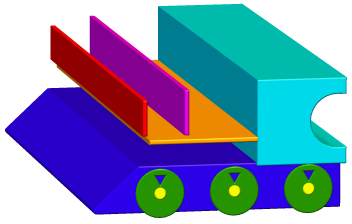


 Extrusion Depth: You can experiment with each shape and decide on
the depth of each extrusion to suit your taste. Below are the settings
that I made which may not completely suit your 3D model as your
shapes may not be exactly like mine. The settings are:
3 wheel axles (yellow). Extrusion depth = 37
3 wheels (green). Extrusion depth = 34
The cabin (light blue). Extrusion depth = 24
The enginge (orange). Extrusion depth = 21
Small front funnel (red). Extrusion depth = 4
Larger funnel (purple). Extrusion depth = 10
The base (dark blue). Extrusion depth = 26
NOTE: The wheels are really an illusion. They are in reality long
tube shapes. Because their Extrusion depth is wider than the
wedge shape, they appear to be wheels.
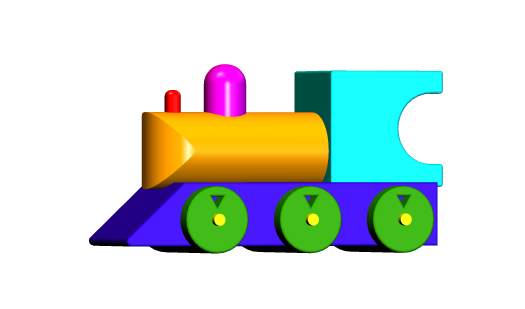
Bevel settings: Experiment with the bevel depth for each shape and
decide on the amount of bevel that looks best. Below are my choices,
which you may use as a guide.
3 wheel axles (yellow). No bevel
3 wheels (green). Smoothed 1a depth = 8
The cabin (light blue). Smoothed 1a depth = 8, Round
The engine (orange). Curved depth = 122, Mitre
Small front funnel (red). Rounded depth = 21, Round
Larger funnel (purple). Rounded depth = 65, Round
The base (dark blue). Curved depth = 8
Your train image should now look like the above.
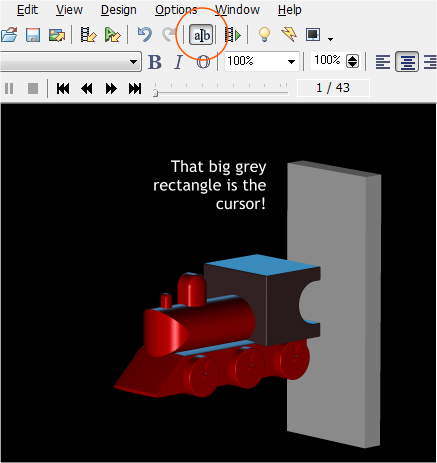
Select the cursor and press Ctrl v to paste into Xara 3D. Hold down the
Shift key and press Enter after you paste each shape.
To paste or to select and edit each of the shapes use the Hide/Show
Cursor. Hold down the Shift key and press the left or right arrow key to
highlight a shape. In the example above the cabin is highlighted.
TIP: Press Ctrl + Home (the Home key on your keyboard) to return
to the top. Each time you press the Left or Right arrow key
(depends on which way the train is facing) you advance to the
next shape.
Extrusion Depth: You can experiment with each shape and decide on
the depth of each extrusion to suit your taste. Below are the settings
that I made which may not completely suit your 3D model as your
shapes may not be exactly like mine. The settings are:
3 wheel axles (yellow). Extrusion depth = 37
3 wheels (green). Extrusion depth = 34
The cabin (light blue). Extrusion depth = 24
The enginge (orange). Extrusion depth = 21
Small front funnel (red). Extrusion depth = 4
Larger funnel (purple). Extrusion depth = 10
The base (dark blue). Extrusion depth = 26
NOTE: The wheels are really an illusion. They are in reality long
tube shapes. Because their Extrusion depth is wider than the
wedge shape, they appear to be wheels.
Bevel settings: Experiment with the bevel depth for each shape and
decide on the amount of bevel that looks best. Below are my choices,
which you may use as a guide.
3 wheel axles (yellow). No bevel
3 wheels (green). Smoothed 1a depth = 8
The cabin (light blue). Smoothed 1a depth = 8, Round
The engine (orange). Curved depth = 122, Mitre
Small front funnel (red). Rounded depth = 21, Round
Larger funnel (purple). Rounded depth = 65, Round
The base (dark blue). Curved depth = 8
Your train image should now look like the above.
Select the cursor and press Ctrl v to paste into Xara 3D. Hold down the
Shift key and press Enter after you paste each shape.
To paste or to select and edit each of the shapes use the Hide/Show
Cursor. Hold down the Shift key and press the left or right arrow key to
highlight a shape. In the example above the cabin is highlighted.
TIP: Press Ctrl + Home (the Home key on your keyboard) to return
to the top. Each time you press the Left or Right arrow key
(depends on which way the train is facing) you advance to the
next shape.
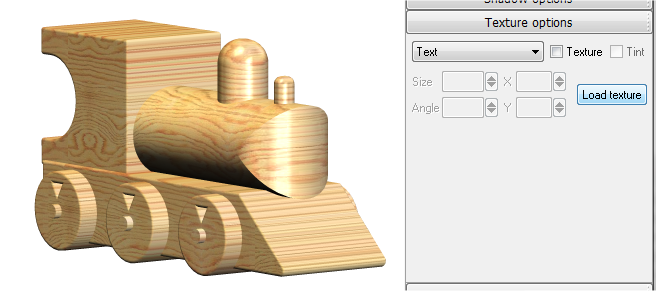
 The Wood Texture: Open Texture options and click the Load Texture
button. Browse to your C: > Program Files (x86) > Xara > Xara 3D Maker
7 > Textures and select Pale wood.jpg.
Your train should now sport a natural wood grain appearance. You may
want to adjust the lights. But first grab the train in Xara 3D Maker 7
and drag to rotate the train into the desired position.
If you go to the Extrusion Options section you can apply a glossy finish.
Just check the Gloss option if it is not already checked.
The Wood Texture: Open Texture options and click the Load Texture
button. Browse to your C: > Program Files (x86) > Xara > Xara 3D Maker
7 > Textures and select Pale wood.jpg.
Your train should now sport a natural wood grain appearance. You may
want to adjust the lights. But first grab the train in Xara 3D Maker 7
and drag to rotate the train into the desired position.
If you go to the Extrusion Options section you can apply a glossy finish.
Just check the Gloss option if it is not already checked.
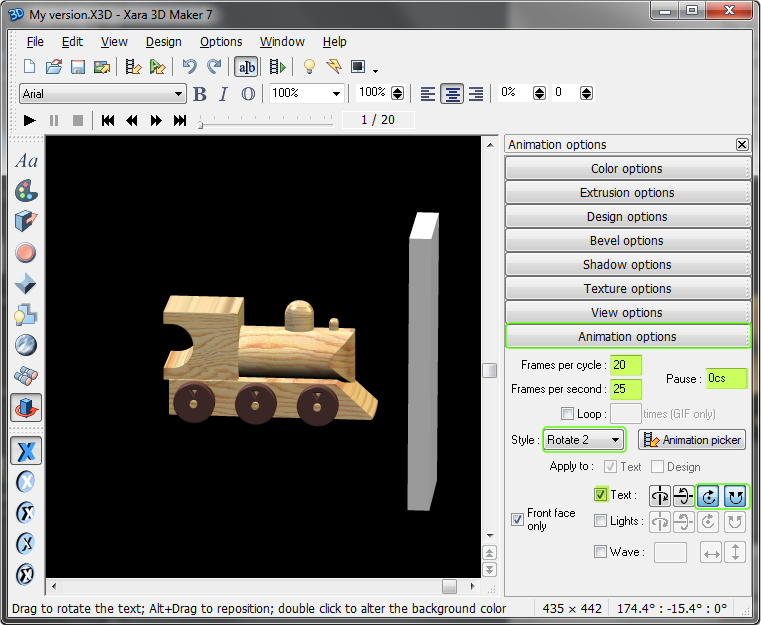
 Animating the wheels: Select Rotate 2 in the Animation options and
make sure that the text box is not checked.
Using the giant cursor again, select the 3 wheels as shown. Now add a
check to the Text box (the wheels are the ‘text’) and click on the the
play button to start the animation. The wheels should rotate according
to which of the 3 axis buttons you have chosen. The button to the right
will direct the rotation clockwise or anti-clockwise. When you have the
wheels turning correctly then you can remove the cursor.
You can click here for my Xara 3D Maker file. Some people learn better
when they can see the actual settings.
Optional Animation: By choosing the other Animation options, you can
have the train speeding along using either of the ‘Scroll’ options or by
having the whole train rotating using the ‘Rotate 1’ option.
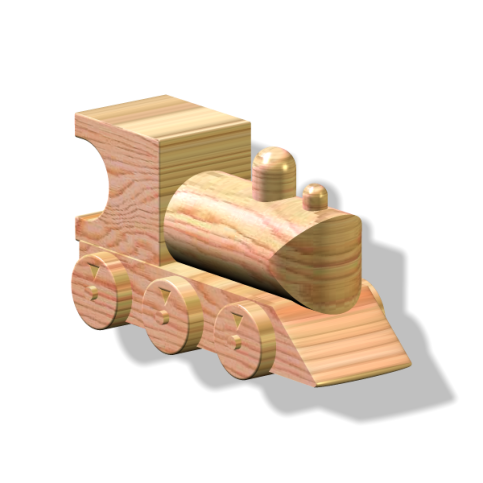
Here’s the final image. It was Exported at a PNG, 24-bit and with
Transparency checked.
Your feedback and questions are
always welcome and greatly
appreciated. Use the Send e-
mail link below to send me your
comments and questions.
Anas ibn Handel
Send e-mail
Animating the wheels: Select Rotate 2 in the Animation options and
make sure that the text box is not checked.
Using the giant cursor again, select the 3 wheels as shown. Now add a
check to the Text box (the wheels are the ‘text’) and click on the the
play button to start the animation. The wheels should rotate according
to which of the 3 axis buttons you have chosen. The button to the right
will direct the rotation clockwise or anti-clockwise. When you have the
wheels turning correctly then you can remove the cursor.
You can click here for my Xara 3D Maker file. Some people learn better
when they can see the actual settings.
Optional Animation: By choosing the other Animation options, you can
have the train speeding along using either of the ‘Scroll’ options or by
having the whole train rotating using the ‘Rotate 1’ option.
Here’s the final image. It was Exported at a PNG, 24-bit and with
Transparency checked.
Your feedback and questions are
always welcome and greatly
appreciated. Use the Send e-
mail link below to send me your
comments and questions.
Anas ibn Handel
Send e-mail

 The method for
pasting the shapes
into Xara 3D Maker 7
is explained in the
next step.
The method for
pasting the shapes
into Xara 3D Maker 7
is explained in the
next step.


