Viewing Stereograms
Many people have seen a Stereogram image but have never had much luck seeing the hidden image. This section is for you Stereogram-challenged persons.
Most of us can see the hidden image in a Stereogram unless we have a serious problem with our eyesight. But sometimes the pressure to see the hidden
image is too much and when the image does not immediately leap out at us, we panic and get performance anxiety and then no matter how hard we try, the image will not appear.
The best advice for viewing Stereograms is RELAX. This is not a contest! Try to look beyond the Stereogram and focus your eyes at a distance behind the
image. For example, if you are viewing these images on the screen, pretend you are focussing on something on the wall behind your monitor. Gradually, your eyes will focus on the image and your brain will pull it together.
Another method is to put your nose almost on the image (don't get too close or you might put a nose print on your screen). Now pull back ever so slowly,
again trying to focus on something behind the screen. As you slowly pull away from the screen, relax and let your eyes pick out the image and bring it into focus.

If the above suggested methods fail, try this. Stare at the two black circles above
. Eventually your eyes will pull the two images together and it will look like there are three circles and you will have a feeling of space. This is what should happen when you look at a Stereogram.
How Stereograms Work
Stereograms hide portions of the image in a series of panels. The spacing of the
image portions, determine whether the image comes forward or backwards. Stare at the example above. The white circles are spaced closer together and so they
appear to come forward more than the dark gray circles which appear to be farther apart.
The software used to create a Stereogram uses two images. The first is called a
"Depth Map" (shown above) and tells the software how to add depth to the image. White comes out the most while black goes the farthest back. In this depth map
, when hidden in the Stereogram, the white rectangle in the center will appear to come forward the most from the background. The intermediate shades will stair step down either side.
The second image used by the software is a repeating panel in which the image is
repeated and spaced to produce the illusion of depth. Images with a lot of texture, such as the one shown here, work better at hiding the image as the distortion to the panel caused by the software is less obvious.
And here is the actual Stereogram created using the repeating panels and depth
map images shown above. The longer you stare at the Stereogram, the more depth you will see between the steps. Notice how the repeating pattern has been
rearranged. This subtle manipulation of the pattern is what creates the hidden image in the Stereogram.
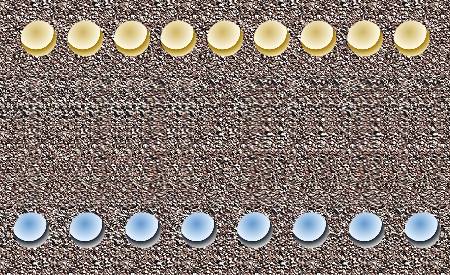
Many of my Stereogram images have additional "floating objects" which when
viewed with the Stereogram image appear to float on a separate plain above or sometimes beneath the hidden image. In the example above, the gold and silver
spheres both appear to float above the hidden stair step image. The floating objects in my final images, often provide a clue to the hidden image.
And that in a nutshell is how Stereograms work.


|

