|
|


|
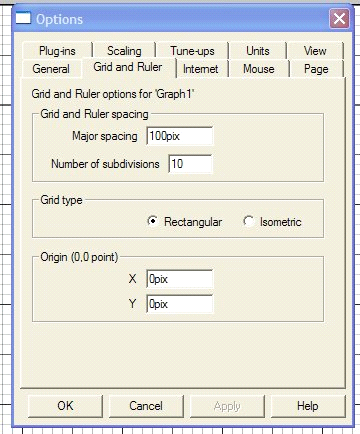
First set up the following option in the Page Options dialog. Right click on the page and from the pop up menu, select Page Option... The following dialog should appear:
Select the Grid and Ruler tab and enter 100pix in Major spacing and 10 in Number of subdivisions as shown above. Select the Units tabbed section and set the Page Units to Pixels and the Color units to Percent. Press the OK button to accept the new settings. Now we are ready to start the tutorial I will use bold font for Selections of menu and Italic for sub-menus
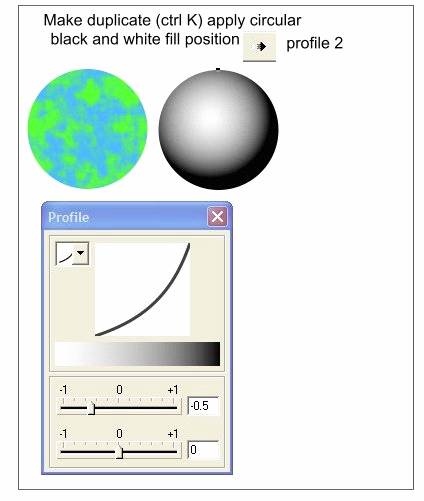
Step 1 Select the Ellipse Tool, hold down the Ctrl key to constrain the ellipse to a circle, and draw a circle 120 pixels in diameter. With the circle still selected, select the Fill Tool and from the Fill Types drop down list, select Fractal Clouds. Apply the following colors to the handles to the outer side apply RGB 88, 255, 41 and the inside RGB 75, 179, 255. Right click on the fill to access the fractal settings on the Infobar. In the Fractal Resolution enter 39 and key in 30 in Fractal Graininess text entry box. Press Enter to apply the changes. Your circle should now look like the one in the design above. We now have created an earth look alike sphere but it still looks a little flat. Don't worry we are going to adjust it in the next step
Step 2 Make a clone duplicate of the created circle by pressing (CRTL-K) on your Keyboard. Apply a black fill to the new cloned circle and with the circle still selected, select the Fill Tool and from the Fill Type drop down list, select . Move the center of the fill up to the left. Press the Position Profile icon and from down pull list, select Profile 2. This enlarges the white fill portion of the fill.
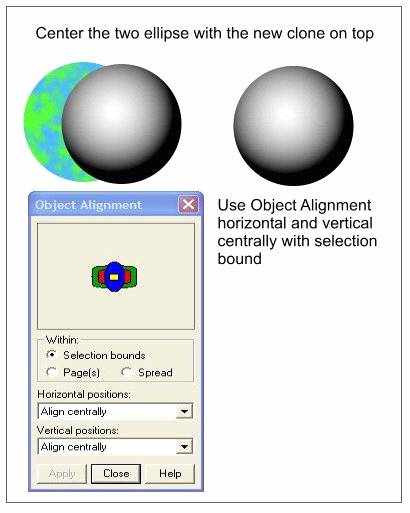
Step 3 Next select the new created circle and center it over the first circle you have created. For accuracy use the Object Alignment dialog (ARRANGE> ALIGNMENT). Check the Selection bounds option. From the Horizontal positions pull down menu select Align centrally and from the Vertical positions select Align centrally. Press Apply. TIP: You also can use your mouse to select the two alignments by clicking in the upper window of the Object Alignment and clicking in the middle of the preview window.
|
|||||||
|
|